Free Bear Crochet Lovey
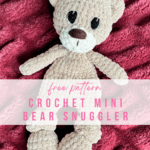
This Free Bear Crochet Lovey pattern creates a sweet gift or cuddly friend. Whether you call this a lovey or a snuggler, this pattern is a half plush animal, half blanket- the best of both worlds!
Bear Crochet Lovey Pattern
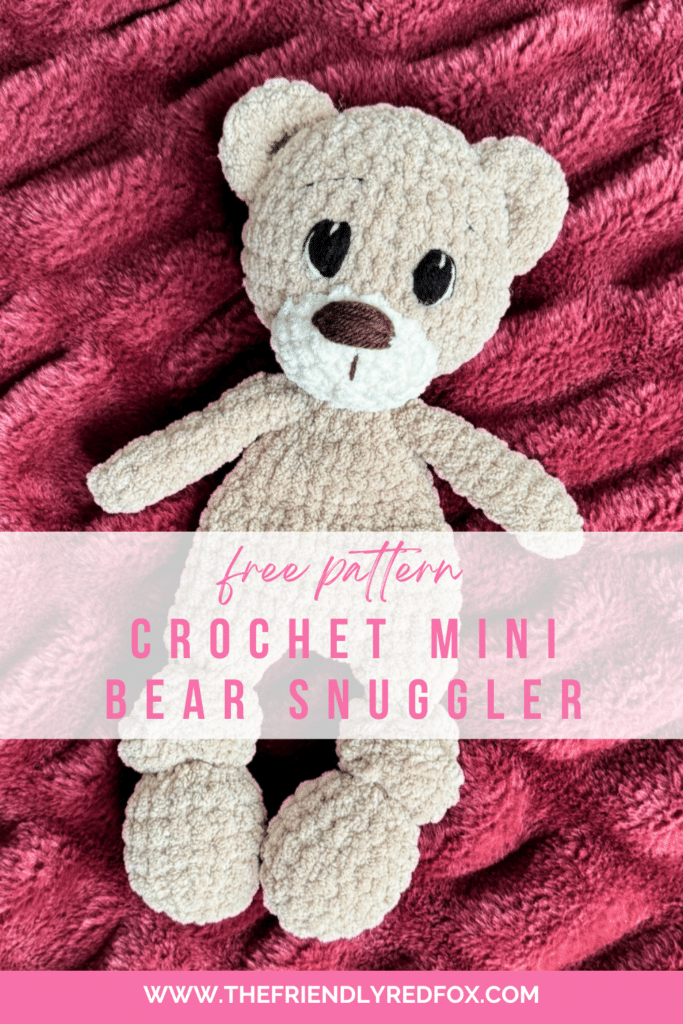
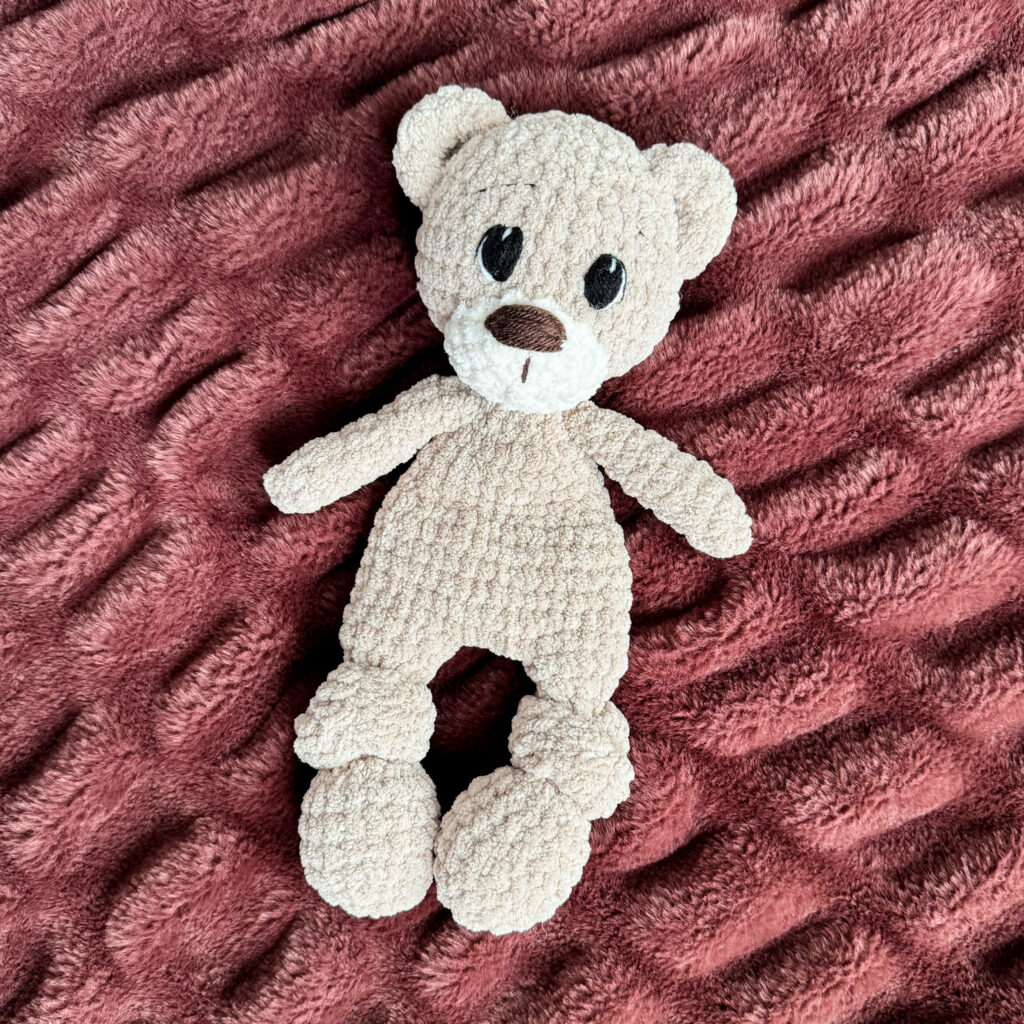
I love a good bear crochet pattern- as you can see with this classic teddy bear . This free crochet lovey pattern makes a smaller version of the orignal size snuggler that some of my other patterns come in. If you have been around for a while, you know I love the snuggler– half blanket, half stuffed animal. The hands, feet and head are stuffed, but you leave the body flat, more like a blanket or lovey.
JOIN MY NEWSLETTER TO RECEIVE…
A free email course-Amigurumi 101
This free amigurumi email course gives you what you need to master the basics of amigurumi, along with some extra tips and tricks!
I have gone back and forth on what to call this type of creation- I tend to use snuggler as a new term, because that seemed to be how others found them. However, someone mentioned to me that they like “lovey” because it makes it sound more blanket like. Either way, you will stuff the feet very lightly and the head more traditionally, while everything else is not. That makes is more blanket like than a traditional stuffed animal.
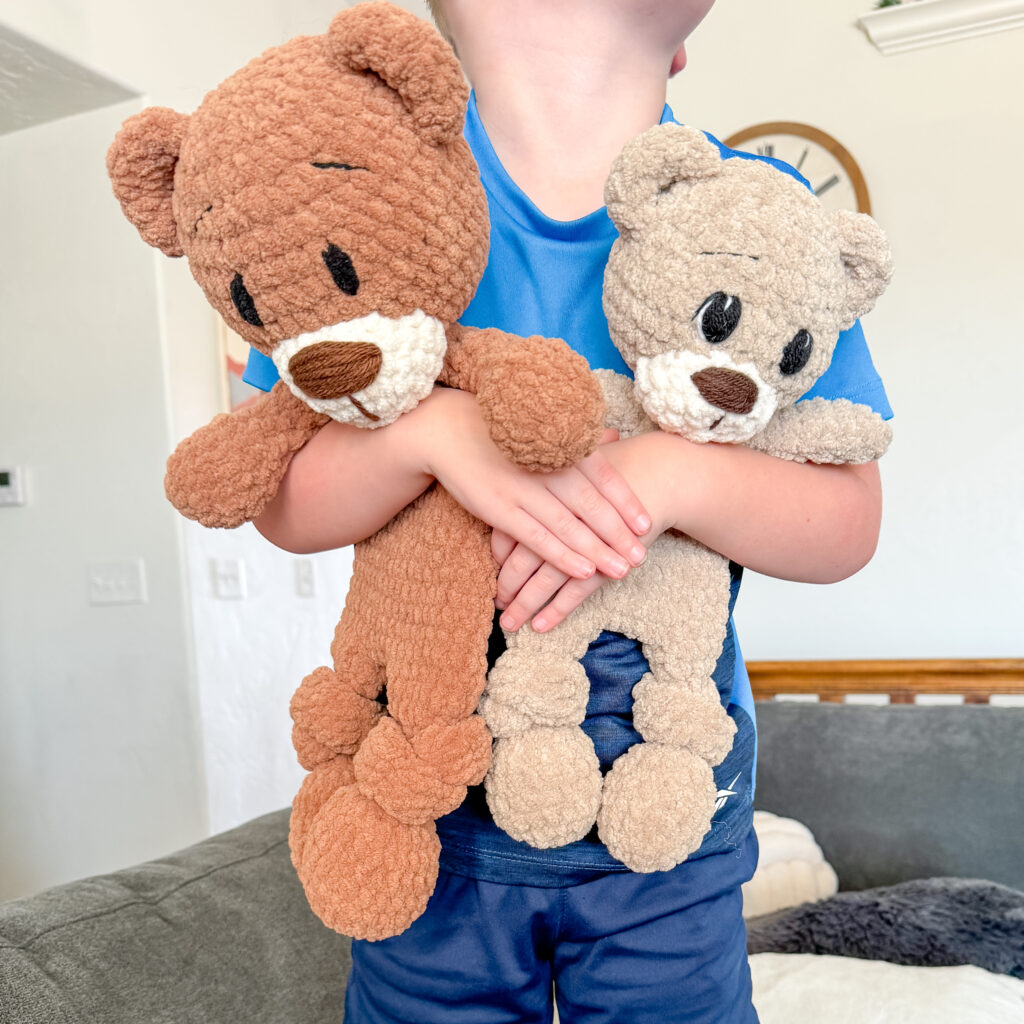
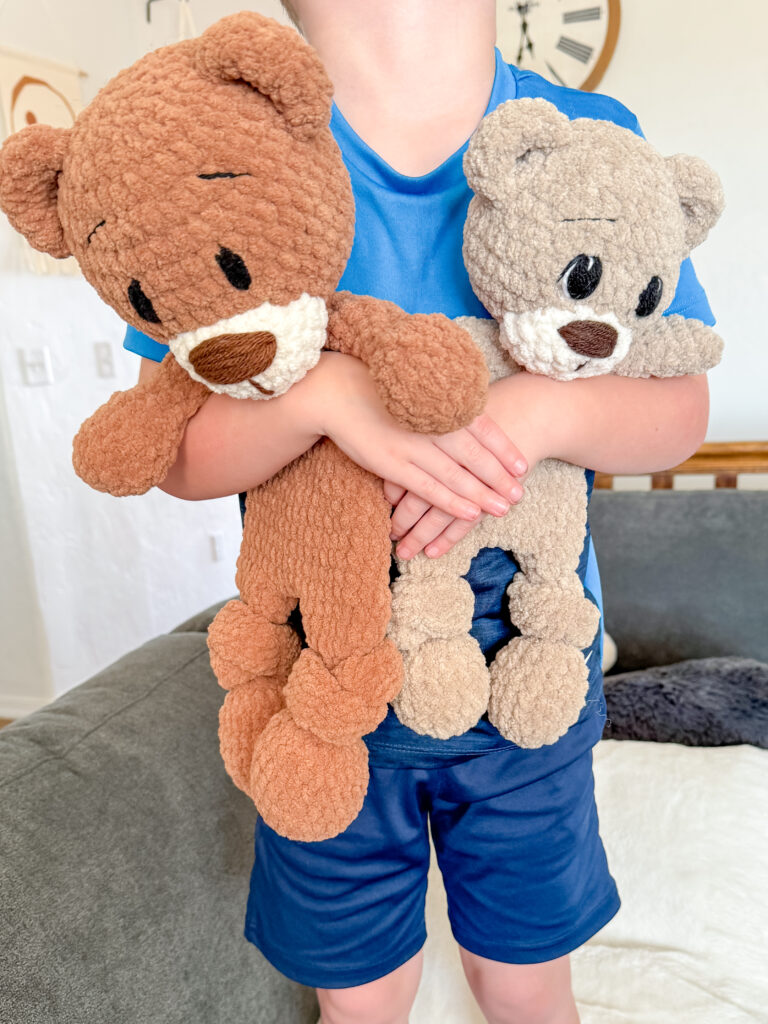
I love the larger versions, but for very small hands (and for those that are short on time!) I think this free bear crochet lovey pattern is perfect. You don’t sacrifice the cuddly factor, but it is a more manageable size. This design comes in around 12 inches, instead of 16 like the original snuggler teddy bear pattern!
JOIN MY NEWSLETTER TO RECEIVE…
A free email course-Amigurumi 101
This free amigurumi email course gives you what you need to master the basics of amigurumi, along with some extra tips and tricks!
Wouldn’t this be such a dream to cuddle up with? If you want something just as lovable, you can make the puppy snuggler! Or if you want to see the whole line up, you can do so here!
Want the Ad-free, Printable PDF?
You can find it in one of my stores!
Materials you’ll need
To get started making this free crochet snuggler pattern, you’ll want to gather all your materials first.
There is a whole section where you can find tutorial videos for different parts of this pattern. Most are linked in the section they are specific to, but if you want to view them before you begin you can see the collection here.
Notes: This snuggler pattern is made from the feet up. You will make two feet, fastening off one and then attaching them together from the second one. The body will decrease and then increase into the head. This video shows how to strengthen the neck. This has a double use in this pattern- keeping the head from being overly floppy and to allow the head to be stuffed without losing the stuffing in the body. Because of the nature of this pattern, the head will still “flop” but that is what I expect of the lovey/blanket form.
The arms are attached with a long needle. You can find the video for that here.
I embroidered the eyes so it would be safe for a baby/toddler. You can find my collection of embroidery videos here.
Substitute yarns could be Bernat Blanket yarn or Big Twist from Joann’s. You may need to change the hook size if you change the yarn.
Free Bear Crochet Lovey Pattern
Neck Strengthener:
In a magic circle, SC 7. SC in each around for a total of 10 rows. Fasten off and leave a
long tail. You will need this before you stuff the head. Here is a tutorial on how it will work!
Beginning with the feet and using the body color:
Round 1: In a magic circle, SC 6.
Round 2: SC INC in each around. (12)
Round 3: SC in the first, SC INC in the next. Repeat around. (18)
Rounds 4-7: SC in each around. (18) *4 total rows*
Round 8: SC in the first, INV DEC in the next. Repeat around. (12)
Round 9: INV DEC in each around. (6)
Stuff the foot part, but not the next chain rows.
From here on, you will be chaining 2, DC in the same stitch and crochet around. Then attach to the first stitch with a slip stitch. This creates the part of the leg that you will knot. You can knot before you attach the legs or afterwards. The foot may be “squished” a bit as you tie, but there should be enough length. I created a video to show the next part of the leg, and you can see that here.
Rounds 10-18: DC in each around. (6) *9 total rows*
Round 19: SC INC in each around. Attach to the first stitch with a slip stitch and chain 1 (12)
Round 20: SC in each around. (12)
Fasten off the first foot. On the second foot, chain 4 and slip stitch to the first leg where you fastened off.
Click here for a video and photo tutorial of this next part! (note that the numbers are different for this mini version, but the method is the same)
Round 21: Chain 1 and SC in each stitch around on the leg (12). SC in each chain across. (4) SC in each stitch around the second leg. (12) SC on the other side of the chain. (4) Attach to the first SC with a slip stitch. (a total of 32)
Rounds 22-26: SC in each around. (32) *5 total rows*
Round 27: SC in the first two. INV DEC in the next. Repeat around. (24)
Rounds 28-31: SC in each around. (24) *4 total rows*
Round 32: SC in the first. INV DEC in the next. Repeat around. (16)
Round 33: INV DEC in each around. (8)
Round 34: SC INC in each around. (16)
Round 35: SC in the first stitch, SC INC in the next. Repeat around. (24)
Round 36: SC in the first two stitches, SC INC in the next. Repeat around. (32)
Round 37: SC in the first three stitches, SC INC in the next. Repeat around. (40)
Rounds 38-40: SC in each around. (40) *3 total rows*
Round 41: SC in the the first three, INV DEC in the next. Repeat around. (32)
Round 42-43: SC in each around. (32) 2 total rows
Begin to stuff here. If you haven’t already, attach the neck strengthener! If you choose to use safety eyes, attach them around rounds 38-39.
Round 44: SC in the first two, INV DEC in the next. Repeat around. (24)
Round 45: SC in each around. (24)
Round 46: SC in first, INV DEC in the next. Repeat around. (16)
Round 47: INV DEC in each around. (8)
Fasten off and sew the remaining hole closed.

Crochet Lovey Bear Snout, Ears, and Arms
Ears (make 2)
Round 1: In a magic circle, SC 8.
Round 2: SC INC in each around. (16)
Round 3: SC in the first, SC INC in the next. Repeat around. (24)
Round 4: SC in each around. (24)
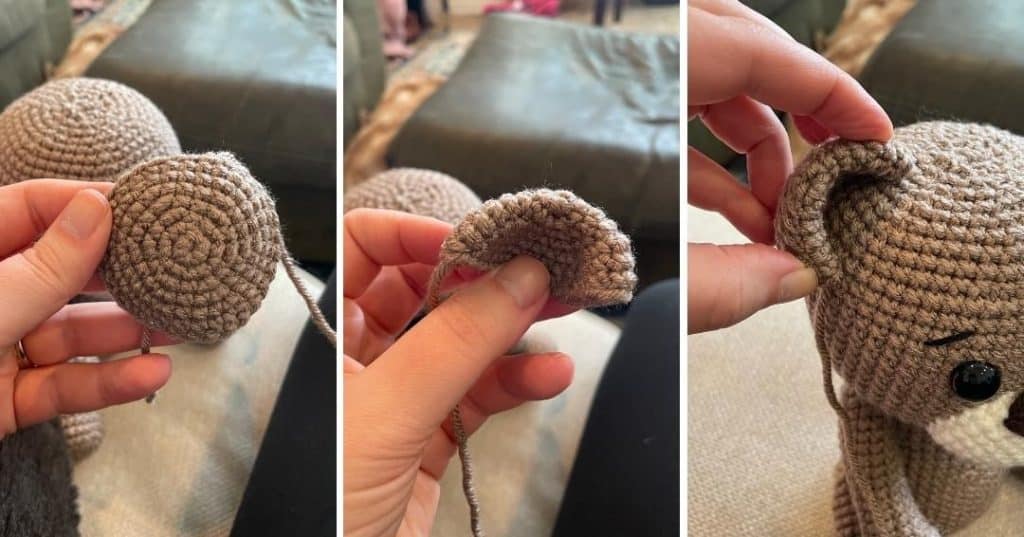
Fasten off and leave a long tail. Fold the ears in half. You will attach the ears through both halves of the ear and through the head. Sew the ears about 3 rows out from the top of the head. The halves will curve and span about 5 rows between each side.
Note: The picture below is of my worsted weight yarn bear, but you will see that the technique is the same as with the thicker yarn of this ear. If you’d like to see the video tutorial for the worsted weight bear to see it in action, click here! The video is at the top of the pattern right before the materials list.
Snout
Round 1: In a magic circle, SC 6
Round 2: SC INC in each stitch around (12)
Round 3: SC in first, SC INC in next. Repeat around. (18)
Rounds 4: SC in each around. (18)
Fasten off and leave a long tail to sew on to the face, with the bottom around round 34 and the top just under round 38. Lightly stretch the snout into an oval shape before you attach.
Using a long piece of brown yarn. Embroider the nose on about row 4, making about 4-5 passes through the same stitches. Bring the needle up from the back, and cover about 4-5 stitches.
Eyes
I embroidered the eyes to make them safe for babies. If you want to see the video and picture tutorials for those, you can find the collection here.
Arms
Round 1: In a magic circle, SC 7.
Round 2: SC INC in each around. (14)
Round 3-4: SC in each around. (14)
Round 5: INV DEC in the first. SC in the next 5. INV DEC. SC in the remaining 5. (12)
Round 6: SC in each around. (12)
Round 7: INV DEC in the first. SC in the next 4. INV DEC. SC in the remaining 4. (10)
Round 8: SC in each around. (10)
Round 9: INV DEC in the first. SC in the next 3. INV DEC. SC in the remaining 3. (8)
Rounds 10-11: SC in each around.
Fasten off and leave an extra long tail. Sew the opening closed (leave unstuffed!).
Attach the arms between rows 31 and 32 of the body. Use the yarn through method outlined, or if you prefer you can do it the traditional way.
Did you make this Bear Crochet Lovey pattern?
Mention me @thefriendlyredfox so I can see your creations! You can also leave a comment below!

I am struggling trying to figure out how to attach the ears. I would love to see a video tutorial on this for the snuggly bear. I’m not sure how you go through both layers of the ear and also the head. Or do you sew both layers of the ear together before attaching it to the head. I would appreciate it if you could please let me know. Thank you.
I have a video in my original teddy bear pattern right here! https://www.thefriendlyredfox.com/crochet-teddy-bear-a-free-pattern/
I can’t figure out how to put the ears on. Where should I start sewing them on? How much do I bend them? How many rows should they take up? I have no idea how I’m going to get them even. Any chance you could provide a video or some clearer instructions for the ears? Thank you 🙂
The numbers for where to place the ears and how many rounds they span are in the paragraph immediately under Round 4. If you’d like to see a video, there’s a link right above the picture that has the worsted weight bear ears. It goes to the worsted weight bear pattern and the video is at the top of the pattern right before the materials list. Hope this helps!
Hi Kali! Thanks for the pattern. I have a question regarding the wool and hook size. I see that the hook recommended for Premier Basix Chenille is an 8mm but you use a 4.5 mm. I can’t get Premier where I am so I just want to make sure I get the right size of everything. So I should get any chenille that’s meant for an 8mm hook but use a 4.5 mm hook, right?
Thanks!
Yes – the size 6 super bulky yarn package usually recommends a size 8mm. I use a small hook because I prefer tighter stitches. It helps them keep their shape better than the bigger hook! But with Bernat, I will sometimes size up to a 5mm or 5.5mm. Amigurumi with worsted weight uses a much smaller hook than the package recommends as well – it’s the same theory!
Hi, if I don’t stuff the body, I noticed that the neck strengthen can be felt is it necessary to use it?
Hi! It keeps the stuffing from falling down from the head to the body. You can always make it shorter if you need to!
I love this pattern but I wondering if you could tell me what the total yard amount I would need to make the whole body of the bear in the beige color. I want to make sure I buy enough yarn to complete the whole bear. Thank you in advance
This bear uses about 200g of Premier Basix Chenille. If you use that brand and the recommended size hook, it’s about 265-275 yards, but you’ll need to buy 2 skeins because they come in 150g skeins.
Thank you so much for your respond can’t wait to start the pattern. Have a great day ~ Happy Crocheting
I would like to use medium weight (4) to make this but I fear I won’t have enough yarn so I’m hoping you see this soon and can help. I have 2 skeins in a color I want to use and they are 170 yards/100 grams. Obviously I will use a smaller crochet hook but how small? I was thinking maybe an I hook?
Thank you for your time!
When I use worsted weight for anything, I usually use a 4mm hook or smaller. Because it’s a pattern written for plush yarn, I can’t tell you how much worsted weight you will need, as I haven’t tested it in other weights.
Hello! I am a teenager who loves to crochet.🧶 I made this adorable bear and several of your other patterns as well. I love them so much. They are the most adorable patterns ever!! Thank you. ❤️❤️ God bless you and your family!