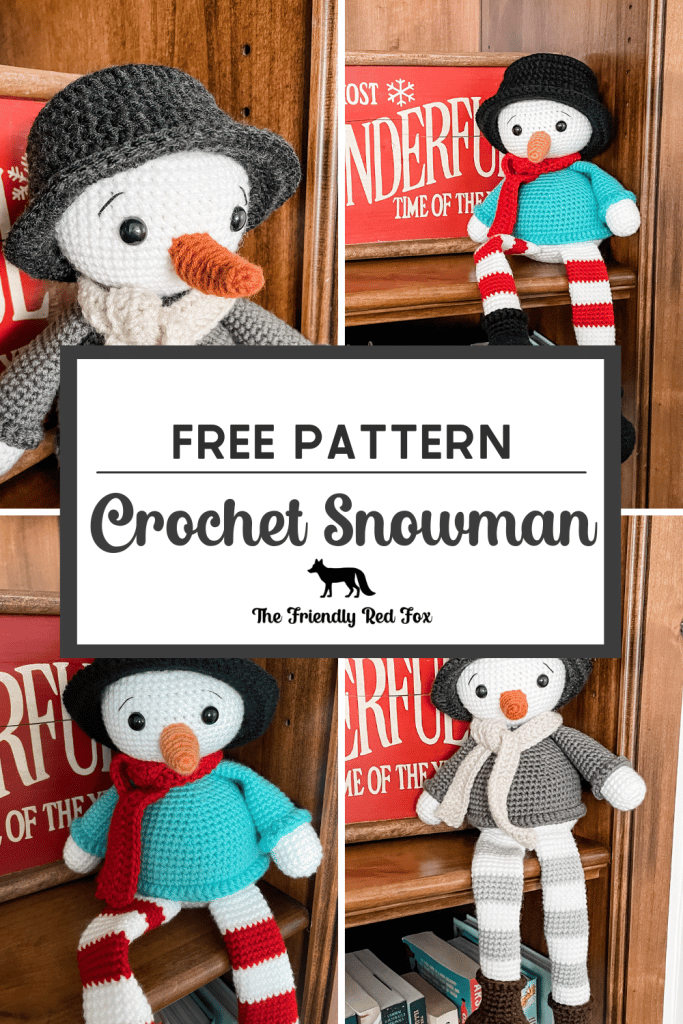
Free Snowman Crochet Pattern
This free Snowman crochet pattern makes a sweet little decoration designed to sit on a little shelf with his striped legs hanging over! This is the fifth design in my Christmas Shelf Sitters series. They are all based off of a little moose my grandma had growing up. She always went all out when it came to decorating for Holidays so this is my tribute to her memory. This crochet Snowman sits about 7 inches tall, but is closer to 15 including the legs! The body and head are one piece with the various limbs sewn on.
Please note this pattern is only for PERSONAL USE. Please feel free to make as many
items as you wish for yourself, or as gifts. You may sell items made with this pattern but
PLEASE LINK BACK OR GIVE CREDIT TO ME AS DESIGNER. In no way can you
share, reproduce, or sell this pattern. Please respect my rights as the designer.
Read through the entire pattern before you begin.
Free Crochet Snowman Materials
You will need:
About 50g each of Size 4 Worsted weight yarn in white, sweater color, stripe colors, boot colors
12mm safety eyes
Stuffing
3.75mm hook
5.5 hook for hat and scarf
Needle for sewing
Stitch marker
¾ cup Poly pellets (these are used to weigh down the body so it can sit on the shelf)
The poly pellets are optional, but they do provide a lot of stability. I poured mine into mismatched socks and tied it up, like a bean bag. You can also use a sandwich bag or if you feel like your stitches are tight enough, just pour them into the body. I was more worried about my boys playing rough with them and the pellets working out, so I used the sock.
Abbreviations
SC- single crochet
SC INC- single crochet increase (2 SC in each stitch)
INV DEC- Invisible decrease (put hook through the FRONT LOOP ONLY of two consecutive stitches [two loops on hook] Yarn over pull through both loops. [two loops on hook] Yarn over pull through two loops)
Magic Circle- Make a loop, leaving a long tail to work with. Insert hook in center of loop, yarn over and draw up a loop. Yarn over, pull through to make the first chain (this does not count as a stitch!). Continue to crochet over the loop and tail with the number of stitches called for. (If you need 6 SC, then crochet 6 SC inside the ring.) Pull the tail to close the circle.
Always move your stitch marker to the last stitch in the round. This pattern is worked in continuous rounds.
Free Crochet Snowman Pattern
Legs
Stuff the boot part very well and then lightly through the top of the leg.
Using Black (or preferred boot color):
Round 1: 6 SC in a magic circle.
Round 2: INC in each around. (12)
Round 3: SC in the first, SC INC in the next. (18)
Round 4: SC in the first 2, SC INC in the next. Repeat around. (24)
Round 5: SC in first 3, SC INC in next. Repeat around. (30)
Round 6: SC in first 4, SC INC in the next. Repeat around. (36)
Rounds 7-11: SC in each around. (36)
Round 12: INV DEC 12 times. SC in the remaining 12 stitches. (24)
Round 13: INV DEC 6 times. SC in the remaining 12. (18)
Rounds 14-17: SC in each around. (18)
Change to white. Change colors every 5 rows, alternating white and red.
Rounds 18-52: SC in each around. (18)
Fasten off leaving a long tail to sew onto the body. Stuff the feet really well. Stuff the rest of the legs lightly, up until the last five rows. Make the boots edge by attaching the black yarn to the first row where you change color, with the legs facing up and the boots down so that your stitches will be facing up.Go around the stitch, like you were making a post stitch. Chain 2. HDC in each around, slip stitching to the first when you meet it. Fasten off and weave in the ends.
You will attach the legs to row 10 of the body, about 4 stitches apart.
If you are having a hard time with the boot edge, you can watch the above video. I go through the whole process for you!
Arms
I only stuff the very bottom and very lightly. Then not at all through the top half.
Using ivory color:
Round 1: SC 6 in a magic ring.
Round 2: SC INC in each around. (12)
Round 3: SC in first, SC INC in the next. Repeat around. (18)
Rounds 4-8: SC in each around. (18)
Change to sweater color.
Rounds 9-25: SC in each around.(18)
Round 26: SC in the first, INV DEC in the next. Repeat in next.
Fasten off and leave a tail long enough to sew on. Attach the arms between rows 28 and 29 on the body.
Make the sweater edge by attaching white yarn to the first row where you change color, with the hands facing up so that your stitches will be facing down (like the cuffs of your sweater would.) Go around the stitch, like you were making a post stitch. Chain 2. HDC in each around, slip stitching to the first when you meet it. Fasten off and weave in the ends.
Carrot nose
To get the lined edge, crochet in the back loop only for the entirety of the nose.
Using orange yarn:
Round 1: In a magic circle, 6 SC.
Round 2: SC in each around.
Round 3: SC in first, SC INC in next. Repeat around.(9)
Round 4-5: SC in each around.
Round 6: SC in first 2, SC INC in next. Repeat around. (12)
Round 7-13: SC in each around.
Fasten off and leave a long tail to sew onto the head. Lightly stuff. Center the nose between the eyes and one row below them.
Body
With white yarn:
Round 1: In a magic circle, 6 SC.
Round 2: SC INC in each around. (12)
Round 3: SC in first, SC INC in next. Repeat around. (18)
Round 4: SC in first 2, SC INC in next. Repeat around. (24)
Round 5: SC in first 3, SC INC in next. Repeat around. (30)
Round 6: SC in first 4, SC INC in next. Repeat around. (36)
Round 7: SC in first 5, SC INC in next. Repeat around. (42)
Round 8: SC in first 6, SC INC in next. Repeat around. (48)
Round 9: SC in first 7, SC INC in next. Repeat around. (54)
Round 10: SC in first 8, SC INC in next. Repeat around. (60)
Rounds 11-12: SC in each around. (60)
Change to preferred sweater color
Rounds 13-19: SC in each around. (60)
Round 20: SC in the first 8, INV DEC in the next. Repeat around. (54)
Rounds 21: SC in each around. (54)
Round 22: SC in the first 7, INV DEC in the next. Repeat around. (48)
Round 23: SC in each around. (48)
Round 24: SC in the first 6, INV DEC in the next. Repeat around. (42)
Round 25: SC in each around. (42)
Round 26: SC in the first 5, INV DEC in the next. Repeat around. (36)
Round 27: SC in each around. (36)
Round 28: SC in the first 4, INV DEC in the next. Repeat around. (30)
Round 29: SC in the first 3, INV DEC in the next. Repeat around. (24)
Round 30: SC in the first 2, INV DEC in the next. Repeat around. (18)
Round 31: SC in the first, INV DEC in the next. Repeat around. (12)
Change to white.
Rounds 32: SC in each around (12)
From here we will be increasing the head. From this point I am resetting the number on the rounds. Round 33 of the body is now Round 1 of the head. It will be easy to see.
Head
Round 1: SC in first, SC INC in next. Repeat around. (18)
Round 2: SC in first 2, SC INC in next. Repeat around. (24)
Round 3: SC in first 3, SC INC in next. Repeat around. (30)
Round 4: SC in first 4, SC INC in next. Repeat around. (36)
Round 5: SC in first 5, SC INC in next. Repeat around. (42)
Round 6: SC in first 6, SC INC in next. Repeat around. (48)
Round 7: SC in first 7, SC INC in next. Repeat around. (54)
Round 8-20: SC in each stitch around. (54)
Place the safety eyes in between rows 13 and 14, ten stitches apart. The nose will be attached in the center and one row below the eyes. I also like to stretch the bottom of the head a little. It makes it more round from the point of the neck.
Round 21: SC in the first 7, INV DEC in the next. Repeat around. (48)
Round 22: SC in the first 6, INV DEC in the next. Repeat around. (42)
Round 23: SC in the first 5, INV DEC in the next. Repeat around. (36)
Round 24: SC in the first 4, INV DEC in the next. Repeat around. (30)
Round 25: SC in the first 3, INV DEC in the next. Repeat around. (24)
Round 26: SC in the first 2, INV DEC in the next. Repeat around. (18)
Round 27: SC in the first, INV DEC in the next. Repeat around. (12)
Round 28: INV DEC around. (6)
Fasten off leaving and weave in the end.
Sweater Edge
Make the sweater edge by attaching white yarn to the first row where you change color, with the bottom facing up so that your stitches will be facing down (like the edge of your sweater would.) Go around the stitch, like you were making a post stitch. Chain 2. DC in each around, slip stitching to the first when you meet it. Fasten off and weave in the ends.
Scarf
Using H hook:
Chain 70. Two stitches from the end DC. DC in each stitch to the end (68)
Chain 2 and DC in the same stitch. DC in each stitch to the end. (68)
Fasten off.
Hat
Using H hook
Row 1: 10 DC in a magic ring, join to first DC. Chain 2
Row 2: 2 DC in each around, join. Chain 2 (20 DC)
Row 3: 2 DC in first, DC in next, repeat around, join. (30 DC)
Row 4: 2 DC in first, DC in next 2, repeat around, join. (40 DC)
Row 5: 2 DC in first, DC in next 3, repeat around, join. (50 DC)
Row 6: 2 DC in first, DC in next 4, repeat around, join. (60 DC)
Row 7-11: DC in each around. (60 DC)
Row 12: DC INC in first, DC in the next 5. Repeat around. (70)
Row 13: DC INC in first, DC in the next 6. Repeat around. Fasten off and weave in the end. (80)
Now dress him up and enjoy having a snowman that will never melt in your home!


Thank you, Kali, for your beautiful patterns. They are my favorite patterns to work with and they’re written with the most explicit directions and the most helpful videos to go with them.
Happy Holidays,
Diane