Free Squishy Chicken Crochet Pattern
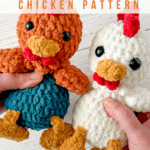
If you want a lovable and squishable friend, this free squishy chicken crochet pattern is just what you need! This works up quickly with blanket yarn, so you can make many for markets or for gifts!

Squishy Chicken Crochet Pattern Notes
This free squishy chicken crochet pattern works up quickly with blanket yarn to about 8 inches tall. With both a rooster and hen variations, this amigurumi version is the perfect size for small hands and a quick make! This little chicken crochet pattern works up to be about 7 inches tall.
This is another pattern in my “squishie” series! I called them that as an ironic nickname, and then it slowly became the official term. They are made with blanket yarn and the body is intentionally understuffed. This makes them adorably squishy! You will get hooked, and want to make the entire collection.
While this free chicken crochet pattern is made to have a squishy body, the head is fully stuffed. The wings and feet are not, however. I found this was the best way to get the cuddly body while keeping the shape that I want.
JOIN MY NEWSLETTER TO RECEIVE…
A free email course-Amigurumi 101
This free amigurumi email course gives you what you need to master the basics of amigurumi, along with some extra tips and tricks!
This chicken crochet pattern is easy to adapt to make a bunch of different looks. With hen and rooster variations, color combinations, and the extra “crazy eyes” version, you will be wanting to make an entire chicken coop full!
The little legs are my favorite part of the pattern. Similar to my Silly Goose Pattern, these amigurumi chicken legs are dangly and fun! You can have the four version or the three point version, different tail feathers and normal or crazy eyes. I provided three videos to help you make your own crochet chicken! You can see them linked throughout the pattern or see all of them here.

Want the Ad-free, Printable PDF?
You can find it in one of my stores!

Materials you’ll need
To get started making this squishy chicken crochet pattern, you’ll want to gather all your materials first.
You will need:
- Hen: 60g Premier Basix Chenille in Winter White
- Rooster: 30g Premier Basix Chenille in Teal or Caramel
30g Premier Basix Chenille in Rust or Poppy (for crazy eyed rooster)
Small amount of Premier Basix Chenille in Rust for neck feathers (for crazy eyed rooster) - Small amount of Premier Basix Chenille in mustard
- Small amount of Premier Basix Chenille in red
- 12mm safety eyes
- 4.5mm Crochet Hook
- Tapestry Needle
- Polyfil
- stitch marker

Notes:
This chicken is made from the bottom to the head, all in one piece. You will intentionally understuff the body for a more floppy, silly look. Over-stuffing will change the look dramatically. You will insert a neck strengthener which will help with the shape and stability of the head, while allowing you to understuff the bottom and stuff the head a little more.
The wings, feet, feathers, tail, comb and wattle are attached at the end. The feet are attached dangling from the body.
The wings are attached with a long needle. You can find the video for that here.
You can use safety eyes or try out embroidered eyes so it would be safe for a baby/toddler. You can find my collection of embroidery videos here.
Substitute yarns could be Bernat Blanket yarn or Big Twist from Joann’s. You may need to change the hook size if you change the yarn.
Squishy Chicken Crochet Pattern
Neck strengthener
*Click here for a video and picture tutorial on how this works*
In a magic circle, SC 7. SC in each around for a total of 7 rows. Fasten off and leave a long tail to sew the hole closed and sew through the neck.
Body/Head
Round 1: In a magic circle, SC 8.
Round 2: SC INC in each around. (16)
Round 3: SC in the first, SC INC in the next. Repeat around. (24)
Round 4: SC in the first 2, SC INC in the next. Repeat around. (32)
Round 5: SC in the first 3, SC INC in the next. Repeat around. (40)
Round 6: SC in the first 3, INV DEC in the next. Repeat around. (32)
Round 7: SC in each around. (32)
Round 8: SC in the first 2, INV DEC in the next. Repeat around. (24)
Round 9: SC in each around. (24)
Begin to stuff here. Remember to stuff lightly.
Round 10: SC in the first, INV DEC in the next. Repeat around. (16)
Round 11: SC in each around. (16)
If you are making a rooster, change to head color here.
Round 12: INV DEC in each around. (8)
Round 13: In the front loop only, SC INC in each around. (16)
Round 14: SC in the first, SC INC in the next. Repeat around. (24)
Rounds 15-19: SC in each around. (24)
Insert safety eyes between rounds 17 and 18, about 4 stitches apart. Insert neck strengthener. Remember to watch this video if you haven’t yet!
Round 20: SC in the first, INV DEC in the next. Repeat around. (16)
Stuff the head.
Round 21: SC in each around. (16)
Round 22: INV DEC in each around. (8)
Fasten off and sew the remaining hole closed.
Chicken Amigurumi Parts
Wings (Make 2)
Round 1: In a magic circle, SC 6.
Round 2: SC in each around. (6)
Round 3: SC INC in each around. (12)
Round 4: INC in the first. SC in the next 5 stitches. INC in the next. SC in the remaining 5. (14)
Round 5: INV DEC in the first. SC in the next 5. INV DEC. SC in the remaining 5/ (12)
Round 6: SC in the first, INV DEC in the next. Repeat around. (8)
Fasten off and leave a long tail to use in sewing onto the body. Attach between rounds 10 and 11.
Feet (Make 2)
You can find the full video for this process here.
Round 1: 6 SC in a magic circle (6)
Rounds 2: INC in each around. (12)
Round 3: SC in each around. (12)
Flatten the piece so that two halves touch. Seal the edge with a SC in each stitch across, with your hook going between the stitches of both sides. SC INC in the last stitch.
Fasten off and weave in that end.
For the legs, go through the top of the foot with your hook to grab and then pull through the tail. Chain 3 times, with the first chain near the foot. Fasten off.
Using the long tail and a needle, attach the chain to the body around round 5 of the body. Go through about two stitches a couple of times. Then weave the end through the chains back down to the foot. Sew through the bottom chains into the top of the foot a couple of times. Weave in the end and cut it off.
Repeat for the second foot and leg.
The last picture is from a Silly Goose, but the concept is the exact same!

Neck Feathers
In rust color for rooster. In white for chicken.
Chain 3. slip stitch to first chain. Repeat 12x. Fasten off and leave a long tail to sew on. Wrap it around the neck and attach with the loops facing out. I went through the neck and sewed it on similar to the neck strengthener. I made a video walkthrough for you to see how I did it!
Beak
With mustard color:
Round 1: 6 SC in a magic circle. (6)
Round 2: SC INC in each around. (12)
Round 3: SC in each around. (12)
Fasten off and leave a long tail to sew on. Flatten the beak and attach it in a line.
Wattle
In red:
Chain 4. Turn and SC in the second chain from the hook. SC in the remaining two chains for a total of 3 SC.
Then chain 3. SC in the second chain from the hook. SC in the remaining stitch for a total of 2 SC. This will create an uneven “V.”
Fasten off and sew right beneath the beak.


Hen Variation
Hen’s Comb
Chain 8. In the second chain from the hook HDC INC. Chain 2 and slip stitch into the same chain. SC. *Chain 2. In the next stitch DC INC, chain 2 and slip stitch in the same stitch. SC* Repeat the italicized section for a total of 3 points. Watch the video below for a walk through on this part.
Hen’s Tail
Chain 8. Sl St to the first chain. Chain 8 again and sl st to the first chain again. Repeat one more time for three feathers. Fasten off and attach them to round 7 in the back.

Rooster Variation
Rooster Comb
Chain 10. In the third chain from the hook HDC INC. Chain 2 and slip stitch into the same chain. SC. *Chain 2. In the next stitch DC INC, chain 2 and slip stitch in the same stitch. SC* Repeat the italicized section for a total of 4 points. Watch the video above, or if you want it in a seperate tab you can find it here.

Rooster Tail
Chain 10. Turn. In the first chain SC. SC in the next 3. Skip two chains and SC. SC in the remaining two. Fasten off. Make a total of 3 feathers and attach them around round 7 in the back.


“Crazy Eyes”
8 SC in a magic circle. Fasten off and sew the circle closed. Attach a 12mm safety eye trhough the center, attaching the back. Sew them on approximately the same place you would add the regular safety eyes.

Did you make this pattern?
Mention me @thefriendlyredfox so I can see your Squishy Chicken Crochet Pattern creations! You can also leave a comment below!

Where and how do you connect the wings? Do you fold them and single crochet across the top and then sew them on or leave them open to sew? What row do you attach them to?
Sew them between rounds 10 and 11 and they’ll close up as you attach them!
what color i the tail on the chicken/hen?
The same color as the body! 🙂
What yarn weight do you use?
Super Bulky (6)!
The pattern was easy to follow and turned out adorable! I turned it into a duck and I love it! Thank you!
Thanks for sharing, the instructions were good and the chicken turned out so cute 🥰