Free Triceratops Snuggler Crochet Pattern
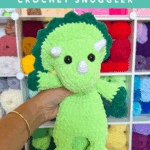
This free triceratops snuggler crochet pattern is extra cuddly and a great size! The plush yarn helps it work up quickly, while still being extra snuggly.

Free Triceratops Crochet Snuggler Pattern Notes
I am so happy to share this free triceratops snuggler crochet pattern! I love a good snuggler, and this version is extra fun. Quirky and cute, with chunky feet and the frilliest frill. It’s probably my favorite thing ever! It stands about 13 inches tall.
This is one of my Mix & Make patterns, because you can mix up the body and make something completely different! There are two different bodies for one head, so if you don’t love this snuggler version you can also make it in a Long-Legged Stuffy Version!
If you want to see which colors I used for this snuggler, you can click here to go the bottom of the post for yarn and shopping links! You can choose to work with different yarn, just keep in mind that although many yarns are classified the same, they can work up much differently.
JOIN MY NEWSLETTER TO RECEIVE…
A free email course-Amigurumi 101
This free amigurumi email course gives you what you need to master the basics of amigurumi, along with some extra tips and tricks!
The Big Footed Snuggler is stuffed with traditional polyfil, but there’s a super cool trick to keep the feet “stuffed.” It doesn’t use traditional stuffing- it uses yarn pom poms! This way you can get the shape but also keep the cuddly snuggler feel and not have the stuffing move into the body!

Ad-free, Printable PDF Full Pattern
My patterns are free on my website, but if you prefer a printable copy, you can find them in my shop!

Triceratops Snuggler Pattern
$6

Plush Triceratops Stuffy Pattern
$6

Clara the Capybara Pattern
$6
Free Triceratops Crochet Pattern Materials
To get started making this free Triceratops Snuggler crochet pattern, you’ll want to gather all your materials first.
You will need:
- 180g Premier Basix Chenille in Main Color
- 30g Premier Basix Chenille in Accent Color
- small amount black worsted yarn
- Stuffing
- 15mm safety eyes
- 4.5mm crochet hook (or hook size that keeps stitches tight and feels comfortable)
- Needle
- Stitch marker
video tutorials
These methods are used in this pattern!


Notes:
This triceratops is made from the feet up. You will make two feet, fastening off one and then attaching them together from the second one. You will use a method to keep the feet’s shape but won’t leak into the open body like regular stuffing will.
The body will decrease and then increase into a flat disc. This is what you will use to sew on the head. Because of the nature of this pattern, the head will still “flop” but that is what I expect of the lovey/blanket form. The frill and horns are attached to the head and then to the body. When made with the recommended yarn, this snuggler is about 13 inches tall.
If you attach the arms, they are movable!
You can use safety eyes or try out embroidered eyes so it would be safe for a baby/toddler.
I have a collection of embroidery videos here.
I used blanket yarn for this pattern, a size 6 weight. I typically use Premier Basix Chenille, Bernat Blanket and Bernat Baby Blanket. I think these are interchangeable size wise. I use a 4.5mm hook for the Premier Basix Chenille and a 5mm for Bernat, which is much smaller than the recommended size on the label, but I want nice, tight stitches for this type of pattern. If this is too tight for you, size up a hook size until you can crochet comfortably but still have tight stitches.
Please be aware that even though the label may say it is size 6, some materials and brands work up much differently. Keep that in mind as you are choosing your yarn.
Suitable yarns could be regular Bernat Blanket, Premier Basix Chenille yarn or Cozy Cub from Michaels (formerly Big Twist from Joann’s).
Small
Mix & Make Plush Triceratops Head Pattern
Head
Round 1: In a magic circle, SC 6. (6)
Round 2: SC INC in each around. (12)
Round 3: SC in the first, SC INC in the next. Repeat around. (18)
Round 4: SC in the first 2, SC INC in the next. Repeat around. (24)
Rounds 5-7: SC in each around. *3 rounds*
Round 8: SC INC in the next 6 stitches. SC in the remaining 18. (30)
Round 9: *SC in the first, SC INC in the next.* Repeat for a total of 6 times. SC in the remaining 18. (36)
Rounds 10-12: SC in each around. (36) *3 rounds*
Round 13: SC in the first 4, INV DEC in the next. Repeat around. (30)
Add safety eyes between rounds 8 and 9, about 6 stitches apart. These are the rounds that go up from the snout to make the forehead. Center them using the increases. start stuffing. continue to close.
Round 14: SC in the first 3, INV DEC in the next. Repeat around. (24)
Round 15: SC in the first 2, INV DEC in the next. Repeat around. (18)
Round 16: SC in the first, INV DEC in the next. Repeat around. (12)
Round 17: INV DEC in each around. (6)
Sew the remaining hole closed.

Head Frill
Row 1: Chain 26 and turn. In the 3rd chain from the hook, HDC. HDC in each all the way back. (24)
Row 2: Chain 1 and turn. HDC in the first, INC in the next. Repeat until the end. Change to accent color on the last stitch. chain 1 and turn. (36)
Row 3: (Each comma separates a stitch. The “chain 2” creates the arch of each spike.) *SC, DC, chain 2, DC, SC.* Repeat * * for a total of 9 spikes.


Attaching the Frill
Watch my tutorial video for attaching the triceratops frill here.
Fasten off and weave in the accent ends. Cut the yarn of the main color so you can use it to attach the frill to the head. Attach the frill on the line between rounds 10 and 11, two rounds behind the eyes. Center the middle spike (spike 5) between the eyes. The frill will cover about 3/4 of the head. On the underside, there should be about 8-9 stitches between each end of the frill.
Don’t attach it straight up- it should lie on a slant. The frill will angle away from the nose. As you sew, make sure that you pull tightly- not enough to make a pucker in the head, but enough that the frill looks more “welded on.”


Worsted Weight Yarn Horn (make 3)
Using a 4mm hook
Round 1: In a magic circle, 6 SC. (6)
Round 2: SC in each around. (6)
Round 3: SC in first, SC INC in next. Repeat around. (9)
Round 4: SC in each around. (9)
Fasten off and leave a long tail to sew on. Attach one on round 3-4, centered between the eyes. Attach the other two around rounds 9-10. I used each eye and lined them up just outside of each eye.


This is the completed triceratops head. Assemble before attaching to body.
Snuggler Tail
Using the main color:
Round 1: In a magic circle, SC 6. (6)
Round 2: SC INC in each around. (12)
Rounds 3-5: SC in each around. (12)
Round 6: SC in the first, SC INC in the next. Repeat around. (18)
Rounds 7-9: SC in each around. (18)
Round 10: SC in the first 2, SC INC in the next. Repeat around. (24)
Fasten off and weave in the end of the tail. Have this ready to go for round 13 on the body.
Feet/Body
Beginning with the feet and using the accent color:
Round 1: In a magic circle, SC 6. (6)
Round 2: SC INC in each around. (12)
Round 3: SC in the first, SC INC in the next. Repeat around. (18)
Change to body color
Round 4: In the back loop only, SC in each around. (18)
Rounds 5-7: SC in each around. (18) *3 rounds*
Round 8: SC in the first, INV DEC in the next. Repeat around. (12)
Stuff the feet. Do not stuff past round 9. If you prefer to use the pom pom method, you can see the video here
Round 9: INV DEC in each around. (6)
Round 10: SC INC in each around. (12)
Stop here and fasten off for the first foot. On the second foot, chain 4 and slip stitch to the first leg where you fastened off.
Round 11: Chain1 and SC in each stitch around on the leg (12). SC in each chain across. (4) SC in each stitch around the second leg. (12) SC on the other side of the chain. (4) Attach to the first SC with a slip stitch. (a total of 32)


Round 12: SC in each around. (32)
We are attaching the tail here. For concept video, see here.
Round 13: SC in the first 8 stitches. Attach the tail with stitch markers, the first stitch being the 9th. Go through the stitch on the tail and through the corresponding stitch in the body. Repeat for a total of 12 stitches. SC in the remaining 12 stitches. (32)
Round 14: SC in the first 8 stitches. Go through the stitches on the top half of the tail and through the corresponding stitch in the body. Repeat for a total of 12 stitches. SC in the remaining 12 stitches. (32)


(Body Cont’d)
Rounds 15-16: SC in each around. (32)
Round 17: *SC in the first two. INV DEC in the next.* Repeat around. (24)
Rounds 18-22: SC in each around. (24) *5 rounds*
Round 23: *SC in the first two. INV DEC in the next.* Repeat around. (18)
Round 24: SC in each around. (18)
Round 25: SC in the first. INV DEC in the next. Repeat around. (12)
Round 26: INV DEC in each around. (6)
From here we are increasing the base we will sew on to the head.
Round 27: SC INC in each around. (12)
Round 28: SC in the first stitch, SC INC in the next. Repeat around. (18)
Fasten off and leave a long tail to sew on. (see photos + video link below)
Attaching the Head to the Body
Watch the video tutorial here.
Once you are ready to attach the head to the body, pin the flat disc that is at the top of the body where you want it on the head. Try to center it as best you can. I prefer mine to be slightly close to the nose so that the head flops forward more than backwards.
As you sew, go through the front loop on the SC at the top of the disc. Pull tightly each time. Try to pull the disc out as you go, so that it lies as flat to the head as you can.
Arms (make 2)
Stuff the hand and the bottom half of the arm as you go.
Using the accent color:
Round 1: In a magic circle, SC 6. (6)
Round 2: SC INC in each around. (12)
Round 3: SC in each around. (12)
Change to the main color.
Rounds 4-6: SC in each around. (12)
Round 7: SC in the first, INV DEC in the next. Repeat around. (8)
Rounds 8-12: SC in each around. (8)
Fasten off and leave an extra-long tail. Sew the opening closed.
Attach the arms with the long needle method outlined in the Friendly Files or see this video here on rounds 24-25, just below the head.


From Left to Right:
GREEN: Premier Basix Chenille in Kiwi
Premier Basix Chenille in Emerald
PURPLE: Premier Basix Chenille in Eggplant
Bernat Baby Blanket in Baby Lilac
Want the Ad-free, Printable PDF?
You can find it in one of my stores!

Did you make this pattern?
Mention me @thefriendlyredfox so I can see your Triceratops Snuggler Crochet Pattern creations! You can also leave a comment below!
I would like to thank you For all of your terrific patterns patterns. I have made several of your snuggly and turned out terrific it’s very seldom that someone would do what you have done. I’d like to thank you with all my heart.
You’re welcome! Thank you for being here!
Hey Kali, I’ve made a herd of your turtles (for all my grandkids and nieces and nephews 😁) and I love them. This is the first snuggler I’ve made and I have a question. Is there any stuffing in the body of the snuggler or just in the arms and feet? Thank you so much for all your beautiful patterns and help.
Hi! Just the arms and feet are stuffed! The body is left unstuffed so it’s snuggly!