Crochet Iguana Pattern

Crochet Iguana Pattern
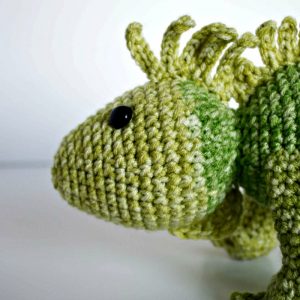
This crochet iguana pattern is about 10 inches long when made with the recommended yarn. I consider it a beginner pattern and it works up pretty quickly! Don’t be intimidated by the frills and ridges. It is actually pretty easy to do!

Please note this pattern is only for PERSONAL USE. Please feel free to make as many
items as you wish for yourself, or as gifts. You may sell items made with this pattern but
PLEASE LINK BACK OR GIVE CREDIT TO ME AS DESIGNER. In no way can you
share, reproduce, or sell this pattern. Please respect my rights as designer. This pattern is the intellectual property of The Friendly Red Fox.
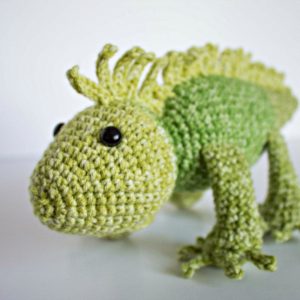
Iggy is the Letter I pattern in my Amigurumi A to Z series! See the other patterns in the series here. Also, take a minute and read my amigurumi tips and tricks post. It will help a lot with all the details and how to get your amigurumi iguana just right!
You can purchase the ad-free, printable PDF or you can scroll down for the free pattern.
If you enjoy the use of this free crochet iguana pattern, please take a minute to follow me on Instagram and join my Friendly Crochet Club on Facebook! If you want to follow along, sign up for the Friendly Newsletter!
Crochet Iguana Materials and Notes
You will need:
Approx 150 g size 4 yarn (I used Yarn Bee Soft and Sleek in Green)
Crochet Hook in Size 3.75
Tapestry Needle
Polyfil or preferred stuffing
10.5mm safety eyes
stitch marker
Abbreviations
SC- single crochet
SC INC- single crochet increase (2 SC in each stitch)
HDC- Half Double Crochet
DC- Double Crochet
TRC- Triple Crochet
INV DEC- Invisible decrease (put hook through the FRONT LOOP ONLY of two consecutive stitches [two loops on hook] Yarn over pull through both loops. [two loops on hook] Yarn over pull through two loops)
Magic Circle- Make a loop, leaving a long tail to work with. Insert hook in center of loop, yarn over and draw up a loop. Yarn over, pull through to make the first chain (this does not count as a stitch!). Continue to crochet over the loop and tail with the number of stitches called for. (If you need 6 SC, then crochet 6 SC inside the ring.) Pull the tail to close the circle.

Take a minute and watch this video for some tips on the trickier parts of this pattern!
Crochet Iguana Pattern
Body and Head
Round 1: 6 SC in a magic ring.
Round 2: SC in each around. (6)
Round 3: INC in each around. (12)
Rounds 4-6: SC in each around. (12)
Round 7: SC in the first, INC in the next. Repeat around. (18)
Rounds 8-10: SC in each around. (18)
Round 11: SC in the first 2, INC in the next. Repeat around. (24)
Rounds 12-14: SC in each around. (24)
Round 15: SC in the first 3, INC in the next. Repeat around. (30)
Rounds 16-18: SC in each around. (30)
Round 19: SC in the first 4, INC in the next. Repeat around. (36)
Rounds 20-35: SC in each around. (36)
Round 36: SC in the first 4, INV DEC in the next. (30)
Begin to stuff here! Continue stuffing as you go.
Round 37: SC in each around. (30)
Round 38: SC in the first 3, INV DEC in the next. (24)
Round 39: SC in the first 2, INV DEC in the next. (18)
Round 40: SC in the first, INV DEC in the next. (12)
We will begin growing the head from here.
Round 41: SC in the first, INC in the next. (18)
Round 42: SC in the first 2, INC in the next. (24)
Round 43: SC in the first 3, INC in the next. (30)
Round 44: SC in the first 4, INC in the next. (36)
Round 45: SC in each around. (36)
Round 46: SC in the first 5, INC in the next. (42)
Round 47: SC in each around. (42)
Round 48: SC in the first 5, INV DEC in the next. (36)
Round 49: SC in each around. (36)
Round 50: SC in the first 4, INV DEC in the next. (30)
Round 51: SC in each around. (30)
Round 52: SC in the first 3, INV DEC in the next. (24)
Round 53: SC in each around. (24)
Round 54: SC in the first 2, INV DEC in the next. (18)
Round 55-56: SC in each around. (18)
Attach the eyes between rows 49 and 50, about 6 stitches apart.
Round 57: SC in the first, INV DEC in the next. (12)
Round 58: INV DEC in each around. (6)
Sew the remaining hole closed. Weave in the ends.
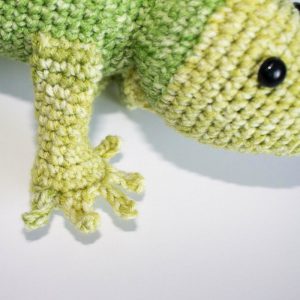
Legs (make 4)
Stuff only the feet.
Round 1: 6 SC in a magic circle.
Round 2: INC in each around. (12)
Round 3: SC in the first, INC in the next. (18)
Rounds 4-5: SC in each around. (18)
Round 6: INV DEC 8 times. SC in the remaining 2 stitches. (10)
Rows 7-15: SC in each around. (10)
Fasten off leaving a long tail to sew onto the body.
For the claws, attach the yarn with a slip stitch around row 4 on the far side of the foot pad. *Chain 5 and slip stitch in the remaining 4 chains. Skip a stitch on the foot and attach with the slip stitch.* Repeat * * for a total of 5 claws. Fasten off and weave in ends.
Attach the back leg around row 16-20. And the front one around row 28-32. Lay the body on a book or something similar to make sure the legs are even. Make sure the legs both touch the ground. Repeat on the other side.
Back Ridge
Begin by chaining 5. In the second chain from the hook, slip stitch. Slip stitch in the remaining 3 stitches for a total of 4 slip stitches. Chain 5 again and repeat. You will begin making a feathery looking row. I made 20 “spikes.” Fasten off and leave a very long tail to sew the ridge on. Fasten the ends at the neck and the tail, centered in the middle of his back. Sew the ridge on. Be sure that it is straight and hasn’t turned before sewing.
Head Piece
Begin by chaining 8. In the second chain from the hook, slip stitch. Slip stitch in the remaining 6 stitches for a total of 7 slip stitches. Chain 8 again and repeat. You will begin making a feathery looking row. I made 5 “spikes.” Attach the same way as the the back.
Throat Piece
Chain 9. In the second chain from the hook, SC. HDC, HDC, DC, DC, TRC, TRC, DC in the remaining stitches. Chain 2 and slip stitch to the last DC. Leave a long tail to sew on. Attach with the longer side at the back near the neck and the shorter side toward the nose.

This is such a fantastic pattern! I couldn’t find the yarn that you used, but I was able to get a green gradient yarn from Red Heart on short notice. It still came out super cute, Thank you so much!