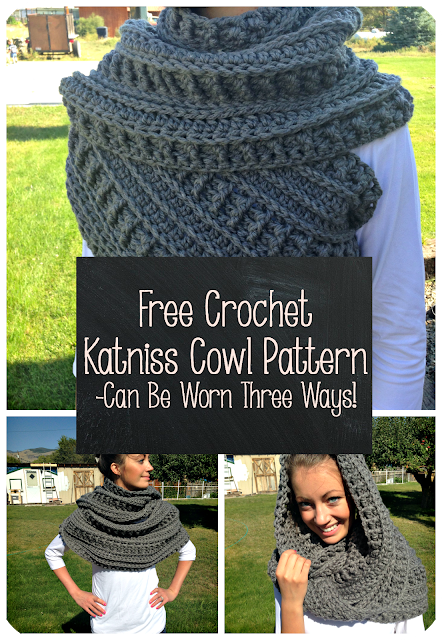
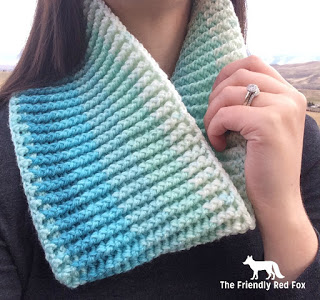
Free Crochet Katniss Cowl Pattern
![]()
EDIT: I HIGHLY recommend you read the FAQ page HERE before you begin this project! Please look at it if you are having any questions… chances are they are answered there!
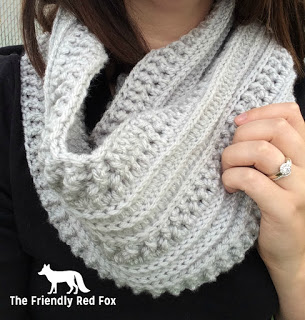
If you love the look but not the bulk, check out my Ribs and Ridges Scarf. Same pattern, worsted weight yarn!
(this post contains affiliate links. For more information please check out my policy page)
When I first watched Hunger Games: Catching Fire and I saw Katniss’s knitted cowl my DIY mind immediately began making a pattern for it. I never attempted it, mostly because I did not feel like I would ever really NEED a one armed vest thing. It just did not seem very practical. (Does her other arm get cold? Is it an archery thing? I just don’t know…)
Then not too long ago, my volleyball coach from the good old days sent me a pin to this scarf and asked if I could whip up something similar. I loved that it is just a giant infinity scarf rather than a one armed t-shirt thing. This means you can wear it multiple ways, but still achieve that “awesome” look sported by the Hunger Games victor. However, that particular pattern was knitted and my knitting skills are sadly lackluster. But I spent some time and developed my own crochet pattern.
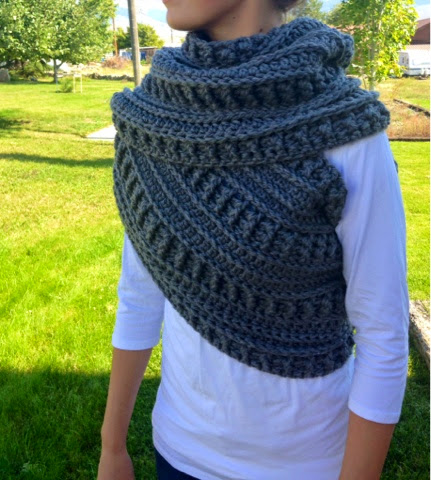
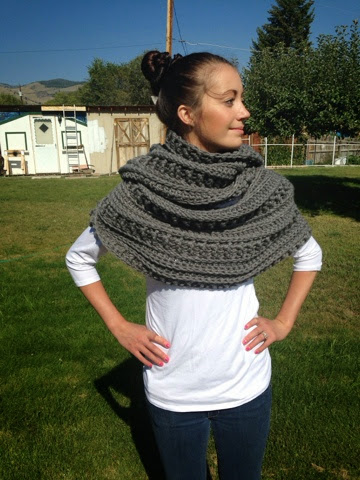
This is seriously a mega scarf, measuring just over 60 inches long and 13.5 inches high (this seems to be the magic length for the perfect “wrap”), and made from almost 600 yards of yarn. If you are worried about the length for yourself, measure it by wrapping around yourself after the first row of post stitches because that is essentially the finished length.
This is a beautiful piece with a lot of detail, and can be worn 3 ways!
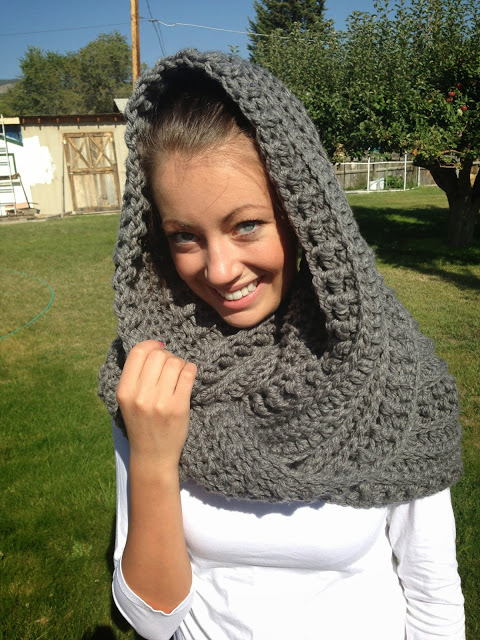
This is an intermediate pattern, but a beginner could figure it out with some determination.
You will need to know how to front and back post double crochet, front post single crochet and the double crochet. If you don’t know these stitches, there are a lot of great youtube videos to help. (And do not be scared to try them– they are the same basic stitches, just put in a different spot!)
If you want to try out these stitches on an easier (read “smaller”) project try out my Free Katelyn Ear Warmer Pattern.
This scarf is also crocheted in the round to prevent some uneven sewing. The pattern is ridged and so can be hard to make the attached line look very neat. I found it was better to attach in the round. It may still be a little “gappy.” I suggest leaving a long end and sewing the gaps together just a little bit. There is nothing wrong with a little sewing manipulation! And because of the many ways to wrap and wear this, it is easy to hide that section.
Again, please read the FAQ page before you begin!
Ready? Here is what you will need to get started.
Size M Hook (9.0)
**I used to recommend a P hook but the majority do better with an M**
Large sewing needle for sewing in ends
600 yards of size 6 bulky yarn (I used Bernat Collegiate Chunky in Grey)
EDIT: I have had many people end up with scarves that are TOO big when using an extra bulky yarn. I would stay away from thick, wooly yarns like Wool-Ease Thick and Quick. Some size 5 yarns would work, and some size 6 yarns will not. I stay by my recommendation of the Bernat yarn. Also, be sure to try on your scarf after a few rows. Because we are not all the same shape and size, you may need to adjust. And if you need to start over, well better after 2 or 3 rows than after the whole thing. The nice thing with this scarf is that you do not need to have a certain number of chains- you can customize it to your own size!
Row 1: Chain until you reach 65 inches (I am sorry– I could not force myself to make an actual count.) You will want to crochet over the end length of 61 inches because the post stitches pull it together. Connect to form a giant ring.
Row 2: Chain 2, DC across, Join.
Row 3: Chain 2, DC in first stitch, FPDC alternating with BPDC until you reach the last stitch. DC in last St, Join. Chain 2.
Row 4: This next row will depend on the number of stitches you made… But essentially you will FPDC or BPDC on the post crochets you already made. Line up the FPDC with a FPDC and a BPDC with a BPDC (to achieve that nice ridged look!) until you reach the end.Join.
Row 5: Repeat row 4.
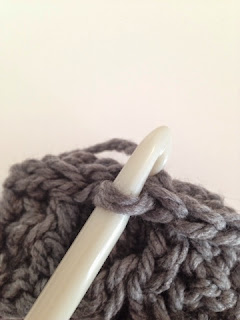
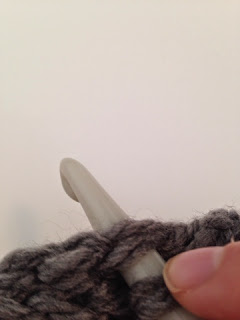
Row 6: Chain one, FPSC in every stitch across. Do not alternate like the PDC. This will give you that straight line. Join to the first FPSC when you reach that point.
THEN slip stitch to the DC made in row 5. The FPSC sit in front of those stitches making that pretty line. But you will want to crochet over the DC BEHIND the line made in Row 6. The slip stitch back just helps for a smoother transition.


Row 7: Chain 2, DC in each stitch across, slip stitch. (Remember this row is not done in the FPSC you did in the last row but the DC from Row 5)
Row 8: Chain one, FPSC across. Follow the same technique as in row 6.
Row 9: Chain 2, DC across, slip stitch.
Row 10: Chain one, FPSC across. Follow the same technique as in row 6.
Repeat Rows 2-10 twice more.
Then Repeat Rows 2-5.
Finish off and weave in ends (remember to leave that long tail to weave in between the few gaps of your seam!)
I would love to see any of your finished scarves! Post them to my Facebook page and show them off! And if you would like to see some of my inspiration follow me on Pinterest! Do you prefer Instagram? (So do I!)
I do not have a problem with individuals making and
selling items using this pattern. I do have a problem if you take my
photos and the credit:) No big deal, just use your own pictures and link
back to this page if you are selling online! Thanks so much!
Have any questions?? Please read the FAQ page HERE!
This pattern is influenced by an original copyrighted pattern by Bo Peep’s Bonnets. You can find the original pattern at https://www.etsy.com/listing/170787987/instant-download-knitting-pattern-the?ref=shop_home_active_4 You can also purchase the original product here –https://www.etsy.com/listing/169791485/huntress-cowl-hand-knit-cowl-infinity .


Loving the pattern! But one question, how many skeins of yarn did you use?
-vicky
she said she used 600 yards. So I guess that depends on how many yards your skein has 🙂
I am loving your pattern – so fun and easy, but…I am about halfway through and just now realized that it is twisting like an infinity scarf! Is that supposed to happen or did I do something wrong? Doh!
Well… haha it should not be twisting! Maybe when you connected the rows it got turned somehow? Wish I could be more helpful!
I normally have very tight tension and I used a little over 2 of the large (430 sone yards) of yarn for mine. I cut out a couple rows of FPDC and BPDC…one on accident and one to match, or I would have used a lot more yarn !!!
So, you said you cut out a row of fpdc and bpdc. Does the pattern call for two or three rows total of alternating back and forth? I was getting a little confused by that and wanted to make sure I was doing it correct.
Just finished making this and it took 11 skeins of Lionbrand Hometown USA in Houston Cream 6 super bulky with an N hook. It's hefty and so incredibly soft. I am busty and a bigger woman so I can to essentially double the inches of your suggestion. I did the first row of post stitches and remeasured. It turned out so beautifully. Can't wait to wear it! Thank you so much for sharing this pattern.
Thanks for posing this!! I am using the same yarn and the store only had 5 skiens. I will have to make sure that I go back and search for more now that I know it takes 11!! Thanks!
Sure 🙂 now remember, mine only took 11 skeins because I had to make it larger. 65 inches wasn't even close to wrap around my torso and neck.
Stuck on row 6 not exactly sure what I'm supposed to be doing? Any help???
Hey Anon, for row 6 you are front post single crocheting on every post around. Make sure to slip stitch twice at the end, once into your chain one from the beginning of this row, and again into the loop behind it, slightly to the left. Make sure for row 7 you double crochet across every loop that is behind the single crochet you just did, making a nice line.
Oooooo ok thank you now I get it lol thanks!
OMG thank you! I love this idea and thank you for making it FREE! Can't wait to make it!
Apparently I'm not the only one stuck on row 6 and the previous explanations are leaving still confused. I've done the FPSC that I understand but the slip stitch stuff is confusing. Any clarity would be appreciated greatly!
Slip Stitch to the first FPSC(does this mean slip stitch all the way around the FPSCs I just completed or just one single slip stitch?). THEN slip stitch to the back stitch(what is the back stitch? Is it the top of row 5 which appears to be behind row 6 or is there some unspoken crochet thing I don't know?). If you crochet on top of the line you just made, there will be no line. You must crochet in the back part!
I updated the pattern with some pictures and a little more detail. The slip stitch is just to join and then to crochet in the DC you made in row 5! I am new to this so I am sorry for the confusion! Hopefully that makes more sense for you!
Perfect thank you 🙂 I am still relearning all this 🙂 I'm sure it was fine for more experienced people but I'm not so much that LOL again Ty!
Would I be able to use 2 strands worsted weight instead of the chunky? (sorry, I'm new to crochet, but I LOVE this pattern!)
I don't see why not! I always feel like working with more than one strand is kind of a hassle, but it would work. To get the thickness I would recommend 3 strands or yours might not be the same size in the end:)
Sweet! Thanks :o)
i love it so much .. am working on in now
Dear Kali,
thanks so much for sharing the pattern for this wonderful cowl! I'm new to crocheting and somehow did manage to pull one off (funny enough, I did have no trouble to understand the working of row 6). But I really struggled with row 4 (and 5) and it would be so kind, if you could clarify: So, in row 3 we DC in the first and then the last stitch. In row 4 we chain 2 and then line up the FPDCs and BPDCs with the PDCs from row 3, without DC in the first and last stitch?
I didn't know what to do with these DCs from row 3, so I worked/incorporated them into the alternating of FPDCs and BPDCs. My pattern then looked like this:
Row 3: Chain 2, DC in first st, FPDC in second st, BPDC in third, (….) , BPDC, DC in last st, join.
Row 4: Chain 2, BPC in first stitch (which was the DC in row 3), FPDC in second st (for lining up with row 3), (…) BPDC, FPDC in last st (which also was a DC in row 3), join.
Was this the right way to work it? I'm still so confused about it, but would like to make another one for my mom…
Oh, and a final question: Is there a special reason for chaining only 2 before each row of DC, as DC "normally" calls for chaining 3?
Thanks again and lovely greetings from Berlin, Christin
I think that the way you did it was perfect! You could probably do away with the DC at the end but I just think it helps to connect. And if I felt that getting to the end would be a little wonky with the order of the PDCs then I added one. And I always use 2 chains, but that is just a personal preference. The fun thing with crocheting is that you can have your own little quirks and it (usually) turns out! So glad you enjoyed the pattern!
Thanks so much for your time and effort to go through all the comments to help! Your sweet reply leaves me with much more confidence now to start another one as a gift. Also, your comment about the chaining is a great help! Since I'm new to all of this, I am like "there must be a rule or special reason why I have to do it the way described". It is for sure relieving to hear, that crocheting leaves you space to find your own way. I will definitely keep your words in mind 🙂
I wish you all the best!
This is a beautiful pattern and I like that it is different to the original Katniss cowl. I am going to make one for my daughter. I am in UK and so am thinking of buying Drops Andes which is a super chunky. Is this suitable do you think? I am thinking 6 balls will do it. http://www.woolwarehouse.co.uk/drops-andes-light-grey-mix-9020-100g
Hazel, I think that would work wonderfully! Beautiful choice!
Love love love! I just finished mine and will never take it off!
I love to hear that! 🙂
Any chance you have a knitting pattern for this beauty?
The link at the end of my post goes to a gorgeous knit pattern that is similar to this. She gave me the inspiration for the long cowl and how to wrap it! Bo Peeps Bonnets, is the business name.
Thank you for the pattern! You're pictures look great! I just completed mine using Lion Brand Wool – Ease Thick and Quick ( size 6, super bulky ). I ended up making mine about 6 feet long instead of 5 because I'm not quite so petite. I also took out a few rows because I think my size 6 yarn was thicker than your size 6 yarn. It's about a foot wide. I think it looks really good but I don't know how to make it work (haha). I'm not sure if it is too long, or too short, or if I'm just doing something wrong. I got the hood ok and I was able to get the shawl just once but could NOT get the Katniss cowl. I tried it on half way through and it seemed to work but it just bunches up now. Do you have any more tips on how to put it on? I hope I don't have to take it out and remake it :- / ( though it works up pretty quick with the size of the yarn and hook ).
Thanks again!
Did you see the link to the youtube video? it is farther down the comments. Hope you get it figured out!
Hello, This is Ans from The Netherlands again. This is awesome. I had to try row 6 a couple of times, but if you follow exactly the pattern it will work. Thanks Ans
There is an instructional video on utube, by Bo Peep's Bonnets, that demonstrates exactly how to achieve the Katniss cowl look.
Following is the link to : "How to Wrap the Huntress Cowl" Bow Peep's Bonnets…
http://www.youtube.com/watch?v=hck21MYogW4
Hope this helps.
When the Late Elizabeth Zimmermann published her ingenious idea of knitting a Moebius , she gave already the instruction to knit it to 60 inch long.
See her book "Knitting Around " , School House Press , 1989, page 52 .
mirjam
http://www.fibersiv.net
Thank you for this! My daughter has wanted a Katniss cowl since we saw Catching Fire, but I hesitated because it would only be 'in' for a year or two. This way I can give her the Katniss cowl, but it can go beyond the trend and she can wear it for years!