Crochet Goat Pattern- a Free Pattern and Tutorial
Crochet Goat Pattern
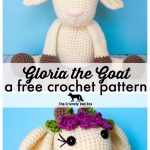
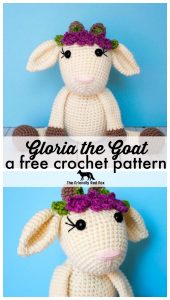
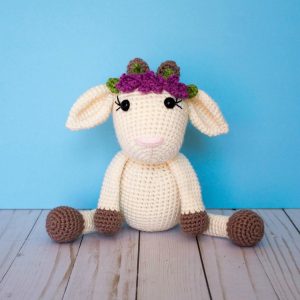
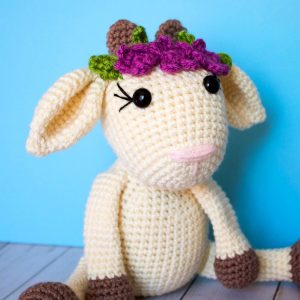
This sweet little crochet goat pattern is about 8 inches tall when sitting and about 4 inches wide. She is crocheted in parts and then put together. With her sweet face and floral crown, she is sure to be a favorite! Her pattern is relatively easy to follow, suitable for most beginners.
I enjoyed making this little girl! I went for a more cutesy version of a goat, but I also love this more realistic pattern from Planet June!
You can purchase the ad-free, printable PDF or you can scroll down for the free pattern.
If you enjoy the use of this free crochet goat pattern, please take a minute to follow me on Instagram and join my Friendly Crochet Club on Facebook! If you want to follow along, sign up for the Friendly Newsletter!
Gloria is the Letter G pattern in my Amigurumi A to Z series! See the other patterns in the series here. Also, take a minute and read my amigurumi tips and tricks post. It will help a lot with all the details and how to get your amigurumi goat just right!
Crochet Goat Pattern Materials and Abbreviations
This pattern is property of The Friendly Red Fox. Please note this pattern is only for PERSONAL USE. Please feel free to make as many items as you wish for yourself, or as gifts. You may sell items made with this pattern but PLEASE LINK BACK OR GIVE CREDIT TO ME AS DESIGNER. In no way can you share, reproduce, or sell this pattern. Please respect my rights as designer. Read through the entire pattern before you begin.
You will need:
About 100g Yarn Bee Soft and Sleek in Ivory (or suitable worsted weight substitute)
Small amount of brown accent color
12mm safety eyes
Stuffing
3.75mm hook
Needle for sewing
Stitch marker
Embroidery thread for eyelashes
Abbreviations
SC- single crochet
SC INC- single crochet increase (2 SC in each stitch)
INV DEC- Invisible decrease (put hook through the FRONT LOOP ONLY of two consecutive stitches [two loops on hook] Yarn over pull through both loops. [two loops on hook] Yarn over pull through two loops)
Magic Circle- Make a loop, leaving a long tail to work with. Insert hook in center of loop, yarn over and draw up a loop. Yarn over, pull through to make the first chain (this does not count as a stitch!). Continue to crochet over the loop and tail with the number of stitches called for. (If you need 6 SC, then crochet 6 SC inside the ring.) Pull the tail to close the circle.
Be sure to watch this video when you begin to attach them! This pattern is very similar to the one in the video, so it will be very helpful to watch!
Crochet Goat Pattern
Always move your stitch marker to the last stitch in the round. This pattern is worked in continuous rounds.
Head
Round 1: In a magic circle, 6 SC.
Round 2: SC INC in each around. (12)
Round 3: SC in first, SC INC in next. Repeat around. (18)
Round 4: SC in first 2, SC INC in next. Repeat around. (24)
Round 5: SC in first 3, SC INC in next. Repeat around. (30)
Round 6: SC in first 4, SC INC in next. Repeat around. (36)
Rounds 7-12: SC in each around. (36)
Round 13: SC in first 5, SC INC in next. Repeat around. (42)
Round 14: SC in first 6, SC INC in next. Repeat around. (48)
Round 15-18: SC in each around. (48)
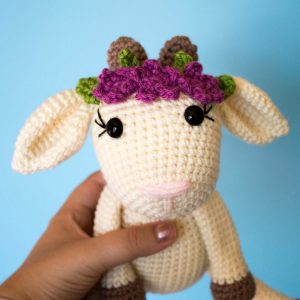
Attach the eyes between rows 14 and 15, 7 stitches apart. Begin to stuff here. Sew on any eyebrows or eyelashes with embroidery thread. Make the nose by using a long pink yarn and making multiple loops over 6 stitches on row 7. Insert the yarn in the same holes to keep it clean.
Round 19: SC in the first 6, INV DEC in the next. Repeat around. (42)
Round 20: SC in the first 5, INV DEC in the next. Repeat around. (36)
Round 21: SC in the first 4, INV DEC in the next. Repeat around. (30)
Round 22: SC in the first 3, INV DEC in the next. Repeat around. (24)
Round 23: SC in the first 2, INV DEC in the next. Repeat around. (18)
Round 24: SC in the first, INV DEC in the next. Repeat around. (12)
Round 25: INV DEC around. (6)
Fasten off and carefully sew the remaining hole closed.
Horns (using the brown)
Round 1: In a magic circle, 6 SC.
Round 2: SC INC in each around. (12)
Rounds 3-5: SC in each around. (12)
Fasten off and leave a long tail to sew on. I attached at the very top.
Ears (with the ivory)
Round 1: In a magic circle, 6 SC.
Round 2: SC in each around. (6)
Round 3: SC INC in each around. (12)
Round 4: SC in first, SC INC in next. Repeat around. (18)
Round 5: SC in the first 2, SC INC in next. Repeat around. (24)
Round 6: SC in the first 3, SC INC in next. Repeat around. (30)
Rounds 7-11: SC in each around. (30)
Round 12: SC in the first 3, INV DEC in the next. Repeat around. (24)
Round 13: SC in first 2, INV DEC in next. Repeat around. (18)
Round 14: SC in first, INV DEC in next. Repeat around. (12)
Round 15-16: SC in each around. (12)
Fasten off, leaving a tail to sew on the head. Pinch the bottom of the ear to make a little crease and sew a few stitches to hold the shape. I sewed them on about 5 rows out from the top circle. Sew them on a downward angle.
Body
Round 1: In a magic circle, 6 SC.
Round 2: SC INC in each around. (12)
Round 3: SC in first, SC INC in next. Repeat around. (18)
Round 4: SC in first 2, SC INC in next. Repeat around. (24)
Round 5: SC in first 3, SC INC in next. Repeat around. (30)
Round 6: SC in first 4, SC INC in next. Repeat around. (36)
Round 7: SC in first 5, SC INC in next. Repeat around. (42)
Round 8-20: SC in each around. (42)
Begin to stuff here.
Round 21: SC in the first 5, INV DEC in the next. Repeat around. (36)
Round 22: SC in each around. (36)
Round 23: SC in the first 4, INV DEC in the next. Repeat around. (30)
Round 24: SC in each around. (30)
Round 25: SC in the first 3, INV DEC in the next. Repeat around. (24)
Round 26: SC in the first 2, INV DEC in the next. Repeat around. (18)
Rounds 27-29: SC in each around (18)
Fasten off, leaving a long tail. This is what you will use to sew on the head. Attach the head by pinning it in place. The nose will hang off toward the front, while the back will be mostly attached. Sew around multiple times. Make sure the neck is firmly stuffed before you attach.
Legs (make 2)
*I only stuff the very bottom and very lightly. Then not at all through the top half.*
Using accent color:
Round 1: In a magic circle, 6 SC.
Round 2: SC INC in each around. (12)
Round 3: SC in first, SC INC in next. Repeat around. (18)
Round 4: SC in first 2, SC INC in next. Repeat around. (24)
Rounds 5-7: SC in each around. (24)
Round 8: SC in the first 2, INV DEC in the next. Repeat around. (18)
Round 9: SC in the first, INV DEC in the next. Repeat around. (12)
Change to ivory.
Rounds 10-25: SC in each around (12)
Fasten off and leave a long tail to sew onto the body. Attach them in the middle, about 7 rows from the very center.
Arms
*I only stuff the very bottom and very lightly. Then not at all through the top half.*
Using accent color:
Round 1: SC 6 in a magic ring.
Round 2: SC INC in each around. (12)
Round 3: SC in first, SC INC in the next. Repeat around. (18)
Rounds 4-6: SC in each around. (18)
Round 7: SC in first, INV DEC in the next. Repeat around. (12)
Change to ivory.
Rounds 8-23: SC in each around.(12)
Fasten off and leave a long tail to sew on the body. I sew them on rows 22- 26 angled slightly so that the arms are angled down toward the feet.
Flowers
In a magic circle SC 5. Slip stitch to the first stitch. *Chain 5. Slip stitch in the same stitch. Slip stitch over the next.* Repeat * * 4 more times for a total of 5 petals. I made three and sewed them in front between the ears.
If you want some greenery with the flowers, I made really simple “leaves” by chaining 7 and then HDC in each chain across, fastening off, and sewing to the head.

Hi! I have 3.5 and a 4mm hooks, but no 3.75. Can I size up or down and still be ok? I am a new at doing crochet so any advice is appreciated!
Hi! You’d be ok to size up or down – just depending on your tension. Sizing down will make your stitches smaller, sizing up will make them bigger!
Loved Gloria. And like how you explained instructions and noted what you did.
Thank you for sharing. Im still working on her but love how the head has turned out so far.
Thanks again.