Crochet Duck Pattern
Crochet Duck Pattern
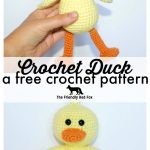
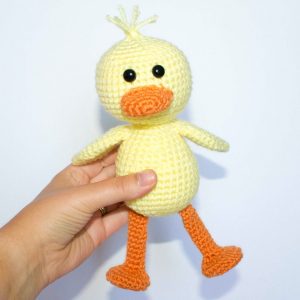
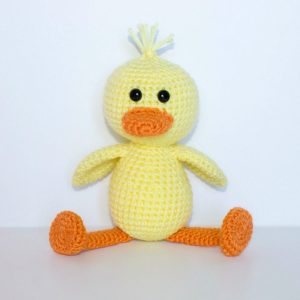
This crochet duck is about 5 inches tall (not including the legs.) The head and body are made in one piece, and the wings, legs, and beak are sewed on. This is a great beginner pattern.
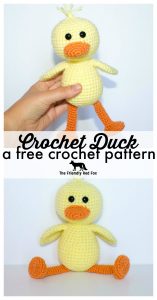
This little duck is the Letter “D” in my Amigurumi from A to Z series! Read this post to learn more and to see the other letters!
Andrew Duckwell Waddlington III is a very royal little duckling. His father, King Mallard, wants him to take a bigger interest in the Pond Politics, but Andrew (or Drew as he rather be called) enjoys riding the lily pads at the edge of the pond. He has quite a bit of time to grow into his Princeship, however. He is still a little duckling.
You can purchase the printable, ad-free PDF here or from Etsy. For the free pattern, please scroll down.
If you like what you see please follow me on Instagram, or join my Facebook Group!
Please note this pattern is only for PERSONAL USE. Please feel free to make as many
items as you wish for yourself, or as gifts. You may sell items made with this pattern but
PLEASE LINK BACK OR GIVE CREDIT TO ME AS DESIGNER. In no way can you
share, reproduce, or sell this pattern. Please respect my rights as designer, this pattern belongs to The Friendly Red Fox.
If you make Andrew (excuse me… Drew.) make sure to tag me @thefriendlyredfox and use the #friendlyatoz!
Crochet Duck Materials
You will need:
Approx 100 g size 4 yarn in Yellow and small amount in Orange
Crochet Hook in Size 3.75
Tapestry Needle
Polyfil
10.5mm safety eyes
stitch marker
Abbreviations
SC– single crochet
SC INC– single crochet increase (2 SC in each stitch)
INV DEC– Invisible decrease (put hook through the FRONT LOOP ONLY of two consecutive stitches [two loops on hook] Yarn over pull through both loops. [two loops on hook] Yarn over pull through two loops)
Magic Circle– Make a loop, leaving a long tail to work with. Insert hook in center of loop, yarn over and draw up a loop. Yarn over, pull through to make the first chain (this does not count as a stitch!). Continue to crochet over the loop and tail with the number of stitches called for. (If you need 6 SC, then crochet 6 SC inside the ring.) Pull the tail to close the circle.
Crochet Duck Pattern
Beak
Round 1: In a magic circle, 6 SC.
Round 2: SC INC in each around. (12)
Round 3: SC in first, SC INC in next. Repeat around. (18)
Round 4: SC in first 2, SC INC in next. Repeat around. (24)
Round 5: SC in each around (24)
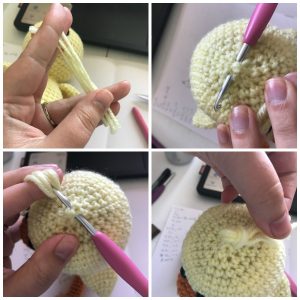
Fasten off and leave a long tail to sew on. Lightly stuff before attaching. Read this post for my tips on how to attach the beak.
Body and Head
With main color:
Round 1: In a magic circle, 6 SC.
Round 2: SC INC in each around. (12)
Round 3: SC in first, SC INC in next. Repeat around. (18)
Round 4: SC in first 2, SC INC in next. Repeat around. (24)
Round 5: SC in first 3, SC INC in next. Repeat around. (30)
Round 6: SC in first 4, SC INC in next. Repeat around. (36)
Rounds 7-13: SC in each around. (36)
Round 14: SC in first 4, INV DEC in the next. Repeat around. (30)
Rounds 15-16: SC in each around. (30)
Begin stuffing here.
Round 17: SC in first 3, INV DEC in the next. Repeat around. (24)
Rounds 18-19: SC in each around. (24)
Round 20: SC in first 2, INV DEC in the next. Repeat around. (18)
Round 21: SC in the first, INV DEC in the next. Repeat around. (12)
From here we are increasing the head.
Round 22: SC in first, SC INC in next. Repeat around. (18)
Round 23: SC in first 2, SC INC in next. Repeat around. (24)
Round 24: SC in first 3, SC INC in next. Repeat around. (30)
Round 25: SC in first 4, SC INC in next. Repeat around. (36)
Round 26: SC in first 5, SC INC in next. Repeat around. (42)
Rounds 27-36: SC in each around. (42)
Sew the beak on between rows 29 and 32. Attach the eyes between rows 34 and 35, about 3 stitches apart.
Round 37: SC in the first 5, INV DEC in the next. Repeat around. (36)
Round 38: SC in the first 4, INV DEC in the next. Repeat around. (30)
Round 39: SC in the first 3, INV DEC in the next. Repeat around. (24)
Round 40: SC in the first 2, INV DEC in the next. Repeat around. (18)
Round 41: SC in the first, INV DEC in the next. Repeat around. (12)
Round 42: INV DEC around. (6)
Fasten off and carefully sew the remaining hole closed.
Wings (make 2)
Round 1: In a magic circle, 6 SC.
Round 2: SC in each around. (6)
Round 3: SC INC in each around. (12)
Round 4: SC in each around. (12)
Round 5: SC in first, SC INC in next. Repeat around. (18)
Rounds 6-10: SC in each around. (18)
Round 11: SC in the first, SC INV DEC in the next, repeat around. (12)
Round 12: SC in each around. (12)
Fasten off and leave a long tail to sew on. I attached them between rows 18 and 19.
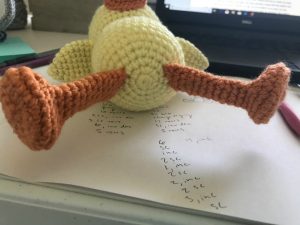
Legs (make 2)
Using the orange yarn:
Round 1: In a magic circle, 6 SC.
Round 2: SC INC in each around. (12)
Round 3: SC in first, SC INC in next. Repeat around. (18)
Round 4: SC in first 2, SC INC in next. Repeat around. (24)
Rounds 5-6: SC in each around. (24)
Round 7: INV DEC 10 times. SC in the remaining 4. (14)
Round 8: INV DEC 5 times. SC in the remaining 3. (9)
Rounds 9-19: SC in each around. (9)
Fasten off and leave a long tail to sew on. I attached them angled slightly on row 4 of the body.
Duck Fuzz
Cut two pieces of yarn about 6 inches long. Insert the hook through one of the stitches at the top of the head. Loop the yarn in half. Use your hook to pull it through at the halfway point, but not all the way. Go under the loop and pull the ends back through. Pull the ends tight.
If you liked this duck pattern, make sure to check out these other Free Crochet Duck Patterns!