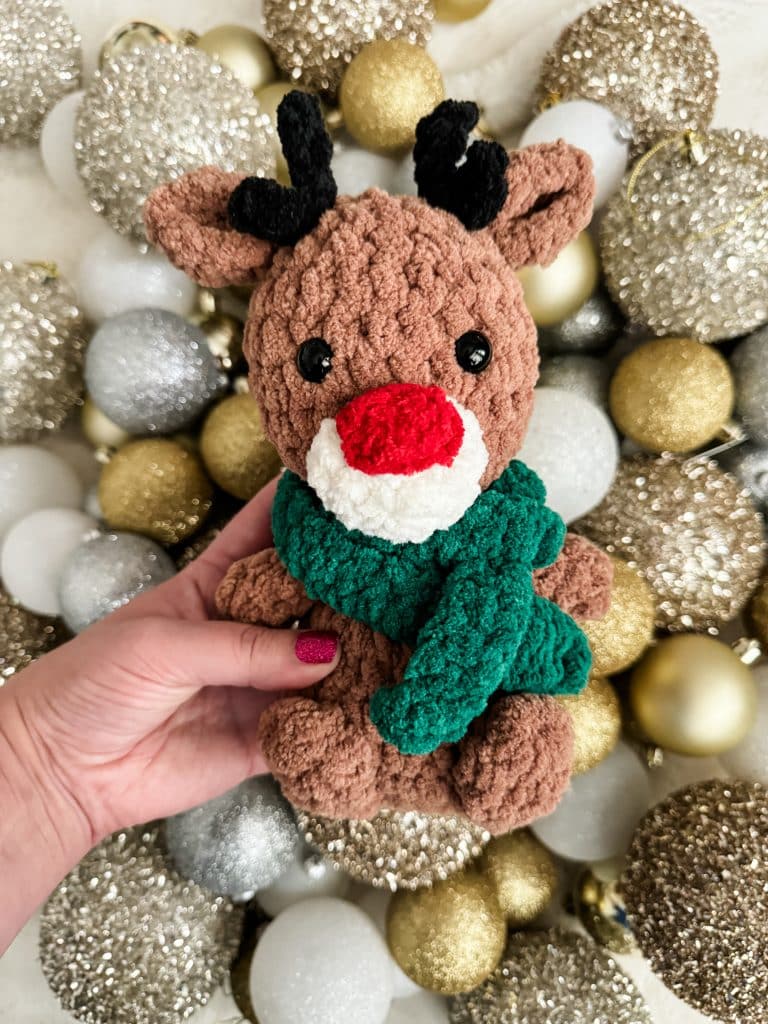
Free Chubby Moose and Reindeer Crochet Pattern
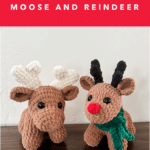
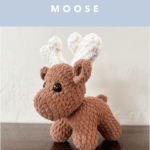
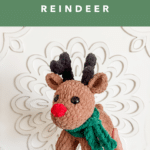
This free crochet moose and reindeer pattern is extra cuddly and a great size! Standing on four legs, this reindeer works up surprisingly quickly with the plush yarn.

Free Chubby Moose and Reindeer Crochet Pattern Notes
This free Chubby Moose and Reindeer crochet pattern is extra cuddly but works up so quickly compared to “traditional” yarn. They’re about 8 inches tall! This is a fun shape, standing on all fours. If the legs intimidate you, don’t worry! I have A LOT of videos to help you out with making it.
There are two different heads of the chubby moose and reindeer, but just one body – so you can have double the fun in one pattern! You can also make a longer shelf-sitting version of either the moose or the reindeer. Their long dangly legs are the polar opposite of these cute chubby ones!
This is the same chubby body from my Mix-and-Make series. I have a lion version here and a unicorn version here! I also have smaller versions of the moose and reindeer in my Squishy series! (I guess I just like moose and reindeer- ok?!)
You can choose to work with different yarn for this chubby moose and reindeer crochet pattern, just keep in mind that although many yarns are classified the same, they can work up much differently.
If you’re looking for more holiday patterns, I have a whole collection here!
JOIN MY NEWSLETTER TO RECEIVE…
A free email course-Amigurumi 101
This free amigurumi email course gives you what you need to master the basics of amigurumi, along with some extra tips and tricks!


Ad-free, Printable PDF Full Pattern
My patterns are free on my website, but if your prefer a printable copy, you can find them in my shop!

Chubby Moose & Reindeer Pattern
$6

Plush Moose and Reindeer Pattern
$6
Squishy Reindeer Pattern
$9
Free Chubby Moose and Reindeer Crochet Pattern Materials
To get started making this free crochet chubby moose or reindeer pattern, you’ll want to gather all your materials first.
You will need:
- 150g Premier Basix Chenille in Caramel
- 20g Premier Basix Chenille in Winter White or Black (white for the moose, black for the reindeer)
- Small amount of Premier Basix Chenille in Poppy for Reindeer nose
- Small amount for scarf, if you choose
- 12mm safety eyes
- Crochet Hook in Size 4.5mm
- Tapestry Needle
- Polyfil
- stitch marker

Notes:
This chubby moose and reindeer body is made from the feet up. You will make two feet, fastening off one and then attaching them together from the second one. Then once you have two pairs of feet, you will attach those to create the standing chubby body.
The head will be sewn on at the end. I highly recommend using “ami sticks” or even a knitting needle to help you position the head. You can choose between the moose or the reindeer head – they both work for this pattern!
When made with the recommended yarn, this standing chubby moose or reindeer is about 8 inches tall.
You can use safety eyes or try out embroidered eyes so it would be safe for a baby/toddler.
I have a collection of embroidery videos here.
Substitute yarns could be regular Bernat Blanket, Premier Basix Chenille yarn or Big Twist from Joann’s. You may need to change the hook size if you change the yarn.
Chubby Moose and Reindeer Crochet Pattern
**Moose Head**
Head
Starting with the snout in the caramel color:
Round 1: In a magic circle, SC 8.
Round 2: SC INC in each around. (16)
Round 3: SC in the first, INC in the next. Repeat around. (24)
Round 4: SC in the first two, INC in the next. Repeat around (32)
Round 5: SC in the first two, INV DEC in the next. Repeat around. (24)
Round 6-7: SC in each around. (24) *2 rounds*
Round 8: SC in the first 16. INC in the remaining 8. (32)
Round 9: SC in the first 16. *SC in the first, INC* 8x. (40)
Rounds 10-12: SC in each around. (40) *3 rounds*
Insert eyes on round 9, using the 8 INC of round 8 to help center them. There should be about 6 stitches between the eyes.
Round 13: *SC in the first 3, INV DEC*. Repeat around. (32)
Round 14: *SC in the first 2, INV DEC*. Repeat around. (24)
Begin to stuff here, and continue to stuff as you close.
Round 15: SC in the first, INV DEC (16)
Round 16: INV DEC (8)
Fasten off and sew the remaining hole closed.
Ears (make 2)
In Caramel:
Row 1: In a magic circle, SC 8. Ch 1 and turn (8)
Row 2: SC INC in each around. (16)
Row 3: Chain 1 and turn. SC 8x. Chain 2, pulling tightly each time. SC in the remaining 8 stitches. (18)
Fasten off with a long tail. Bringing the ends together, there will be a slight bowl shape. Using one of the ends, sew this together with a few stitches. Weave the end back to the end so you can sew it on the head. Attach the ears around round 12, lined up slightly outside the eyes and so that they face directly out.


Moose Antlers (make 2)
DO NOT STUFF. In winter white:
Make 2:
Round 1: SC 10 in a magic circle.
Rounds 2-8: SC in each around. (10) *7 rounds*
Round 9: SC in the first, INV DEC in the next. Repeat around. (7)
Fasten off with a long tail.
Make 2:
Round 1: SC 8 in a magic circle.
Rounds 2-3: SC in each around. (8)
Fasten off and leave a long tail. Sew this piece on the flat end of the first, longer piece along rounds 4-6.
Attach them behind and inside the ears.


Your Moose Head is done! Click here to go finish the Body!
**Reindeer Head**
Head
Starting with the snout in caramel color:
Round 1: In a magic circle, SC 6.
Round 2: SC INC in each around. (12)
Round 3: SC in the first, INC in the next. Repeat around. (18)
Round 4: SC in the first 2, INC in the next. Repeat around. (24)
Rounds 5: SC in each around.
Round 6: INC in the next 6 stitches. SC in the remaining 18. (30)
Round 7: SC in the first, INC in the next. Repeat for a total of 6 times. SC in the remaining 18. (36)
Rounds 8-10: SC in each around. (36) *3 rounds*
Round 11: SC in the first 4, INV DEC in the next. Repeat around. (30)
Round 12: SC in each around. (30)
Add safety eyes between rows 6 and 7 about 6 stitches apart. These are the rows that go up from the snout to form the forehead. Center them using the increases.
Round 13: SC in the first 3, INV DEC in the next. Repeat around. (24)
Round 14: SC in the first 2, INV DEC in the next. Repeat around. (18)
Begin to stuff here. Continue stuffing to the end.
Round 15: SC in the first, INV DEC in the next. Repeat around. (12)
Round 16: INV DEC in each around. (6)
Sew the remaining hole closed.
Nose
In Red:
Round 1: SC 8 in a magic circle.
Round 2: SC in each around. (8)
Fasten off and leave a long tail. Using a needle, do an invisible decrease in each stitch around. This will be similar to using a hook, but is easier to do with the small stitches and blanket yarn. Go through the front loop of two stitches and lightly pull. Once you finish, pull tightly. You will sew this on the very front of the reindeers nose, slightly on top around rounds 1-3. Center between the eyes.
Ears (make 2)
In Caramel:
Row 1: In a magic circle, SC 8. DO NOT CLOSE. (8)
Row 2: SC INC in each around. (16)
Row 3: Chain 1 and turn. SC 8x. Chain 2, pulling tightly each time. SC in the remaining 8 stitches. (18)
Fasten off with a long tail. Bringing the ends together, there will be a slight bowl shape. Using one of the ends, sew this together with a few stitches. Weave the end back to the end so you can sew it on the head. Sew them on around rounds 11 and 12 so that they go upwards. Line the ears up to be just outside the eyes.
Reindeer Antlers (make 2)
DO NOT STUFF. In black:
Make 2:
Round 1: SC 6 in a magic circle.
Rounds 2-7: SC in each around. (6)
Fasten off with a long tail.
Make 2:
Round 1: SC 6 in a magic circle.
Rounds 2-3: SC in each around. (6)
Fasten off and leave a long tail. Sew this piece on the flat end of the first, longer piece along rounds 3-5.
Attach them inside the ears, on top of the head.

Scarf
The type of yarn will make a big difference. Chain to the desired length. Turning, HDC in each chain back to the beginning. Weave in the ends and wrap it around the neck. Tack in the back if you want to secure. Otherwise, leave as a removable accessory! I chained 70, used a 6mm hook, and the same blanket yarn as the rest of the pattern.
Your Reindeer Head is done! Click here to go finish the Body
**Moose and Reindeer Chubby Body Pattern**
Legs (make 4 in total):
In Caramel:
Make 2 of these. These are Legs “A”
Round 1: 8 SC in a magic circle.
Round 2: INC in each around. (16)
Round 3-6: SC in each around. (16)
Fasten off and set aside.
Make 2 of these. These are Legs “B”
Round 1: 8 SC in a magic circle.
Round 2: INC in each around. (16)
Round 3-6: SC in each around. (16)
Round 7: SC in the next 8. Take off your stitch marker. Chain 2 and attach to one of the finished legs “A.” SC in each stitch around the Leg A (16). SC in each chain across. (2) SC in each stitch around the Leg B. (16) SC on the other side of the chains (2). (36) Put stitch marker on here.
Round 8: SC in each stitch around both legs. (36) SC in the next 6 and fasten off. Move on to the next pair.
You can see the entire process here!

(Body cont’d):
2nd Set of Legs:
You can find a video tutorial for this part here.
Follow the same steps as the first pair of legs, but do not fasten off.
Chain 1 and turn. SC in the next 14. This is the “belly” between the sets of legs.
Line up the legs so that each side of 14 touch. Chain one. SC through both sets of stitches to connect them.
It can be helpful to use stitch markers on both pairs of legs. Count 14 stitches back from where you fastened off on the first pair. There should be 14 stitches on one side, and 22 around the front.


(Body cont’d):
Round 9: Chain 1. SC 3x in the gap between the sets of legs. SC in the 22 stitches around the legs until you reach the next gap. SC 3x in the gap. SC in the remaining 22 stitches. (50)

(Body cont’d):
Round 10: SC in each around. (50)
Round 11: SC in the first 3. INV DEC in the next. Repeat this pattern all the way around. (40)
Round 12: SC in the first 2. INV DEC in the next. Repeat this pattern all the way around. (30)
Begin to stuff here, making sure you get the feet well. Then continue to stuff the body as you close.
Round 13: SC in the first, INV DEC in the next. Repeat this pattern all the way around. (20)
Round 14: SC in the first 2, INV DEC in the next. Repeat this pattern all the way around. (15)
Fasten off leaving a piece long enough to sew the top hole closed and attach the head.
Pinch the hole closed so that you can sew it closed in a line. Make sure you stuff before you completely sew it shut, so you can get the top “gaps.”

Attaching the Head to the Body
When you attach the head, you will angle it on the edge. The tip of the nose will hang over the edge and you will attach it by using the long end from sewing the remaining hole closed. You will use about 4 rows of the head to be flat on the top edge of the body.
I used knitting needles with silicone beads on the ends to keep the head in place. You could also use Ami Stix. You can see a video tutorial here!


Tail
In a magic circle, SC 8. Close the circle, but do not continue in the round.
Chain 1 and turn. INC 4x. Chain 2, pulling tightly each time. INC in the remaining 4 stitches.
Fasten on the back end, with the edges slightly splayed so it is more flat.


Want the Ad-free, Printable PDF?
You can find it in one of my stores!

Did you make this pattern?
Mention me @thefriendlyredfox so I can see your Chubby Moose and Reindeer Crochet Pattern creations! You can also leave a comment below!