Free Plush Flamingo Crochet Pattern
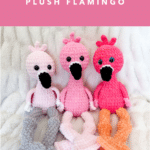
Ready to crochet something adorable? This free plush flamingo crochet pattern makes the perfect huggable companion!

Free Plush Flamingo Crochet Pattern Notes
If you’re looking for a fun and beginner-friendly crochet project, this plush flamingo pattern is just the thing! This design is based on my original Friendly Flamingo but uses soft, squishy blanket yarn for an extra huggable feel. With its long legs, feathery wings, and playful personality, this flamingo is a great introduction to amigurumi while still being a fun, satisfying make for more experienced crocheters.
This project has a mix of simple shaping and just the right amount of sewing to bring everything together. Whether you’re making one for a gift, a nursery, or just because you need a little more pink in your life, this plush flamingo is sure to stand out.
So grab your hook and some blanket yarn, and let’s make a flamingo! Whether you go for classic pink or something totally unexpected, I can’t wait to see your creations.
JOIN MY NEWSLETTER TO RECEIVE…
A free email course-Amigurumi 101
This free amigurumi email course gives you what you need to master the basics of amigurumi, along with some extra tips and tricks!

Ad-free, Printable PDF
My patterns are free on my website, but you can find them in my shop if you prefer a printable copy!

Plush Flamingo Pattern
$6

Friendly Flamingo Pattern
$6

Plush Mermaid Pattern
$6
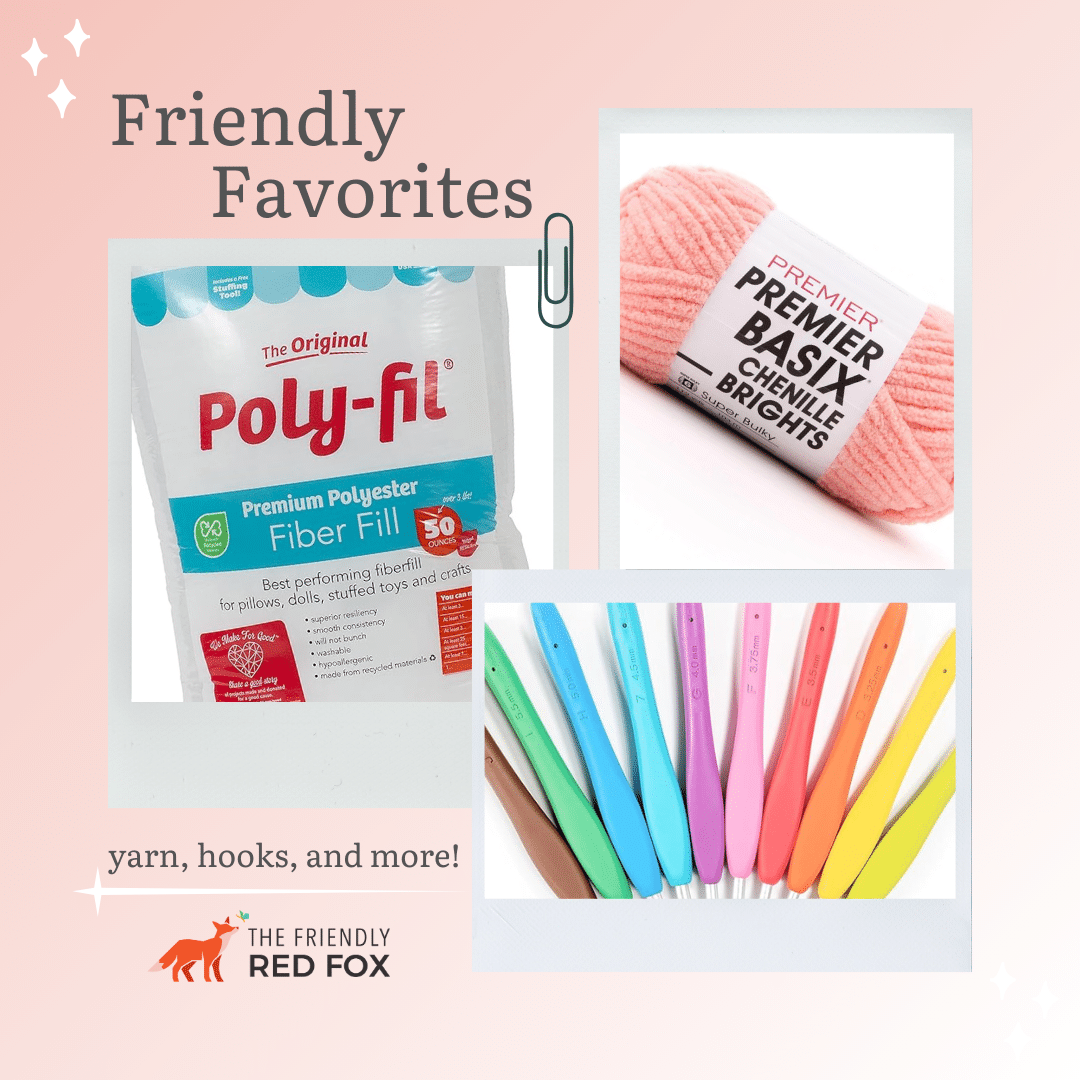
Materials you’ll need
To get started making this free flamingo crochet pattern, you’ll want to gather all your materials first.
You will need:
- 85g Bernat Baby Blanket in Baby Pink for main color
- 60g Premier Basix Chenille in Bubblegum for Legs
- 20g Accent color for wings and feathers
- Small amount of plush yarn in black
- small amount of plush yarn in white
- 15mm Safety eyes
- Stuffing
- 4.5mm crochet hook (or hook size that keeps stitches tight and feels comfortable)
- Needle
- Stitch marker

Important Notes:
I used blanket yarn for this pattern, a size 6 weight. I typically use Premier Basix Chenille, Bernat Blanket and Bernat Baby Blanket. I think these are interchangeable size wise. I use a 4.5mm hook which is much smaller than the recommended size on the label, but I want nice, tight stitches for this type of pattern. If this is too tight for you, size up a hook size until you can crochet comfortably but still have tight stitches.
Please be aware that even though the label may say it is size 6, some materials and brands work up much differently. Keep that in mind as you are choosing your yarn.
I also made one in Big Twist Posh, it is shown in some of the pictures. For this yarn, I used a 4mm hook. Unfortunately, this yarn may not be readily available once Joann goes out of business.
I used the colors/brands:
- Big Twist Posh in Strawberry Glow and Strawberry Shortcake
- Bernat Blanket Yarn in gray
- Bernat Baby Blanket in Baby Pink
- Bernat Blanket Dappled in Apricot
- Premier Basix Chenille in Bubblegum
- Premier Basix Chenille in Hibiscus
You can use safety eyes or try out embroidered eyes so it would be safe for a baby/toddler. I have a collection of embroidery videos here.
Free Plush Flamingo Crochet Pattern
Neck Strengthener
In a magic circle, SC 7. SC in each around for a total of 7 rows. Fasten off and leave a long tail. You will need this before you stuff the head.
Body/Head
With main color
Round 1: In a magic circle, SC 8.
Round 2: SC INC in each around. (16)
Round 3: SC in the first, SC INC in the next. Repeat around. (24)
Round 4: SC in the first 2, SC INC in the next. Repeat around. (32)
Rounds 5-8: SC in each around. (32) *4 rounds*
Round 9: SC in the first 2, INV DEC in the next. Repeat around. (24)
Rounds 10-11: SC in each around. (24) *2 rounds*
Begin to stuff here.
Round 12: SC in the first, INV DEC in the next. Repeat around. (16)
Round 13-14: SC in each around. (16) *2 rounds*
Round 15: INV DEC in each around. (8)
Rounds 16-18: SC in each around. (8) *3 rounds*
Make sure you stuff as well as you can; it will be very hard to stuff the body from here on out.
Round 19: In the front loop only, SC INC in each around. (16)
Round 20: SC in the first, SC INC in the next. Repeat around. (24)
Round 21: SC in the first 2, SC INC in the next. Repeat around. (32)
Insert the neck strengthener here. See this video on how to make your head round!
Rounds 22-26: SC in each around. (32) *5 rounds*
Insert eyes between between rounds 24-25.
Round 27: SC in the first 2, INV DEC in the next. Repeat around. (24)
Round 28: SC in each around. (24)
Begin to stuff the head here, continue to stuff until you close.
Round 29: SC in the first, INV DEC in the next. Repeat around. (16)
Round 30: INV DEC in each around. (8)
Fasten off and weave in the end.
Beak
Beginning in black.
Round 1: In a magic circle, SC 6.
Round 2: SC in each around. (6)
Round 3: SC in the first, SC INC in the next. Repeat around. (9)
Round 4-5: SC in each around. (9)
Change to white.
Round 6: SC in the first 2, SC INC in the next. Repeat around. (12)
Fasten off and leave a long tail to sew on. Sew the beak on rounds 21-23, centered between the eyes.

Tuft of Hair
Chain 5, turn and SC in the 4 chains back toward the beginning.
Chain 5 again, turn and SC in the remaining 4. Repeat for a total of 3.
Fasten off and sew in the center of the head.

Wings (make 2)
These wings are made in a “U” or rainbow shape. If you are experiencing bunching or curling, try relaxing your tension, or going up a hook size.
When making your first chain, leave a long enough tail that you can weave it in, about 5 inches.
Row 1: Chain 6.
Row 2: Turn, and in the second chain from the hook, SC. SC in the remaining 4 chains. (a total of 5 SC)
Row 3: Chain 1 and turn. SC 5 across. SC 3x in the gap between the rows. Then in the other side of the chains, SC 5x. (13)
Row 4: Chain 1 and turn. SC in the first 5. (INC, SC, INC) in the next 3 stitches. SC in the remaining 5. (15)
Row 5: Chain 1 and turn. SC 7 across. SC INC. SC in the remaining 7. (16)
Fasten off and leave a really long tail (about 12 inches)
Weave in the tail from starting the the chains and trim the end. Weave the 12 inch tail up to the top of the wing. This is what you will use to sew the wing onto the body. See video here.

Wing Feathers
Attach the feather color to the side of the of the wing. Chain 7x. Slip stitch to the wing, so that the chains make a loop. Chain 7 more times and slip stitch near the last slip stitch. Now you will have two loops. Continue across the entire bottom of the wing, for a total of 5 loops. Fasten off and weave the end through the bottom stitches. Tie off and weave the remaining ends through. Trim the ends.
Attach the wings on either side of the body, right around rounds 10-11.

Legs (make 2)
*These legs are not stuffed.*
Leaving a long tail (about 8 inches.) This is what you will use to sew the leg onto the body.
Round 1: SC 8 in magic circle. (8)
Rounds 2-9: SC in each around. (8) *8 rounds*
Round 10: SC INC in each around. (16)
Round 11: SC in each around. (16)
Round 12: INV DEC in each around. (8)
Rounds 13-20: SC in each around. (8) *8 rounds*
Round 21: SC INC in each around. (16)
Round 22: SC in the first, SC INC in the next. Repeat around. (24)
Rounds 23-24: SC in each around. (24) *2 rounds*
Round 25: SC in the first 12 and follow the rest of the instructions below.
Flatten the end of the feet, like a sandwich. Take your hook and go through both sides of the foot-through two layers. SC as normal. Repeat, going through each stitch across.
This seals off the foot. Fasten off and weave in the end.
Attach the legs to round 5.

Tail Feathers
The feathers will be attached to the back. You can center them by using the two wings. On round five, you will attach the accent color by going around the post of one of the stitches. Chain 7 times. Then you will attach it with a slip stitch around the post of the next stitch over on the flamingo. You will repeat this for a total of 7 loops. Fasten off and weave in the ends.
Right above those feathers, you will use the main body color for another row of feathers. Start just outside the first feather of the bottom row. Follow the pattern for the first row, but this row will have 9 total loops.


Want the Ad-free, Printable PDF?
You can find it in one of my stores!

Did you make this pattern?
Mention me @thefriendlyredfox so I can see your Plush Flamingo Crochet Pattern creations! You can also leave a comment below!
Hi, sorry to bother you. Is there an error on the beak stitch count? Should it be 6, then 9 and last 12?
Yes- thank you!