Free Flamingo Crochet Pattern
If you’re looking for a fun and beginner-friendly crochet project, this free flamingo crochet pattern is just the thing!

Free Flamingo Crochet Pattern Notes
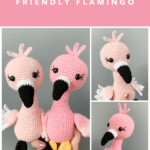
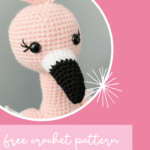
If you’re looking for a fun and beginner-friendly crochet project, this free flamingo pattern is just the thing! Originally featured in my Beginner’s Friendly Guide to Amigurumi, this little pink bird is simple to make and full of personality. With its long legs, curved neck, and cute little beak, it’s a great introduction to amigurumi while still being a satisfying make for more experienced crocheters.
This pattern uses worsted weight yarn, so it’s an easy, accessible project that works up quickly. Whether you’re making one as a gift, adding a new friend to your collection, or creating a whole flock, this flamingo is sure to be a favorite. Plus, the simple construction means less sewing and more crocheting—always a win in my book!
So grab your yarn and hook, and let’s make a flamingo amigurumi! Whether you go for the classic pink or mix it up with fun colors, I can’t wait to see your creations.
JOIN MY NEWSLETTER TO RECEIVE…
A free email course-Amigurumi 101
This free amigurumi email course gives you what you need to master the basics of amigurumi, along with some extra tips and tricks!

Ad-free, Printable PDF
My pattern’s are free on my website, but if your prefer a printable copy, you can find them in my shop!
Friendly Flamingo Pattern
$6

No-Sew Love Bug Pattern
$6

Plush Ballerina Crochet Pattern
$6
Materials you’ll need
To get started making this free flamingo crochet pattern, you’ll want to gather all your materials first.
You will need:
- About 100g I love this Yarn in Pink (or suitable worsted weight substitute)
- Accent color for wings
- Small amount of black for beak
- About 50g color for legs
- 12mm safety eyes
- Stuffing
- F hook (3.75mm)
- Needle
- Stitch marker
- Embroidery thread for eyelashes

Notes:
This free flamingo crochet pattern is the sweetest bird, with adorable eyelashes and the daintiest wing feathers! Her body and head are made in one piece from bottom to top and then all the details are attached at the end.
Suitable yarns could be Big Twist from Joann’s, or Red Heart Super Saver. You may need to change the hook size if you change the yarn.
You can use safety eyes or try out embroidered eyes so it would be safe for a baby/toddler. I have a collection of embroidery videos here.
Free Flamingo Crochet Pattern
Beak
Starting with black
Round 1: In a magic circle, 6 SC.
Round 2: SC in each around.
Round 3: SC in first, SC INC in next. Repeat around.(9)
Round 4-5: SC in each around. (9)
Round 6: SC in first 2, SC INC in next. Repeat around. (12)
Round 7-8: SC in each around. (12)
Round 9: SC in first 3, SC INC in the next. Repeat around. (15)
Change to white.
Rounds 10-12: SC in each around. (15)
Fasten off, leaving a long tail to sew on.
Body/Head
With main color
Round 1: In a magic circle, 6 SC.
Round 2: SC INC in each around. (12)
Round 3: SC in first, SC INC in next. Repeat around. (18)
Round 4: SC in first 2, SC INC in next. Repeat around. (24)
Round 5: SC in first 3, SC INC in next. Repeat around. (30)
Round 6: SC in first 4, SC INC in next. Repeat around. (36)
Round 7: SC in first 5, SC INC in next. Repeat around. (42)
Rounds 8-13: SC in each around. (42)
Round 14: SC in first 5, INV DEC in the next. Repeat around. (36)
Rounds 15-16: SC in each around. (36)
Round 17: SC in first 4, INV DEC in the next. Repeat around. (30)
Rounds 18-19: SC in each around. (30)
Begin stuffing here.
Round 20: SC in first 3, INV DEC in the next. Repeat around. (24)
Rounds 21-22: SC in each around. (24)
Round 23: SC in first 2, INV DEC in the next. Repeat around. (18)
Rounds 24-32: SC in each around. (18)
From here we are increasing the head.
Round 33: SC in first 2, SC INC in next. Repeat around. (24)
Round 34: SC in first 3, SC INC in next. Repeat around. (30)
Round 35: SC in first 4, SC INC in next. Repeat around. (36)
Round 36: SC in first 5, SC INC in next. Repeat around. (42)
Round 37: SC in first 6, SC INC in next. Repeat around. (48)
Rounds 38-47: SC in each around. (48)
Place eyes between rows 42 and 43, eight stitches apart. Sew on eyelashes here if you want. (I like to do it before I put the back of the safety eyes on!) Using 3 strands of the embroidery thread, come up right behind the safety eye and use your stitches like a grid to line them up evenly. Repeat on both sides. Attach the nose so it is centered between the eyes, about one row below the eyes. Make sure the neck is firmly stuffed. Begin stuffing the head.

Round 48: SC in the first 6, INV DEC in the next. Repeat around. (42)
Round 49: SC in the first 5, INV DEC in the next. Repeat around. (36)
Round 50: SC in the first 4, INV DEC in the next. Repeat around. (30)
Round 51: SC in the first 3, INV DEC in the next. Repeat around. (24)
Round 52: SC in the first 2, INV DEC in the next. Repeat around. (18)|
Round 53: SC in the first, INV DEC in the next. Repeat around. (12)
Round 54: INV DEC around. (6)
Fasten off and carefully sew the remaining hole closed. Weave in the end.
Wings (Make 2)
**Start your magic circle, leaving a longer end than normal. This is what you will use to attach the wing to the body.**
Round 1: In a magic circle, 6 SC.
Round 2: SC INC in each around. (12)
Round 3: SC in first, SC INC in next. Repeat around. (18)
Round 4: SC in first 2, SC INC in next. Repeat around. (24)
Rounds 5-7: SC in each around. (24)
Change to white.
Round 8: SC in each around. (24)
– Flatten the wing and put your hook through the touching stitches.
– Slip stitch. Chain 7.
– In the second chain from your hook, slip stitch.
– Slip stitch down the remaining chains for a total of 6 stitches.
– Slip stitch in the next spot, again taking care that you go through both sides of the wing.
Repeat to the end. This is the fringey, feathery look! Sew the top of the wing on row 18. Double-check that both wings are even.

Legs (make 2)
**Start your magic circle, leaving a longer end than normal. This is what you will use to attach the leg to the body. Do not stuff the legs.**
Round 1: In a magic circle, 6 SC.
Round 2: SC INC in each around. (12)
Rounds 3-22: SC in each around. (12)
Round 23: SC in first, SC INC in next. Repeat around. (18)
Round 24: SC in first 2, SC INC in next. Repeat around. (24)
Rounds 25-28: SC in each around. (24)
Flatten the end of the feet, like a sandwich.
Take your hook and go through both sides of the foot-through two layers. SC as normal. (12)
Repeat, going through each stitch across.
This seals of the foot. Fasten off and weave in the end.
Attach to the front of the body, between rows 5 and 6, about 6 stitches apart.

Hair Feathers
Chain 7. Slip stitch in the second chain from hook and in each across (for a total of 6). Repeat 2x. Sew on top of the head.


Want the Ad-free, Printable PDF?
You can find it in one of my stores!

Did you make this pattern?
Mention me @thefriendlyredfox so I can see your Friendly Flamingo Crochet Pattern creations! You can also leave a comment below!