Crochet Teddy Bear- a free pattern
Crochet Teddy Bear Information
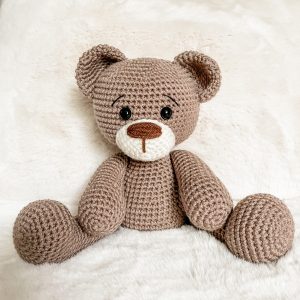
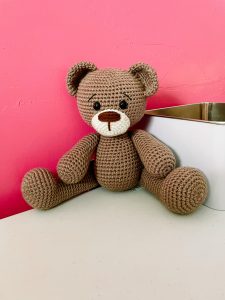
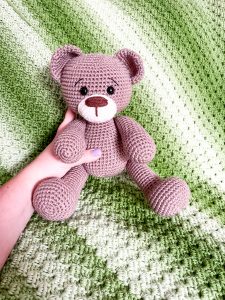
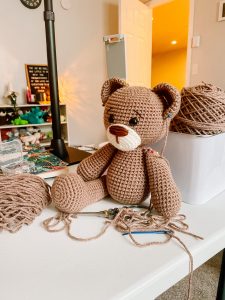
This classic crochet teddy bear pattern is about 9 inches tall sitting and the perfect size for pretty much any age if you are looking to gift this sweet little teddy bear. I love his expressive little face and how perfectly cuddly he is! This is a great pattern for advanced beginners, but even a determined beginner can make this work. This teddy bear is made to sit as a decoration or become a beloved crochet teddy bear toy.
If you like teddy bears, be sure to check out my other bear pattern. I have a couple other “classic” toy patterns. I love this little monkey and my little doll pattern, Molly.
As with all my patterns, if you want to support me as the designer and get the ad-free, printable PDF you can find it on Etsy or in my Ravelry Shop.
Please note this pattern is only for PERSONAL USE. Please feel free to make as many
items as you wish for yourself, or as gifts. You may sell items made with this pattern but
PLEASE LINK BACK OR GIVE CREDIT TO ME AS DESIGNER. In no way can you
share, reproduce, or sell this pattern. Please respect my rights as designer, this pattern belongs to The Friendly Red Fox.
Crochet Teddy Bear Materials
You will need:
Approx 120 g size 4 yarn in main color (I used I Love this Yarn in Brown)
Small amount of Ivory worsted weight
Embroidery thread for eyebrows
Crochet Hook in Size 3.75
Tapestry Needle
Polyfil
12mm safety eyes
stitch marker
Crochet Teddy Bear Pattern Stitch Abbreviations
SC– single crochet
SC INC- single crochet increase (2 SC in each stitch)
INV DEC– Invisible decrease (put hook through the FRONT LOOP ONLY of two consecutive stitches [two loops on hook] Yarn over pull through both loops. [two loops on hook] Yarn over pull through two loops)
Magic Circle– Make a loop, leaving a long tail to work with. Insert hook in center of loop, yarn over and draw up a loop. Yarn over, pull through to make the first chain (this does not count as a stitch!). Continue to crochet over the loop and tail with the number of stitches called for. (If you need 6 SC, then crochet 6 SC inside the ring.) Pull the tail to close the circle.
Crochet Teddy Bear Pattern
Nose/Mouth
Round 1: In a magic circle, 6 SC.
Round 2: SC INC in each around. (12)
Round 3: SC in first, SC INC in next. Repeat around. (18)
Round 4: SC in first 2, SC INC in next. Repeat around. (24)
Round 5: SC in first 3, SC INC in next. Repeat around. (30)
Rounds 6-7: SC in each around. (30)
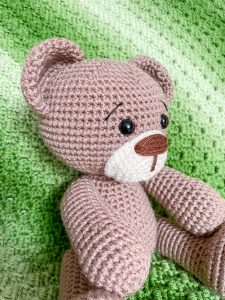
Slip stitch in the next 3 stitches. Fasten off and leave a long tail to sew on to the face. Get a long piece of brown yarn. Sew the nose on about row 6. I make multiple passes (think 10-12) for this bear’s nose. Try to use the same two holes when you go in and out. Use pins to attach it. For this bear, the snout will be more flat than full. Sew it around and very lightly stuff it.
Body and Head
Round 1: In a magic circle, 6 SC.
Round 2: SC INC in each around. (12)
Round 3: SC in first, SC INC in next. Repeat around. (18)
Round 4: SC in first 2, SC INC in next. Repeat around. (24)
Round 5: SC in first 3, SC INC in next. Repeat around. (30)
Round 6: SC in first 4, SC INC in next. Repeat around. (36)
Round 7: SC in first 5, SC INC in next. Repeat around. (42)
Rounds 8-17: SC in each around. (42)
Round 18: SC in first 5, INV DEC in the next. Repeat around. (36)
Rounds 19-20: SC in each around. (36)
Round 21: SC in first 4, INV DEC in the next. Repeat around. (30)
Rounds 22-23: SC in each around. (30)
Begin stuffing here. Make sure you do not under-stuff.
Round 24: SC in first 3, INV DEC in the next. Repeat around. (24)
Rounds 25-26: SC in each around. (24)
Round 27: SC in first 2, INV DEC in the next. Repeat around. (18)
Round 28: SC in the first, INV DEC in the next. Repeat around. (12)
From here we are increasing the head.
Round 29: SC in first, SC INC in next. Repeat around. (18)
Round 30: SC in first 2, SC INC in next. Repeat around. (24)
Round 31: SC in first 3, SC INC in next. Repeat around. (30)
Round 32: SC in first 4, SC INC in next. Repeat around. (36)
Round 33: SC in first 5, SC INC in next. Repeat around. (42)
Round 34: SC in first 6, SC INC in next. Repeat around. (48)
Rounds 35-45: SC in each around. (48)
Attach eyes between rows 39 and 41, about 6 stitches apart. Begin to stuff here. I also stretch the base of the head a little bit so it is more defined, more round than oval. Sew on the nose at this time as well.
Round 46: SC in the first 6, INV DEC in the next. Repeat around. (42)
Round 47: SC in the first 5, INV DEC in the next. Repeat around. (36)
Round 48: SC in the first 4, INV DEC in the next. Repeat around. (30)
Round 49: SC in the first 3, INV DEC in the next. Repeat around. (24)
Round 50: SC in the first 2, INV DEC in the next. Repeat around. (18)
Round 51: SC in the first, INV DEC in the next. Repeat around. (12)
Round 52: INV DEC around. (6)
Fasten off and carefully sew the remaining hole closed.
Arms
Round 1: 6 SC in a magic ring
Round 2: SC INC in each around. (12)
Round 3: SC in first, SC INC in next. Repeat around. (18)
Round 4: SC in first 2, SC INC in next. Repeat around. (24)
Rounds 5-8: SC in each around. (24)
Round 9: SC in first 2, INV DEC in the next. Repeat around. (18)
Start stuffing here.
Round 10-22: SC in each around. (18)
Round 23: SC in the first, INV DEC in the next. Repeat around.(12)
Rounds 24: SC in each around. (12)
Stuff the second half lightly.
Fasten off and leave a long tail. Pin the arms on each side the bear, about halfway just a couple of rounds beneath the head. Sew them on using the tail.
Legs
Round 1: 6 SC in a magic circle.
Round 2: INC in each around. (12)
Round 3: SC in the first, SC INC in the next. (18)
Round 4: SC in the first 2, SC INC in the next. Repeat around. (24)
Round 5: SC in first 3, SC INC in next. Repeat around. (30)
Round 6: SC in first 4, SC INC in the next. Repeat around. (36)
Rounds 7-11: SC in each around. (36)
Round 12: INV DEC 12 times. SC in the remaining 12 stitches. (24)
Start stuffing here.
Round 13: INV DEC 6 times. SC in the remaining 12. (18)
Rounds 14-25: SC in each around. (18)
Round 26: SC in the first, INV DEC around. (12)
Round 27: INV DEC in each around (6)
Fasten off and leave a long tail. Pin the legs on each side of the bottom of the bear, about halfway back. Sew them on using the tail.
Ears (make 2)
Round 1: 6 SC in a magic ring
Round 2: SC INC in each around. (12)
Round 3: SC in first, SC INC in next. Repeat around. (18)
Round 4: SC in first 2, SC INC in next. Repeat around. (24)
Round 5: SC in first 3, SC INC in next. Repeat around. (30)
Rounds 6-7: SC in each around. (30)
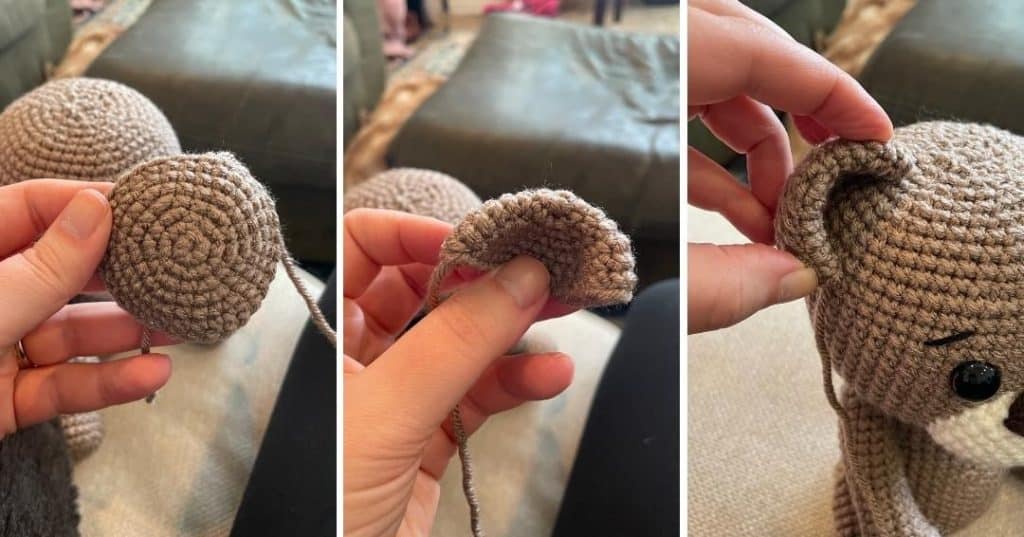
Fasten off and leave a long tail. Flatten the ear. Attach about 5 rounds out from the middle of the head. Use pins to keep it in place. The ear will curve around so it looks more three dimensional. Attach it with the long tail.


Such a sweet litle bear. Thank you so much for the free pattern.
I love this pattern! I have made two now. I’m looking forward to making something else. Thank you!
Hi There
Your pattern for Teddy Bear looks so easy and fast to do, I crochet for Nursing Homes and I am sure that the patients will enjoy this little bear. Thanks so much for posting it. He will look great in many different colours……
This bear is absolutely 💯 percent amazing .Would cheer up even an adult, I’m going to follow your pattern and make one myself,Thank you and for the pictures and pattern, hope to get it looking as nice as yours.
Hi,
I am not reading where the ivory yarn goes into play for the bear’s Face. I read the pattern múltiple times and do not s the color change. Could you please clarify when to start the ivory portion of the face and stitch details. I look forward to your respone. Thank you
The ivory is for the snout/nose and that is made seperately and attached to the head!
Love this pattern. First attempt at anything other than a blanket or beanie. Super easy to follow and for my first one – i think it turned our pretty awesome! Thanks so much for sharing.
Kali, thank you so much for all the help messages. I am making the teddy bear, this my second thing I am making. I have all the parts made, now for sewing together. You have been so helpful with all your suggestions, and videos. Hopefully my bear will look good.
I just made this bear and I am obsessed. Thank you for this wonderful pattern!!
This was one of the best Beginner Teddie Bears that I have tried to crotchet. Thanks so much for sharing the pattern.
Hi,
I’m in the process of making this teddy bear and I noticed in the leg instructions, it says row 25 ends with 18 stitches and row 26 ends with 12, but row 26 says to “SC in the first, INV DEC around.” I think it was meant to say SC for the first (# of) stitches. For now I’ll try to work it out myself, but if you could provide some insight I’d really appreciate it as I’m not very good at math haha.
Thanks for this awesome pattern!
Hi! It’s just SC in one stitch, and then INV DEC. Then you repeat that sequence all the way around!
How did you create the brown on the Ivory snout?
It’s embroidered on with brown yarn!
Just finished making this Bear for my 13 year old grandson, two different coloured greys, white & grey for the snout.
He absolutely loves him 🙂
Thank you so much for this pattern, such an easy one to follow, my grandson found it himself & asked me to make it for him.
What a fun story! I’m so glad your grandson appreciates your talents. That’s amazing 🙂
I am not seeing that I should stuff the arms?
They are stuffed! I just added notes about where to stuff 🙂
How much yarn needed to buy of the main color?
This pattern uses 120g of worsted weight yarn 🙂
i don’t get the body and head section do i stop the body when the pattern mentions the head instructions?
Nope! The head and the body are worked in one continuous piece. You decrease to the neck and then re-increase for the head.
I have just finished this lovely bear pattern, made for my new grandson. It is a great pattern, very easy to follow, thankyou, Pat
Hey this is a great pattern I was just wondering if the SC is in US or UK Terminology
Hi! All of my patterns are in US terminology 🙂
I would like to thank you so much for the pattern it was the first time I made a teddy but used a multiple colour of pink purple peach and blue mix coloured yarn and did different eyes and nose I can’t tell you how in love I am with it and will be giving it to my 1 and half year old niece, I wish I could send you a pic of it. I was wondering if you could advise or direct me to a basic jumper design for this size if teddy bear ?? Thanks again x
Hi! I’m sorry I don’t have a pattern recommendation – I don’t have any for this size bear. You might try a search on Pinterest and see what patterns pop up and see if finished measurements match your finished bear size 🙂 I’m glad you loved the pattern!
Hi. I just finished a bear in this pattern, it turned out perfectly but now I want to do a similar bear but smaller, kinda like a little brother but how do I cut the pattern to make a smaller bear?
Thankful for answer since I absolutely love this pattern. Best regards
I have a few other bear patterns! Some of them are in plush weight. https://www.thefriendlyredfox.com/free-plush-yarn-teddy-bear-crochet-pattern/ This one is probably the closest. You could make it in worsted weight yarn and it would be smaller!
So excited to make this bear! Where would you suggest to start stuffing the legs? I didn’t see it on the instructions. Thanks!
Between rounds 12 and 13!