The Friendly Superhero-A Free Crochet Pattern
Make your own super-powered plushie with The Friendly Superhero—
an easy, free crochet pattern inspired by kids and full of charm!
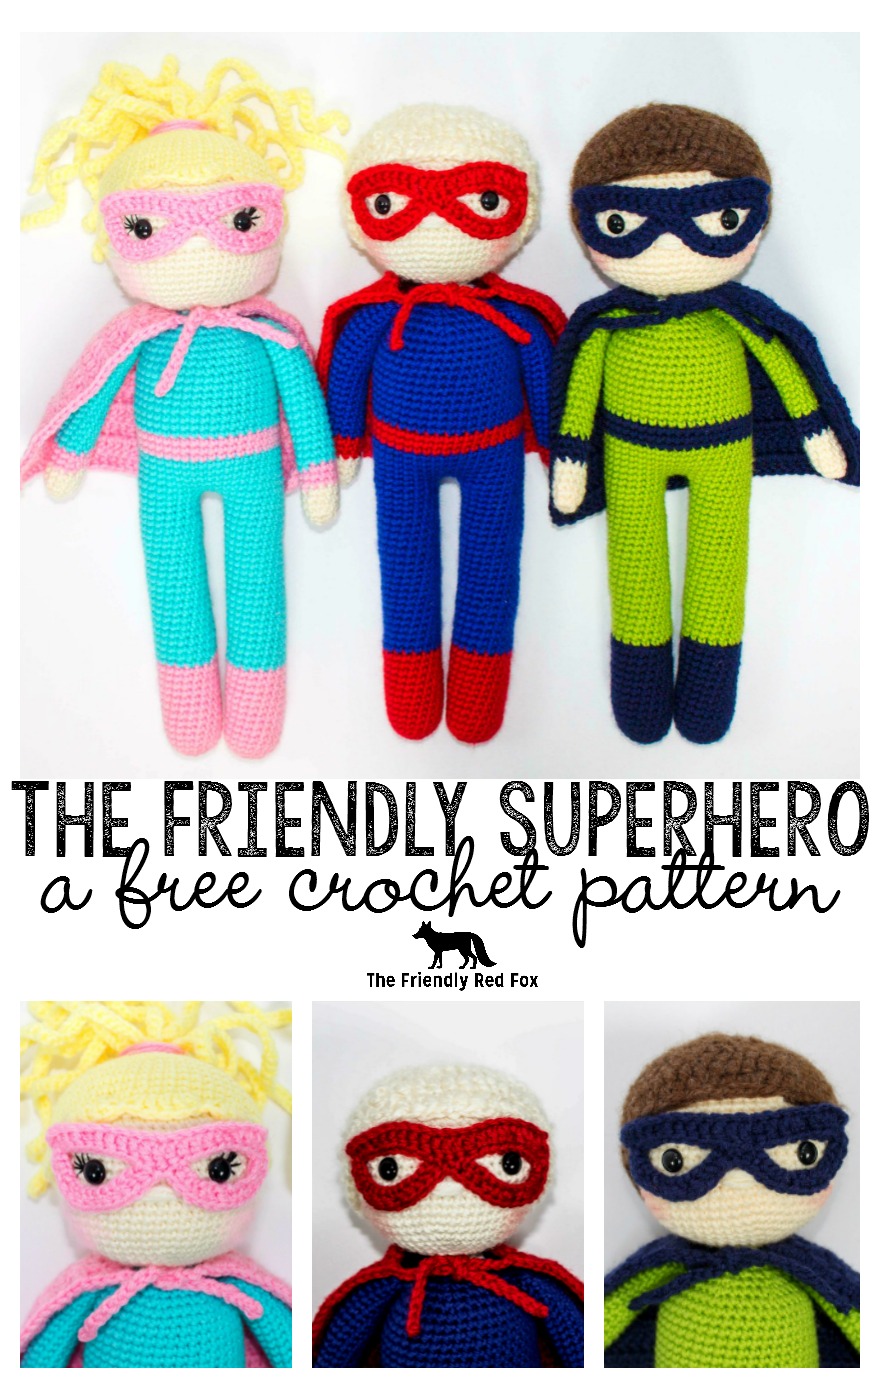
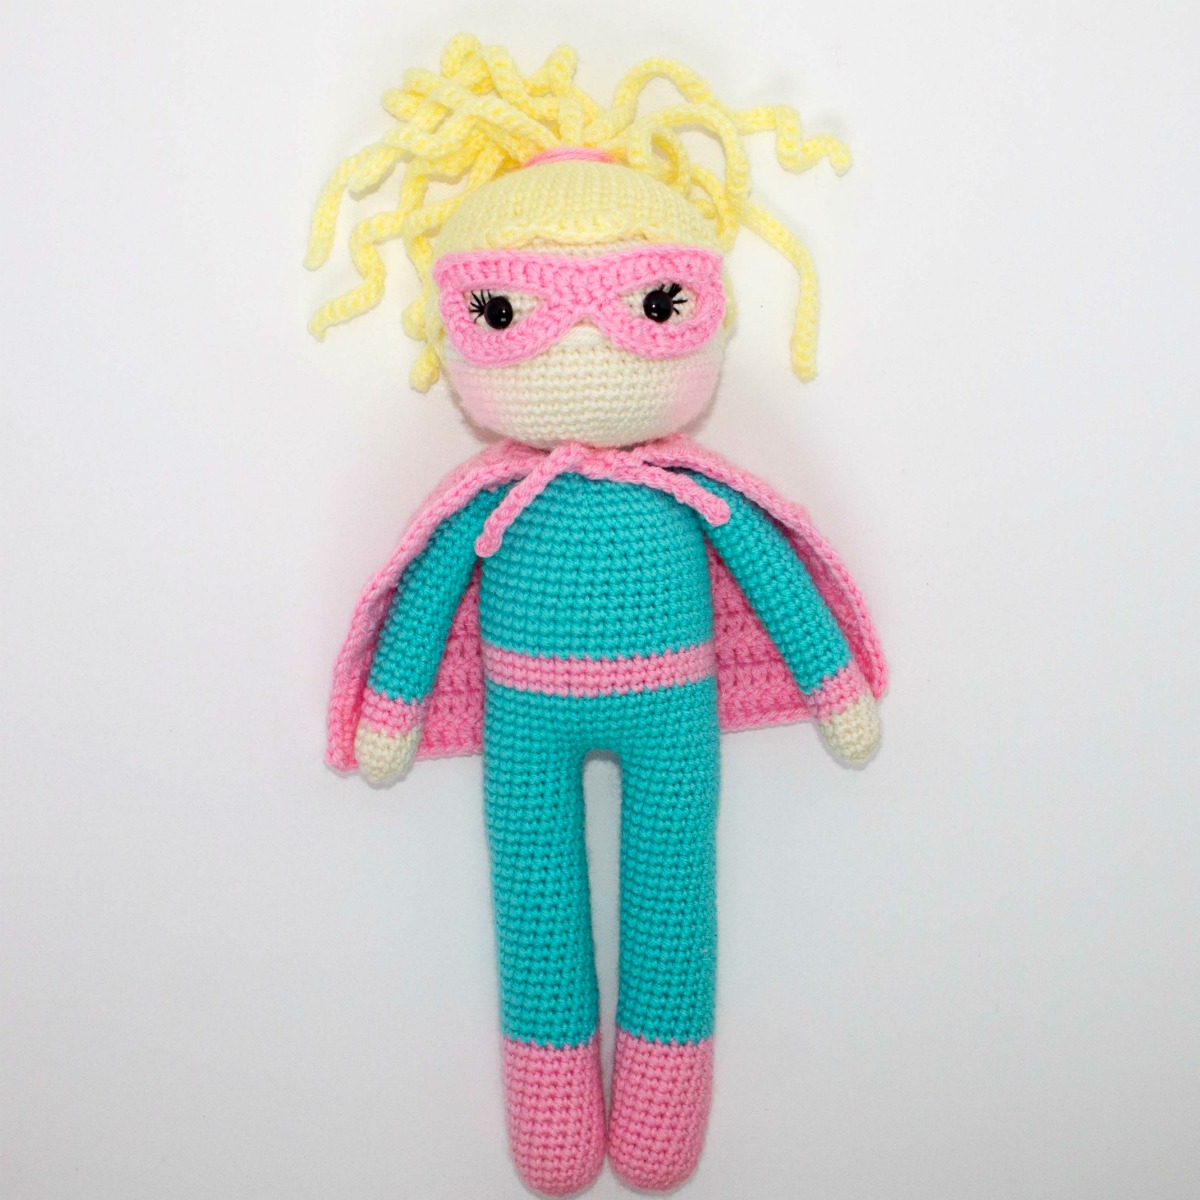
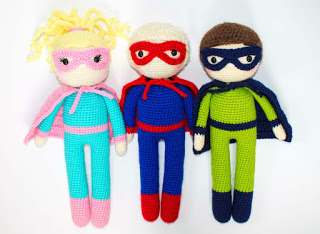
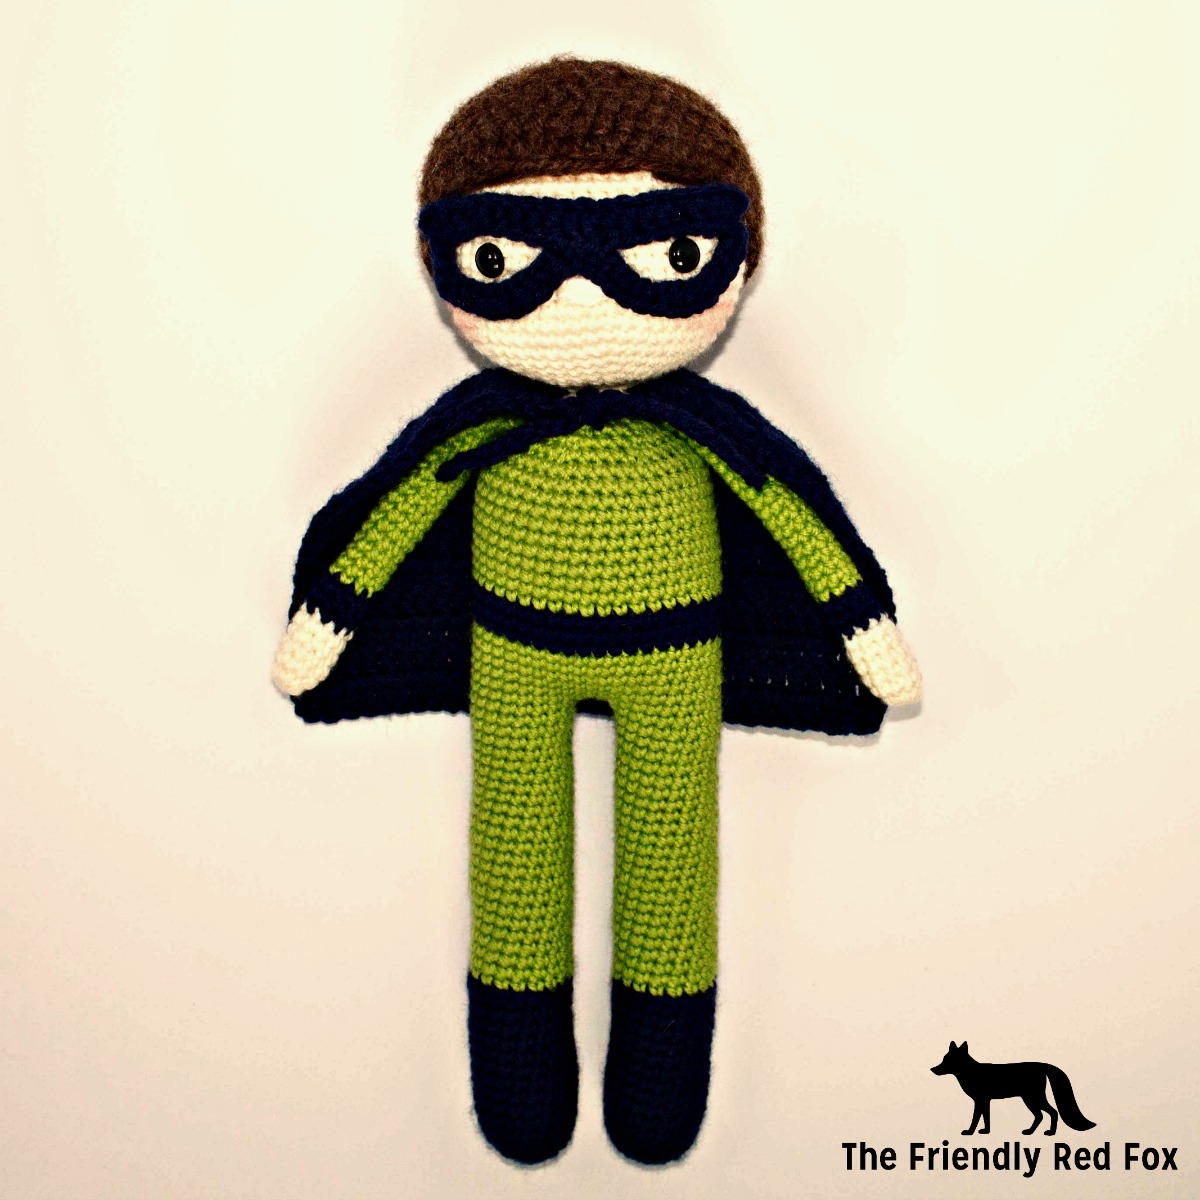
The free crochet pattern for The Friendly Superhero has long been in the works. I am a mom to two boys and have been wanting to make something that they would love, especially my 4-year-oldflies. I don’t know if most little boys go through this, but he has things that are his “favorite” and cycles through them. Cars were his favorite, then cowboys, then dinosaurs… Now, the big thing is superheroes. Even blowing bubbles is his “superpower.” He flies around our home and beats up the bad guys (and my couch in the process). This was so much fun to make because he picked the colors (green and blue-classic!!) and I made it with the same hair color as him. The blue and red hero has curly blonde hair like my little toddler. Then, because I can’t help it, I had to make a girl version. Because strong female characters have my heart forever.
[thrive_leads id=’2591′]
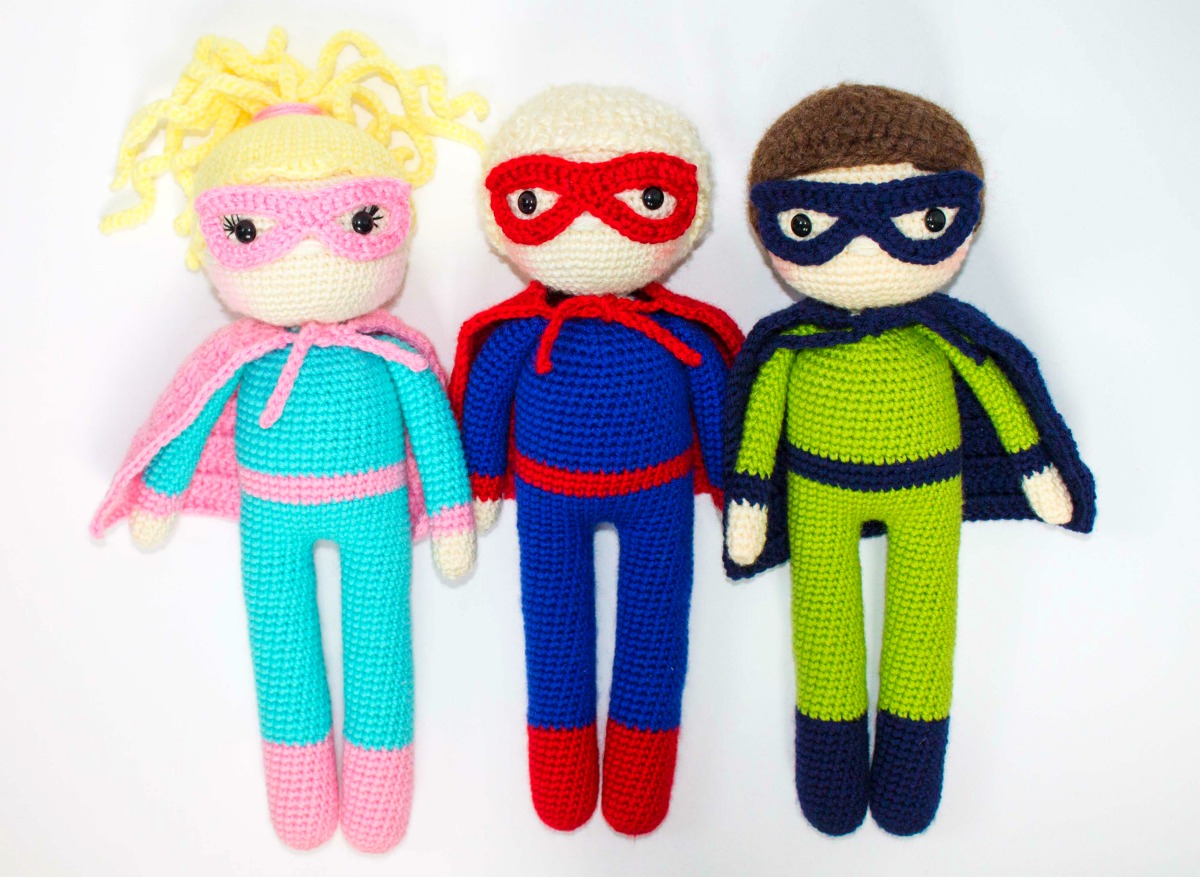
The Friendly Superhero Doll is about 15 inches tall and 4.5 inches wide (not including the arms and hair.) Perfect for the superhero lover in your life. The classic design is perfect to customize to become any popular superhero, or create your own! Either way, this doll is sure to delight and inspire a lot of superhero action.
Ad-free, Printable PDF
My patterns are free on my website, but you can find them in my shop if you prefer a printable copy!
Friendly Superhero Pattern
$6

Bear in a Sweater Pattern
$6

Friendly Flamingo Pattern
$6
Please note: this pattern is only for PERSONAL USE. Please feel free to make as many items as you wish for yourself, or as gifts. You may sell items made with this pattern but PLEASE LINK BACK OR GIVE CREDIT TO ME AS DESIGNER. In no way can you share, reproduce, or sell this pattern. Please respect my rights as designer.
Read through the entire pattern and the amigurumi tips and tricks before you begin.
(This post contains affiliate links. for more information, please see my policies page. Thanks for supporting The Friendly Red Fox!)
Friendly Superhero Crochet Pattern Materials
You will need:
- Worsted Size 4 Yarn in a skin color, main color and accent color (about 150g total)
- Yarn for hair
- Crochet Hook in Size 3.5
- Yarn Needle
- Polyfil (this kind is the ABSOLUTE best for amigurumi)
- 10.5 mm safety eyes
- stitch marker
- Foam Hair Roller (see this post for more information)
Abbreviations
SC– single crochet
SC INC– single crochet increase (2 SC in each stitch)
INV DEC– Invisible decrease (put hook through the FRONT LOOP ONLY of two consecutive stitches [two loops on hook] Yarn over pull through both loops. [two loops on hook] Yarn over pull through two loops)
Magic Circle– Make a loop, leaving a long tail to work with. Insert hook in center of loop, yarn over and draw up a loop. Yarn over, pull through to make the first chain (this does not count as a stitch!). Continue to crochet over the loop and tail with the number of stitches called for. (If you need 6 SC, then crochet 6 SC inside the ring.) Pull the tail to close the circle.
To change color– Start your stitch, but pull the new color through the final loop. In the next stitch, very lightly slip stitch instead of a single crochet. Continue on as normal. This helps make the transition easier and look smoother.
Always move your stitch marker to the last stitch in the round. This pattern is worked in continuous rounds.
Free Superhero Crochet Pattern
Mask
(even though you are making the mask, you won’t attach it until the end. It will help to place the eyes and hair however, so I recommend making it first.)
Using the accent color:
Chain 22. DC in the 3 chain from hook. DC in each across. Turn. (20 DC)
Chain 15. Count 9 DC over. Slip stitch to the 9th DC. Slip stitch in the next 3. Chain 15 more and connect it with a slip stitch to the last DC. Chain 1 and turn. HDC in the next 13 chains. Skip one and slip stitch to the next. Slip stitch in the next (this is the gap between the eyes). Slip stitch to the chain. Skip one on the next set of chains and HDC in the next 13. Connect with a slip stitch to the last DC. Fasten off leaving a long tail to attach the mask to the face.
Legs
(using the Super Boots color)
Round 1: In a magic circle, SC 6
Round 2: SC INC in each stitch around (12)
Round 3: SC in first, SC INC in next. Repeat around. (18)
Round 4-15: SC in each stitch around. (18)
Change to main color here.
Rounds 16-38: SC in each stitch around. (18)
Fasten off.
Repeat for the second leg but do not fasten off. Instead, chain 3 and then SC in the next stitch of the other leg. Take care to crochet over the tail left over by fastening off. SC around the entire leg. When you come to the three chains, SC in each chain around the next leg. SC over the chain back to the other leg. In the last SC on the last chain place your stitch marker. (This is round 39.)
Watch this video on how to attach the legs if you need additional help!
Body
Round 40: SC around. (42)
Rounds 41-46: SC in each around. (42)
Change to accent color for the belt.
Rounds 47-50: SC around (42)
Change back to main color.
Rounds 51-60: SC around (42)
Round 61: 4 SC, INV DEC, repeat around. (35)
Round 62: 3 SC, INV DEC, repeat around. (28)
Round 63: 2 SC, INV DEC, repeat around.(21)
Change to skin color.
Round 64: 1 SC, INV DEC, repeat around. (14)
Round 65: SC in each stitch around. (14)
INV DEC until you have 12 stitches on the round. From here we will be increasing the head. From this point I am resetting the number on the rounds. Round 66 of the body is now Round 1 of the head. It will be easy to see and helps for eye/mask placement and general counting.
Head
Round 1: SC in first, SC INC in next. Repeat around. (18)
Round 2: SC in first 2, SC INC in next. Repeat around. (24)
Round 3: SC in first 3, SC INC in next. Repeat around. (30)
Round 4: SC in first 4, SC INC in next. Repeat around. (36)
Round 5: SC in first 5, SC INC in next. Repeat around. (42)
Round 6: SC in first 6, SC INC in next. Repeat around. (48)
Round 7: SC in first 7, SC INC in next. Repeat around. (54)
Round 8-23: SC in each stitch around. (54)
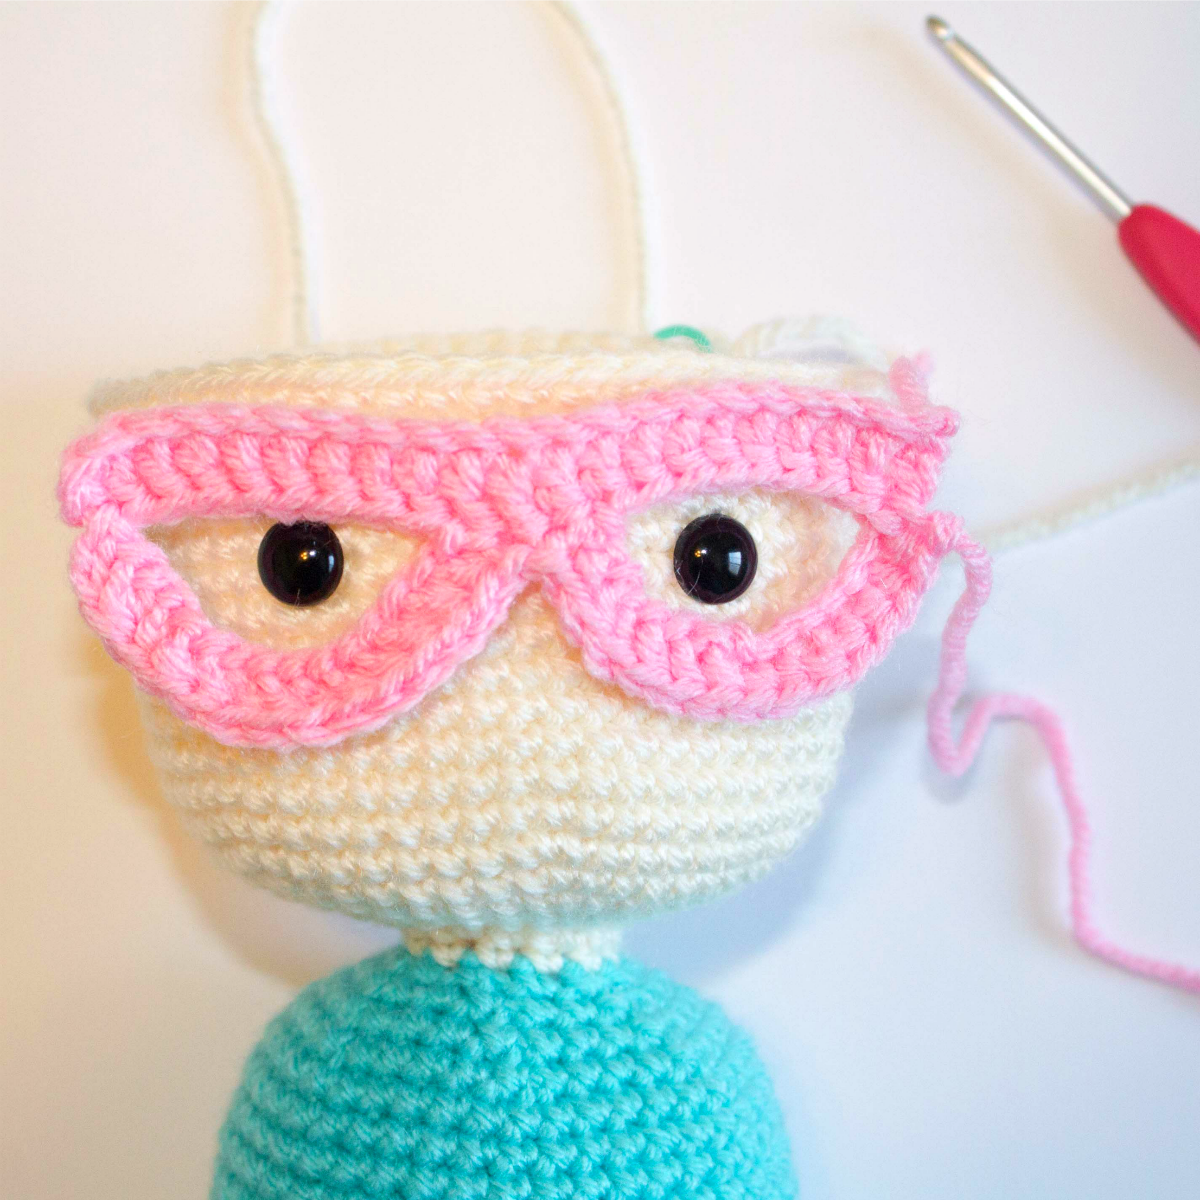
Place the safety eyes in between rows 15 and 16, nine stitches apart. Line up your mask to make sure that they fit well. Sew on eyelashes here. See Best Tips and Tricks for Crochet Doll Faces. This is also a good time to place the foam roller or dowel if you are using one. Make sure to stuff the neck around the dowel as well as you can. See this post for more information.
Round 24: SC in the first 7, INV DEC in the next. Repeat around. (48)
Round 25: SC in the first 6, INV DEC in the next. Repeat around. (42)
Round 26: SC in the first 5, INV DEC in the next. Repeat around. (36)
Round 27: SC in the first 4, INV DEC in the next. Repeat around. (30)
Round 28: SC in the first 3, INV DEC in the next. Repeat around. (24)
Round 29: SC in the first 2, INV DEC in the next. Repeat around. (18)
Round 30: SC in the first, INV DEC in the next. Repeat around. (12)
Round 31: INV DEC around. (6)
Fasten off and carefully sew the remaining hole closed. Leave a long tail to make the nose.
Click here for Part 2
The Friendly Superhero

If you liked this pattern, you may like these other free Friendly Red Fox patterns!
Want the Ad-free, Printable PDF?
You can find it in one of my stores!