Free Crochet Pattern for Crochet Lamb
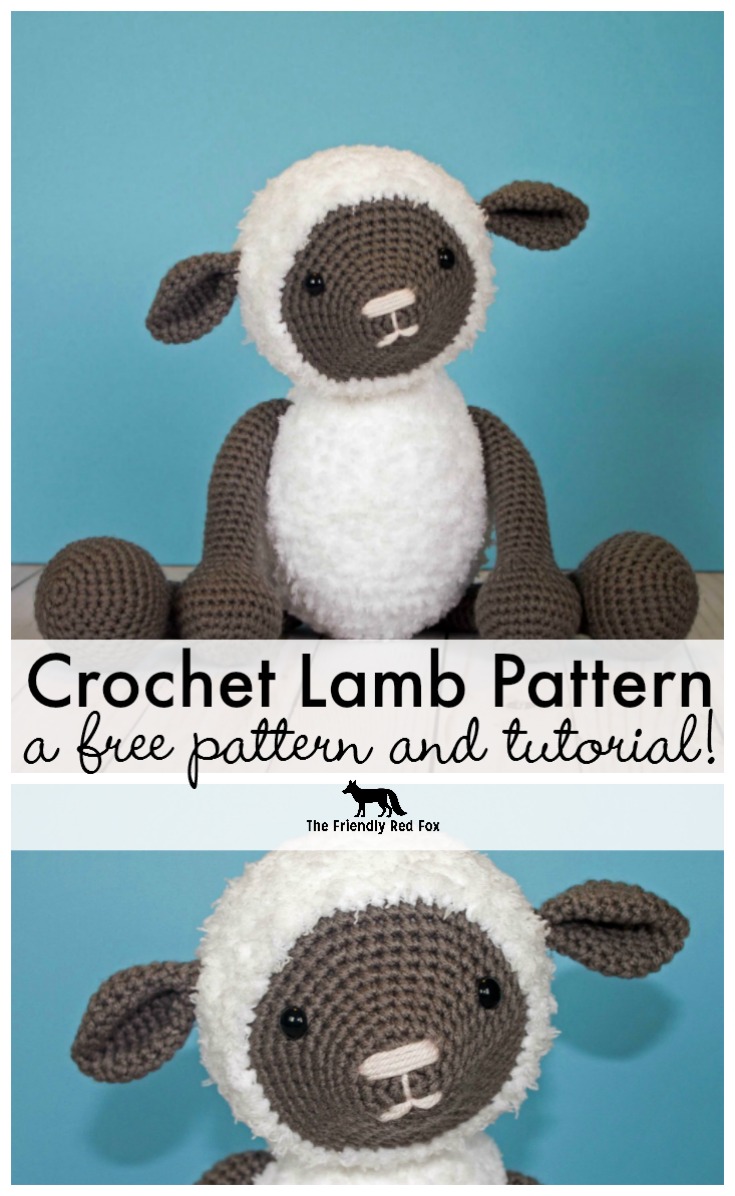
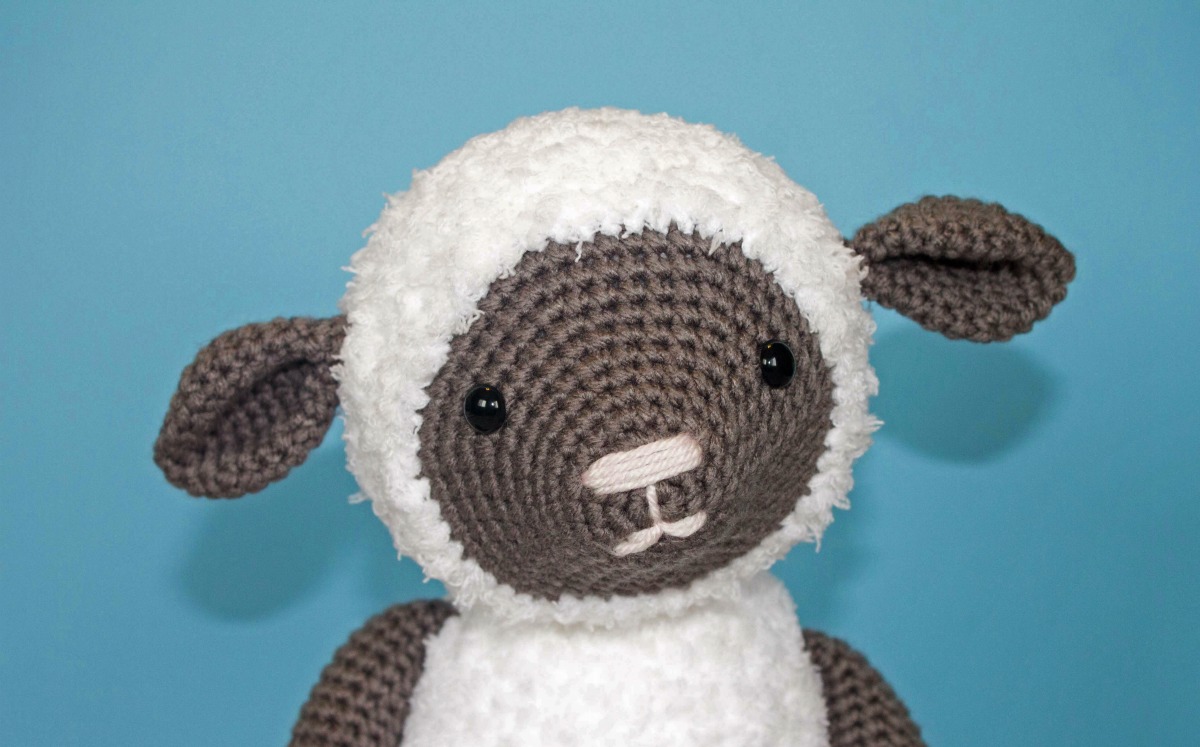
This little crochet lamb pattern is such a fun project! Measuring 10 inches tall sitting down (16 standing up!) it is the perfect size to snuggle. And you will definitely want to because the Bernat Pipsqueak yarn is sooooo soft. Combined with the sweet expression on its face and the rounded hands and feet, I think this may be one of my favorite amigurumis EVER.
and tutorials? Sign up for The Friendly Newsletter
I have had this idea for a little crochet lamb since Christmas when I made the Friendly Santa Doll. The yarn I used for the beard was the Bernat Pipsqueak yarn and it was so delightful and soft! I just knew it would be such a fun, fluffy amigurumi! But I was nervous to try that kind of project with it… It is sooo fuzzy! But I had three people ask me to make a crochet sheep so I decided to try. I AM SO GLAD I DID. Guys, it seems really scary but it went WAY better than I thought! Like loads better. I kept telling my husband how surprised/happy/impressed I was that it was going so well!

You will need:
2 skeins of Bernat Pipsqueak yarn (250 yds aprox.)
Gray worsted weight yarn
size 4 hook
polyfil
10mm safety eyes
small amount of pink yarn
yarn needle
One more tip before you get started… Stuff VERY firmly. The little feet and (hands?) of the sheep will look much better if firmly stuffed and you will be able to see the nose if the whole head is fully stuffed. You will almost always need more than you think you need. I like to stuff them as full as I can. But don’t stuff TOO much or your stitches will stretch. The main problem I see with amigurumi projects is that they are under-stuffed. I also do not stuff all the way to the top of the leg or arms, that way they do not bulge too much when they are sewed on.

Round 1: In a magic circle, 6 SC.
Round 2: SC INC in each around. (12)
Round 3: SC in first, SC INC in next. Repeat around. (18)
Round 4: SC in the first 2, SC INC in next. Repeat around. (24)
Rounds 5-7: SC in each around. (24)
Round 8: SC in first 2, INV DEC in next. Repeat around. (18)
Round 9: SC in first, INV DEC in next. Repeat around. (12)
Round 10-11: SC in each around.
Fasten off, leaving a tail to sew on the head. Pinch the bottom of the ear to make a little crease and sew a few stitches to hold the shape. I attached the ears 4 rows back from where the white fluffy yarn starts about level with the eyes.

Round 1: In a magic circle, 6 SC.
Round 2: SC INC in each around. (12)
Round 3: SC in first, SC INC in next. Repeat around. (18)
Round 4: SC in first 2, SC INC in next. Repeat around. (24)
Round 5: SC in first 3, SC INC in next. Repeat around. (30)
Round 6: SC in first 4, SC INC in next. Repeat around. (36)
Round 7: SC in first 5, SC INC in next. Repeat around. (42)
Round 8: SC in first 6, SC INC in next. Repeat around. (48)
Round 9: SC in first 7, SC INC in next. Repeat around. (54)
Round 10: SC in first 8, SC INC in next. Repeat around. (60)
Rounds 11-18: SC in each around. (60)
Round 19: SC in first 8, INV DEC in next. Repeat around. (54)
Rounds 20: SC in each around. (54)
Round 21: SC in the firsts 7, INV DEC in the next. Repeat around. (48)
Round 22: SC in each around. (48)
Round 23: SC in the first 6, INV DEC in the next. Repeat around. (42)
Round 24: SC in each around. (42)
Round 25: SC in the first 5, INV DEC in the next. Repeat around. (36)
Round 26: SC in each around. (36)
Round 27: SC in the first 4, INV DEC in the next. Repeat around. (30)
Round 28: SC in the first 3, INV DEC in the next. Repeat around. (24)
Round 29: SC in the first 2, INV DEC in the next. Repeat around. (18)
Rounds 30-31: SC in each around (18)


Hi Kali I am searching for your pattern of Mr. Owl. Could you please send it to me at my e-mail address which is rogerscarmen47@gmail.com
Thank You
Sorry! I don’t have an owl pattern.