Free Crochet Doll Pattern- The Friendly Grace
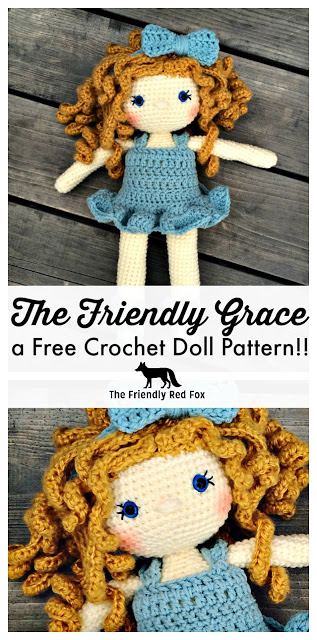
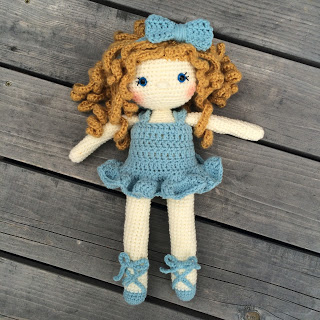
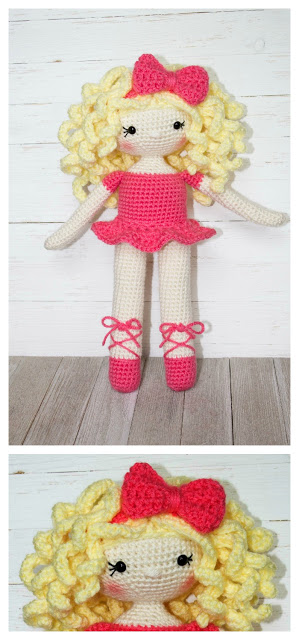
This free crochet doll pattern has been an absolute joy to make! Perfect for the little one that dreams of being a ballerina. If you follow my Free Crochet Doll Tutorials you can personalize this pattern to fit your own little ballerina. This little doll is about 15 inches tall and 3 inches wide. A great size for cuddling! You can make the doll with the dress attached or separate. The blue dress is not attached and the pink is the attached version.
[thrive_leads id=’2591′]
Please note this pattern is only for PERSONAL USE. Please feel free to make as many
items as you wish for yourself, or as gifts. You may sell items made with this pattern but
PLEASE LINK BACK OR GIVE CREDIT TO ME AS DESIGNER. In no way can you
share, reproduce, or sell this pattern. Please respect my rights as designer.
Read through the entire pattern and the Amigurumi Tips and Tricks before you begin.
You will need:
Approx 150 g size 4 yarn (Read this post for my favorite yarn recommendations)
Crochet Hook in Size 3.75 or 3.5
Tapestry Needle
Stuffing (this is what I recommend, especially for dolls!)
10.5mm safety eyes
stitch marker
Yarn for hair and clothes
Abbreviations
SC– single crochet
SC INC– single crochet increase (2 SC in each stitch)
INV DEC– Invisible decrease (put hook through the FRONT LOOP ONLY of two consecutive stitches [two loops on hook] Yarn over pull through both loops. [two loops on hook] Yarn over pull through two loops)
Magic Circle– Make a loop, leaving a long tail to work with. Insert hook in center of loop, yarn over and draw up a loop. Yarn over, pull through to make the first chain (this does not count as a stitch!). Continue to crochet over the loop and tail with the number of stitches called for. (If you need 6 SC, then crochet 6 SC inside the ring.) Pull the tail to close the circle.
Always move your stitch marker to the last stitch in the round. This pattern is worked in continuous rounds.
*Lightly Stuff as you go! THIS is my favorite stuffing for amigurumi.
Legs (using the slipper color)
Round 1: In a magic circle, SC 6
Round 2: SC INC in each stitch around (12)
Round 3: SC in first, SC INC in next. Repeat around. (18)
Round 4-10: SC in each stitch around. (18)
Change to skin color
Rounds 11-38: SC in each stitch around. (18)
Fasten off.
Repeat for the second leg but do not fasten off. Instead, chain 3 and then SC in the next stitch of the other leg. Take care to crochet over the tail left over by fastening off. SC around the entire leg. When you come to the three chains, SC in each chain around the next leg. SC over the chain back to the other leg. In the last SC on the last chain place your stitch marker. (This is round 39.)
Watch this video on how to attach the legs if you need additional help!
Round 40: SC around. (42)
(If you are making the attached dress, change to dress color here)
Rounds 41-60:: SC around (42)
(Change back to skin color. Crochet in the back loop only for the first row of skin color-this is optional, but gives a cleaner line.)
Round 61: 4 SC, INV DEC, repeat around. (35)
Round 62: 3 SC, INV DEC, repeat around. (28)
Round 63: 2 SC, INV DEC, repeat around.(21)
Round 64: 1 SC, INV DEC, repeat around. (14)
Round 65: SC in each stitch around. (14)
INV DEC until you have 12 stitches on the round. From here we will be increasing the head. From this point I am resetting the number on the rounds. Round 66 of the body is now Round 1 of the head. It will be easy to see and helps for eye/mask placement and general counting.

Head
Round 1: SC in first, SC INC in next. Repeat around. (18)
Round 2: SC in first 2, SC INC in next. Repeat around. (24)
Round 3: SC in first 3, SC INC in next. Repeat around. (30)
Round 4: SC in first 4, SC INC in next. Repeat around. (36)
Round 5: SC in first 5, SC INC in next. Repeat around. (42)
Round 6: SC in first 6, SC INC in next. Repeat around. (48)
Round 7: SC in first 7, SC INC in next. Repeat around. (54)
Round 8-23: SC in each stitch around. (54)
Place the safety eyes in between rows 15 and 16, nine stitches apart. Line up your mask to make sure that they fit well. Sew on eyelashes here. See “Best Tips and Tricks for Crochet Dolls” This is also a good time to place the foam roller or dowel if you are using one. Make sure to stuff the neck around the dowel as well as you can.
Round 24: SC in the first 7, INV DEC in the next. Repeat around. (48)
Round 25: SC in the first 6, INV DEC in the next. Repeat around. (42)
Round 26: SC in the first 5, INV DEC in the next. Repeat around. (36)
Round 27: SC in the first 4, INV DEC in the next. Repeat around. (30)
Round 28: SC in the first 3, INV DEC in the next. Repeat around. (24)
Round 29: SC in the first 2, INV DEC in the next. Repeat around. (18)
Round 30: SC in the first, INV DEC in the next. Repeat around. (12)
Round 30: INV DEC around. (6)
Fasten off and carefully sew the remaining hole closed. Leave a long tail to make the nose.
Arms
Round 1: In a magic circle, SC 6 . (6)
Round 2: INC in each around. (12)
Rounds 3-28: SC in each stitch around (12)
Stuff lightly and attach to body. I sew them on between rows 62 and 63.
(HINT: If you are doing sleeves, only go to row 23 with the skin color. Change to the dress color and finish the 5 remaining rows.)
Head over to THIS POST to get all the little details like the dress, slippers, and bow!
And you will need to make hair for this sweet little doll. Read THIS POST to know how to make those curls!


Hi
Thank you for the beautiful amigurumi ideas
I will certainly make some for my grand daughter
Super excited to be trying the friendly Grace for my Granddaughter. Wanted a rag doll for her…she’s 18 months, but they didn’t look good. As I’ve crocheted from primary school I thought I’d give it a go. Edie has beautiful red hair like Grace. Can’t wait to finish it. She lives in New Zealand so I’ve never held her yet…Hoping I will be able to hand the doll to her in person!
Hello Kali, just wanted to say thank you for this free pattern it is so generous of you. The doll is a delight to make and is the perfect size for hugging. I made one to my friends little girl who when asked if she liked it, replied ‘I love it’ Testament indeed x
Love this site. I made two teddy bears and I am getting ready to start the friendly Grace. I had a hard time figuring out what to do for my grandchildren for Christmas and I think I’m addicted now😁. Thank you for the easy to read instructions!!
I thought that something this beautiful would be too hard for me, but your instructions are so good. I did the spiral curls for mine and used a WHOLE skein of yarn… it makes her head a little heavy, but I plan to fix her neck a little to accommodate. I can’t stop playing with her hair… 🙂
Thank you so much for sharing!
just wanted to say thank you for the work you put in to provide the free patterns You need to be thanked for the work involved as well as the generosity of sharing the patterns