Free Crochet Bat Pattern Amigurumi
Crochet Bat Pattern
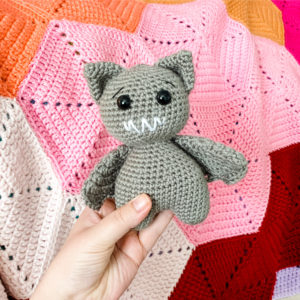
The Friendly Vampire Bat is about 6 inches tall. The legs are made separately and then attached to form the body. The body will decrease and then increase into the head. You will attach the ears and wings.
This pattern is property of The Friendly Red Fox. Please note this pattern is only for PERSONAL USE. Please feel free to make as many items as you wish for yourself, or as gifts. You may sell items made with this pattern but PLEASE LINK BACK OR GIVE CREDIT TO ME AS DESIGNER. In no way can you share, reproduce, or sell this pattern. Please respect my rights as a designer. Read through the entire pattern before you begin.
You will need:
About 80g size 4 worsted weight yarn in gray
10.5mm safety eyes
Stuffing
3.75mm hook
Needle for sewing
Stitch marker
Abbreviations
SC- single crochet
SC INC- single crochet increase (2 SC in each stitch)
INV DEC- Invisible decrease (put hook through the FRONT LOOP ONLY of two consecutive stitches [two loops on hook] Yarn over pull through both loops. [two loops on hook] Yarn over pull through two loops)
Magic Circle- Make a loop, leaving a long tail to work with. Insert hook in center of loop, yarn over and draw up a loop. Yarn over, pull through to make the first chain (this does not count as a stitch!). Continue to crochet over the loop and tail with the number of stitches called for. (If you need 6 SC, then crochet 6 SC inside the ring.) Pull the tail to close the circle.
Always move your stitch marker to the last stitch in the round. This pattern is worked in continuous rounds.
Legs and Body
Round 1: In a magic circle, SC 6
Round 2: SC INC in each stitch around (12)
Round 3: SC in first, SC INC in next. Repeat around. (18)
Rounds 4-5: SC in each stitch around. (18)
Fasten off.
Repeat for the second leg but do not fasten off. Instead, chain 3 and then SC in the next stitch of the other leg. Take care to crochet over the tail left over by fastening off. SC around the entire leg. When you come to the three chains, SC in each chain to the next leg. Crochet in each stitch around the other leg. SC over the chain back to the other leg. In the last SC on the last chain place your stitch marker. (This is round 6.)
Rounds 7-13: SC in each around. (42)
Round 14: SC in the first 4, INV DEC in the next. Repeat around. (35)
Rounds 15: SC in each around (35)
Round 16: SC in the first 3, INV DEC in the next. Repeat around. (28)
Begin to stuff here. Continue to stuff as you go.
Round 17-18: SC in each around. (28)
Round 19: SC in the first 2, INV DEC in the next. Repeat around. (21)
Round 20: SC in each around. (21)
Round 21: SC in the first , INV DEC in the next. (14)
INV DEC until you have 12 stitches on the round.
Round 22: SC in first, SC INC in next. Repeat around. (18)
Round 23: SC in first 2, SC INC in next. Repeat around. (24)
Round 24: SC in first 3, SC INC in next. Repeat around. (30)
Round 25: SC in first 4, SC INC in next. Repeat around. (36)
Round 26: SC in first 5, SC INC in next. Repeat around. (42)
Round 27-33: SC in each stitch around. (54)
Place the safety eyes in between rows 32 and 33, four stitches apart. Sew on eyelashes or eyebrows here. Embroider the fangs with white yarn.
Round 34: SC in the first 5, INV DEC in the next. Repeat around. (36)
Round 35: SC in the first 4, INV DEC in the next. Repeat around. (30)
Round 36: SC in the first 3, INV DEC in the next. Repeat around. (24)
Round 37: SC in the first 2, INV DEC in the next. Repeat around. (18)
Round 38: SC in the first, INV DEC in the next. Repeat around. (12)
Round 39: INV DEC around. (6)
Fasten off and sew the remaining how closed. Weave in the end.
Ears (make 2)
Round 1: 6 SC in a magic ring
Round 2: SC INC in each around. (12)
Round 3: SC in each around. (12)
Round 4: SC in first, SC INC in next. Repeat around. (18)
Round 5: SC in first 2, SC INC in next. Repeat around. (24)
Round 6: SC in each around. (24)
Leave a long tail to sew on. Attach the ears about 2 rows out from the middle on the top.
Wings (make 2)
Round 1: DC 10 in a magic ring.
Round 2: DC INC in each stitch around. (20)
Round 3: DC in the first, DC INC in the next. Repeat this pattern around. (
Round 4: DC in the first two, DC INC in the next. Repeat this pattern around (
Fold the circle in half. The next bit is worked through BOTH stitches of each half, so that it is sealed up. This will create the ridges on the wings.
SC in the first. DC INC in the next. Chain one. TRC in the next stitch. Chain one. In the next stitch, DC INC. Skip one stitch and slip stitch into the next. DC INC in the next. Chain one. TRC in the next stitch. Chain one. TRC in the next stitch. Chain one. In the next stitch, DC INC. Skip one stitch and slip stitch into the next. DC INC in the next. Chain one. TRC in the next stitch. Chain one. In the next stitch, DC INC. Skip one stitch and slip stitch into the next.
Fasten off leaving a long tail. On one of the wings you will weave the end through to the other side of the wing so that when you attach it the stitches will show the right side. Use pins to make sure that the wings are lined up and even, then attach them by sewing the corners down.