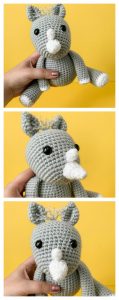
Crochet Rhino Pattern- a Free Amigurumi Rhino Pattern

Crochet Amigurumi Rhino Pattern
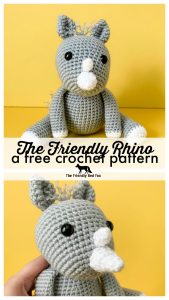
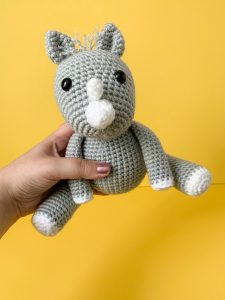
This little crochet rhino is the perfect amigurumi pattern for a cuddle sized little animal. About 8 inches tall, I think he is the best size for little hands to play with! He is the letter R in my Amigurumi A to Z project! As in keeping with the rest of my Amigurumi A to Z animals, this little guy is charmingly simple, and easy enough for a determined beginner. Just check out my amigurumi tips and tricks and you will be ready to go!
This pattern is property of The Friendly Red Fox. Please note this pattern is only for PERSONAL USE. Please feel free to make as many items as you wish for yourself, or as gifts. You may sell items made with this pattern but PLEASE LINK BACK OR GIVE CREDIT TO ME AS DESIGNER. In no way can you share, reproduce, or sell this pattern. Please respect my rights as a designer. Read through the entire pattern before you begin.
Crochet Rhino Materials and Abbreviations
You will need:
About 100g I love this Yarn in Gray (or suitable worsted weight substitute)
12mm safety eyes
Stuffing
3.75mm hook
Small amount of white yarn
Needle for sewing
Stitch marker
Abbreviations
SC– single crochet
SC INC– single crochet increase (2 SC in each stitch)
INV DEC– Invisible decrease (put hook through the FRONT LOOP ONLY of two consecutive stitches [two loops on hook] Yarn over pull through both loops. [two loops on hook] Yarn over pull through two loops)
Magic Circle- Make a loop, leaving a long tail to work with. Insert hook in center of loop, yarn over and draw up a loop. Yarn over, pull through to make the first chain (this does not count as a stitch!). Continue to crochet over the loop and tail with the number of stitches called for. (If you need 6 SC, then crochet 6 SC inside the ring.) Pull the tail to close the circle.
You can purchase the ad-free, printable Pdf or keep scrolling for the free pattern.
Always move your stitch marker to the last stitch in the round. This pattern is worked in continuous rounds.
Crochet Rhino Amigurumi Pattern
Head
Round 1: In a magic circle, 6 SC.
Round 2: SC INC in each around. (12)
Round 3: SC in first, SC INC in next. Repeat around. (18)
Round 4: SC in first 2, SC INC in next. Repeat around. (24)
Round 5: SC in first 3, SC INC in next. Repeat around. (30)
Round 6: SC in first 4, SC INC in next. Repeat around. (36)
Rounds 7-12: SC in each around. (36)
Round 13: SC in first 5, SC INC in next. Repeat around. (42)
Round 14: SC in first 6, SC INC in next. Repeat around. (48)
Round 15-18: SC in each around. (48)
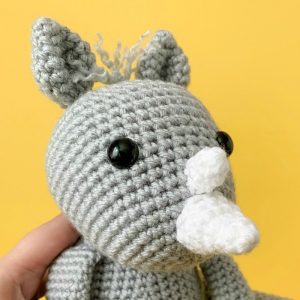
Attach the eyes between rows 12 and 13, 7 stitches apart. Begin to stuff here. Sew on any eyebrows or eyelashes with embroidery thread.
Round 19: SC in the first 6, INV DEC in the next. Repeat around. (42)
Round 20: SC in the first 5, INV DEC in the next. Repeat around. (36)
Round 21: SC in the first 4, INV DEC in the next. Repeat around. (30)
Round 22: SC in the first 3, INV DEC in the next. Repeat around. (24)
Round 23: SC in the first 2, INV DEC in the next. Repeat around. (18)
Round 24: SC in the first, INV DEC in the next. Repeat around. (12)
Round 25: INV DEC around. (6)
Fasten off and carefully sew the remaining hole closed.
Ears (make two)
Round 1: In a magic circle, 6 SC.
Round 2: SC in each around. (6)
Round 3: SC INC in each around. (12)
Round 4: SC in first, SC INC in next. Repeat around. (18)
Rounds 5-6: SC in each around. (18)
Round 7: SC in first, INV DEC in next. Repeat around. (12)
Round 8: INV DEC in each around. (6)
Fasten off leaving a long tail. Sew on between rows 20 and 21, about 8 stitches apart.
Horn
Using the white:
Round 1: In a magic circle, 6 SC.
Round 2: SC in each around.
Round 3: SC in first, SC INC in next. Repeat around.(9)
Round 4-6: SC in each around.
Fasten off, leaving a tail to sew on. Attach to the very front of the nose, about round 3-4.
Small Horn
Round 1: In a magic circle, 6 SC.
Rounds 2-3: SC in each around. (6)
Fasten off. Sew it on directly behind the larger horn.
Body
Round 1: In a magic circle, 6 SC.
Round 2: SC INC in each around. (12)
Round 3: SC in first, SC INC in next. Repeat around. (18)
Round 4: SC in first 2, SC INC in next. Repeat around. (24)
Round 5: SC in first 3, SC INC in next. Repeat around. (30)
Round 6: SC in first 4, SC INC in next. Repeat around. (36)
Round 7: SC in first 5, SC INC in next. Repeat around. (42)
Round 8-20: SC in each around. (42)
Begin to stuff here.
Round 21: SC in the first 5, INV DEC in the next. Repeat around. (36)
Round 22: SC in each around. (36)
Round 23: SC in the first 4, INV DEC in the next. Repeat around. (30)
Round 24: SC in each around. (30)
Round 25: SC in the first 3, INV DEC in the next. Repeat around. (24)
Round 26: SC in the first 2, INV DEC in the next. Repeat around. (18)
Rounds 27-29: SC in each around (18)
Fasten off, leaving a long tail. This is what you will use to sew on the head. Attach the head by pinning it in place. The nose will hang off toward the front, while the back will be mostly attached. Sew around multiple times. Make sure the neck is firmly stuffed before you attach.
Legs (make 2)
Start with white:
Round 1: 6 SC in a magic ring
Round 2: SC INC in each around. (12)
Round 3: SC in first, SC INC in next. Repeat around. (18)
Round 4: In the back loop only, SC in each around. (18)
Round 5: SC in each around. (18)
Change to Gray
Round 6-23: SC in each around. (18)
Round 24: SC in first 2, INV DEC in the next. Repeat around. (12)
Fasten off with a long tail to sew on. Attach the legs so that they lay flat on the ground in a sitting position. The bottom part of the leg will attach around round 7 of the body.
Arms (make 2)
Start with white:
Round 1: 6 SC in a magic ring
Round 2: SC INC in each around. (12)
Round 3: In the back loop only, SC in each around. (12)
Round 4: SC in each around. (12)
Change to gray.
Round 5-21: SC in each around. (12)
Fasten off with a long tail to sew on. The arms angle down slightly, the bottom of the arm around round 20, the top around round 23.
Tail
Chain 12
In the second chain from the hook, HDC. HDC in the remaining chains for a total of 10.
Fasten off. Cut 4 pieces of yarn to attach to the end of the tail. Fold in half and pull through using the hook. Pull the ends through the loop and pull tight. Separate the strands of the yarn for the tail end. Sew it on the backside, centered between the legs.
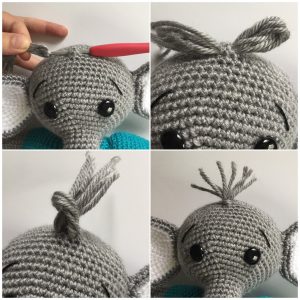
Head Fuzz
Now you can add the cute little hair fuzz! I cut 2 pieces of yarn about 6 inches long. Using your hook pull the yarn through. Pull the ends through the loop made when you pulled through. Pull tight! I attached them right between the ears. Now separate the strands like you did with the tail. Trim them up to your desired length! (NOTE: This picture is for my Friendly Elephant pattern, but the concept is the same!)