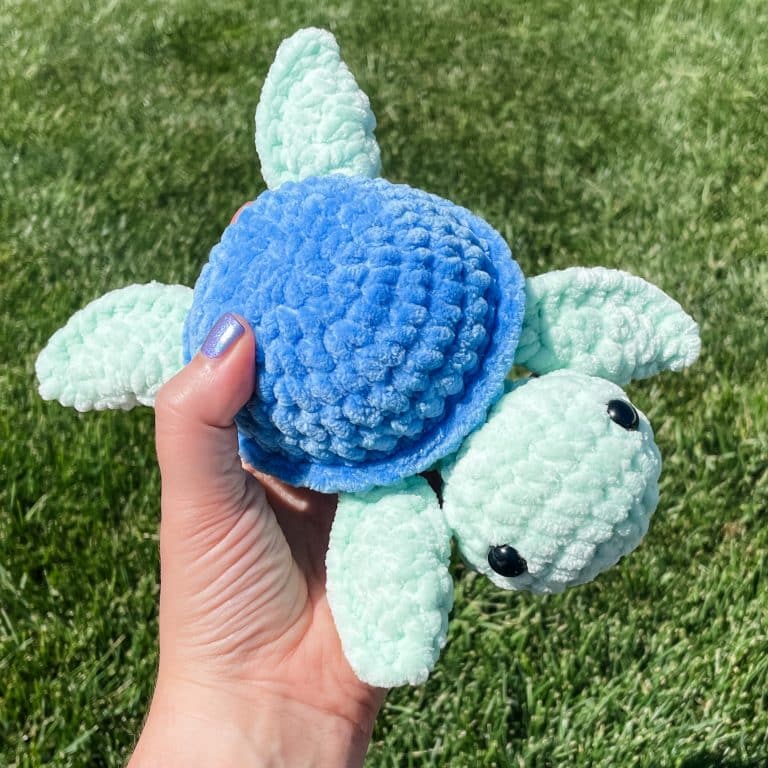
No Sew Crochet Turtle Amigurumi Plush
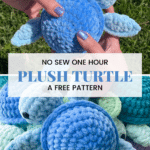
This fun pattern makes a crochet amigurumi turtle in one hour! This is such a great pattern if you hate sewing- this is completely no sew!
Learn how to make Crochet Turtle Pattern
There are some really awesome crochet turtle patterns out there. I never want to create something that is already made. First of all because I feel like it is dishonest, but also because that is no fun! But while I was looking for one, none of them had quite what I was looking for.
JOIN MY NEWSLETTER TO RECEIVE…
A free email course-Amigurumi 101
This free amigurumi email course gives you what you need to master the basics of amigurumi, along with some extra tips and tricks!
So when I started designing this crochet turtle I had three objectives. I wanted it to be a no sew pattern. I know a lot of people don’t love the sewing process, so I wanted this to be crochet only! I also wanted this to be a super quick project… My goal was under an hour! Of course, I also wanted to make something that was super cute. I feel like I accomplished the mission!
Would you like to save this project for later? Input your email address below, and we will promptly deliver the project to your inbox.
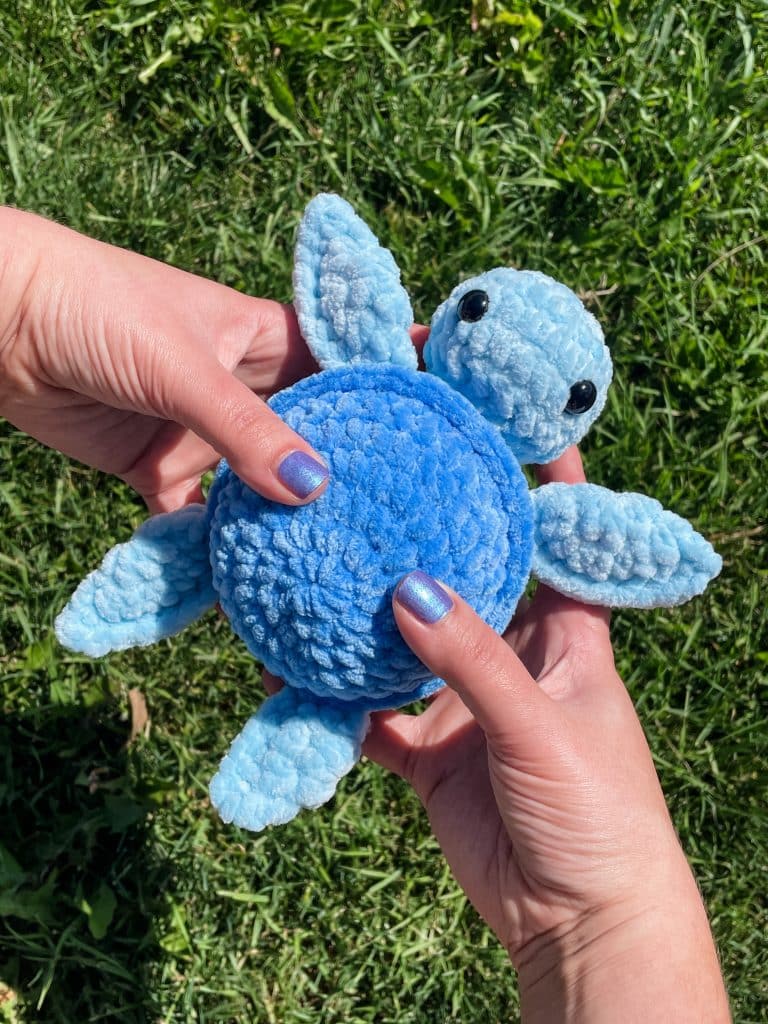
This turtle pattern would be a great pattern if you like to sell what you make. Once you make your first crochet turtle, you will want to make a second! The plush yarn really helps it work up quickly, and you will be under an hour a turtle in no time.
While the no sew aspect makes it slightly more complicated, it is super gratifying to see it come together! The only reason you need a needle is to weave in any ends. You make the fins and head first, then as you crochet the shell/body you attach as you go! Even the ridge of the crochet turtle shell is created by working the front loop on one row, then the back loop on the next one!
The plush yarn makes this amigurumi turtle really cozy and squishy! I know for a fact that kids think they are great, which makes this an awesome last minute gift! Keep some of this plush yarn on hand and you are set for any surprise birthdays. It also doesn’t take a lot, so it is cost effective, too! I also made a MINI VERSION of this cuteness, which uses even less yarn!

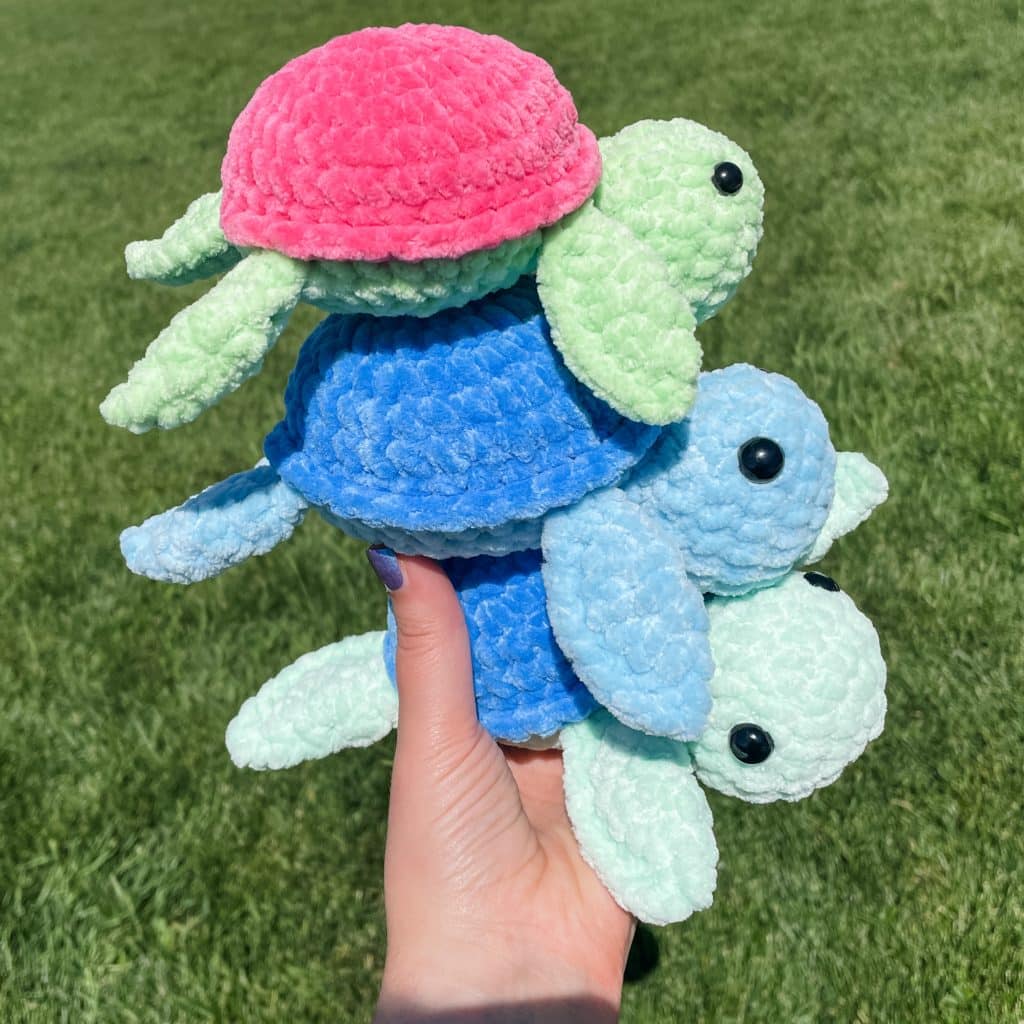
You can have a lot of fun with the color combinations on this too! Plush yarn has come a long way in even a couple of years. There are way more color options out there now, even bright colors! I feel like it used to be mostly neutrals, although I love those colors, too!
Want the ad-free, printable PDF?
Find it on etsy
Get it on Ravelry
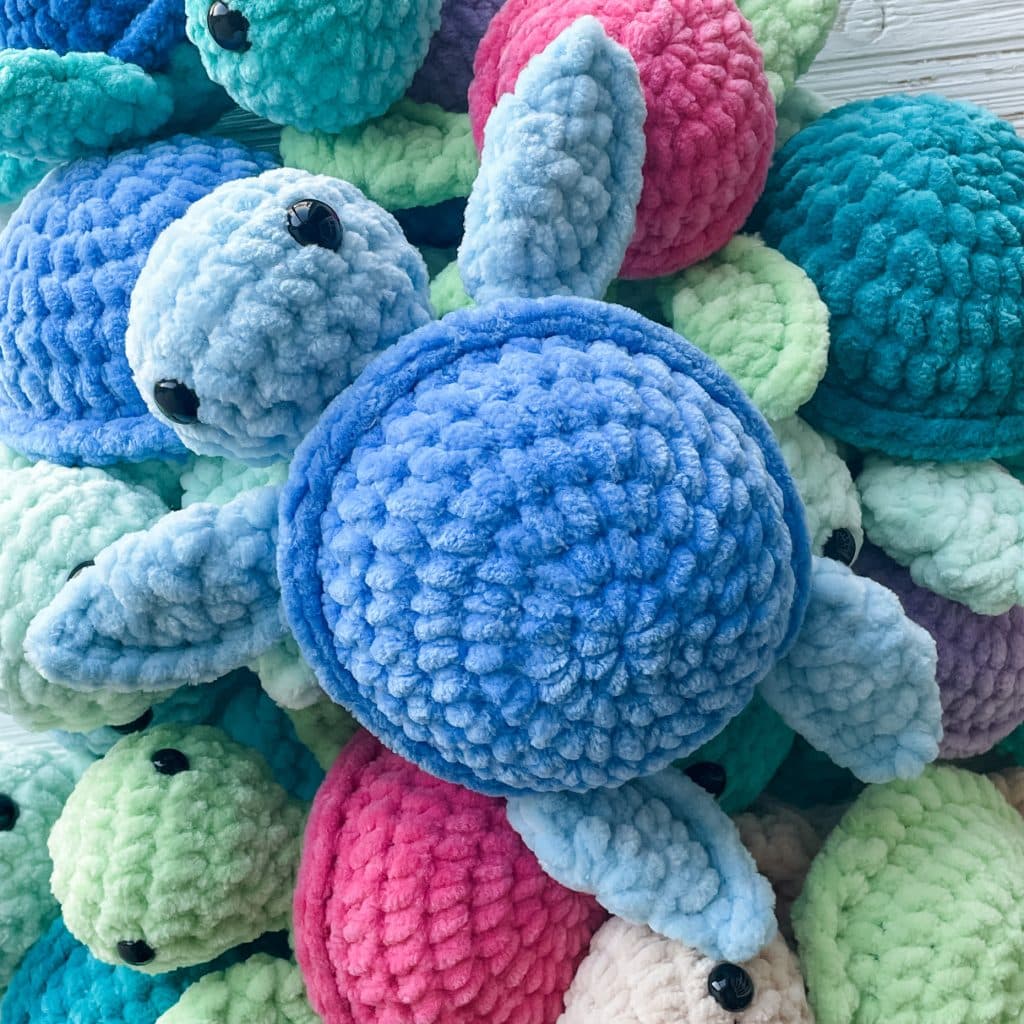
The plush yarn may be a turn off for you… but I really hope you give it a try! I tried three different types as I was trying to get this pattern just right. Hobbii’s Baby Snuggle, Premier Chunky, and Michael’s Sweet Snuggles Lite. They all worked great, and I like them all for different reasons. The Sweet Snuggles Lite makes the crochet turtle quite a bit bigger. It is closer to the popular blanket yarn, if that is helpful. Hobbii and Premier are super similar to each other. I would use a 4mm hook when using those, but it also depends on your tension.
You may also notice that the beginning of the turtle starts with 8 stitches in a magic circle, instead of the typical amigurumi 6. This helps prevent the circle from forming a cone shape. Rounded crochet turtle shells only!
How to make a Crochet Turtle Step by Step
Ready to make this crochet turtle? This post contains some affiliate links for your convenience! Read my full disclosure policy.
Materials you’ll need
Abbreviations
SC- single crochet
SC INC- single crochet increase
HDC- Half Double Crochet
DC- Double Crochet
INV DEC- Invisible decrease
Crochet Turtle Pattern
Fins (make 4)
Using Body color:
Round 1: In a magic circle, HDC 8. Slip stitch to the first stitch and chain one.
Round 2: HDC INC in each around. (16) Slip stitch to the first stitch and chain one.
Fold the circle in half and HDC twice through both halves in the first touching stitches. HDC together the next 6 stitches. HDC twice in the last one. (10)
Turtle Head
Using Body color:
Round 1: In a magic circle, SC 8.
Round 2: SC INC in each around. (16)
Round 3: SC in the first, SC INC in the next. Repeat around. (24)
Round 4-5: SC in each around. (24)
Round 6: SC in first, INV DEC in the next. (16)
Attach the safety eyes between rows 4 and 5, 7 stitches apart.
Round 7: INV DEC in each around. (8)
Round 8: SC in each around. (8)
Fasten off and weave the end in.
Crochet Turtle Body
Start with the shell color:
Round 1: In a magic circle, SC 8.
Round 2: SC INC in each around. (16)
Round 3: SC in the first, SC INC in the next. Repeat around. (24)
Round 4: SC in the first two stitches, SC INC in the next. Repeat around. (32)
Rounds 5-7: SC in each around. (32)
Round 8: In the front loop only SC in each around. (32) Change to body color here.
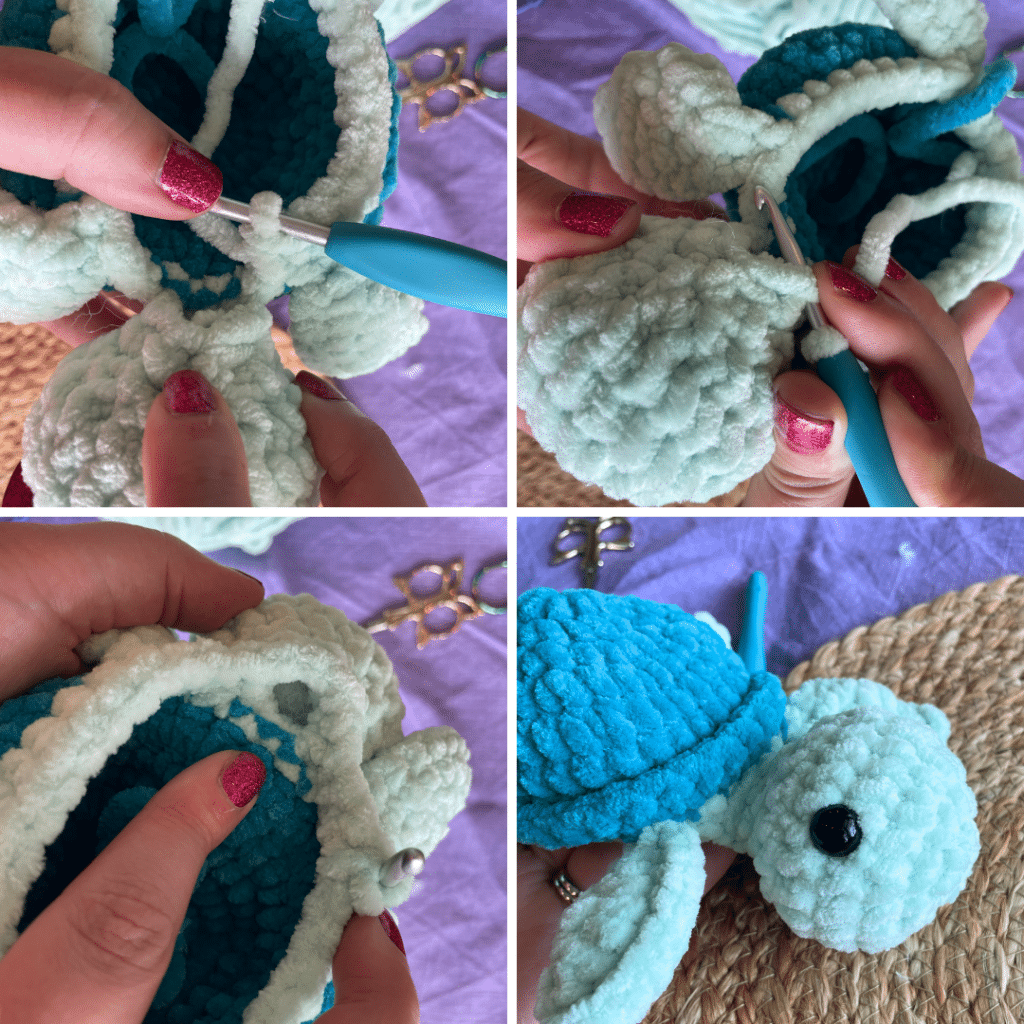
Round 9: *The video above shows this round, as well as round 10 step by step, if you need help. The video can also be found here if you want a different window open. For written notes, see below for a tutorial on attaching the fins and the head*
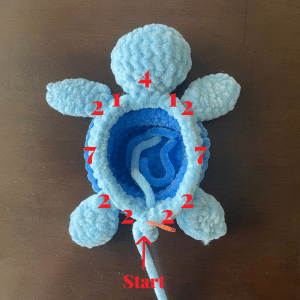
In the back loop only (of round 7!), SC in the next two. Attach the first fin through the next two stitches. SC in the next 7. Attach the second fin in the next two stitches. SC in the next. Attach the head going through the next 4 stitches using slip stitches. SC in the next. Attach the third fin stitches in the next two. SC in the next 7. Attach the fin in the next two. Finish the round with the last two sc.
Continue on to close the body:
Round 10: SC in the first 14. Attach the bottom half of the turtles neck with a SC in the remaining 4 stitches. SC in the remaining 14 stitches.
Round 11: SC in the first two, INV DEC in the next. Repeat around. (24)
Begin to stuff here. Before you stuff the body, make sure the head and neck have enough stuffing. Continue to stuff as you close.
Round 12: SC in the first, INV DEC in the next. Repeat around. (16)
Round 13: INV DEC in each around. (8)
Sew the remaining hole closed. Fasten off and weave in the ends.
Notes on Attaching the Fins
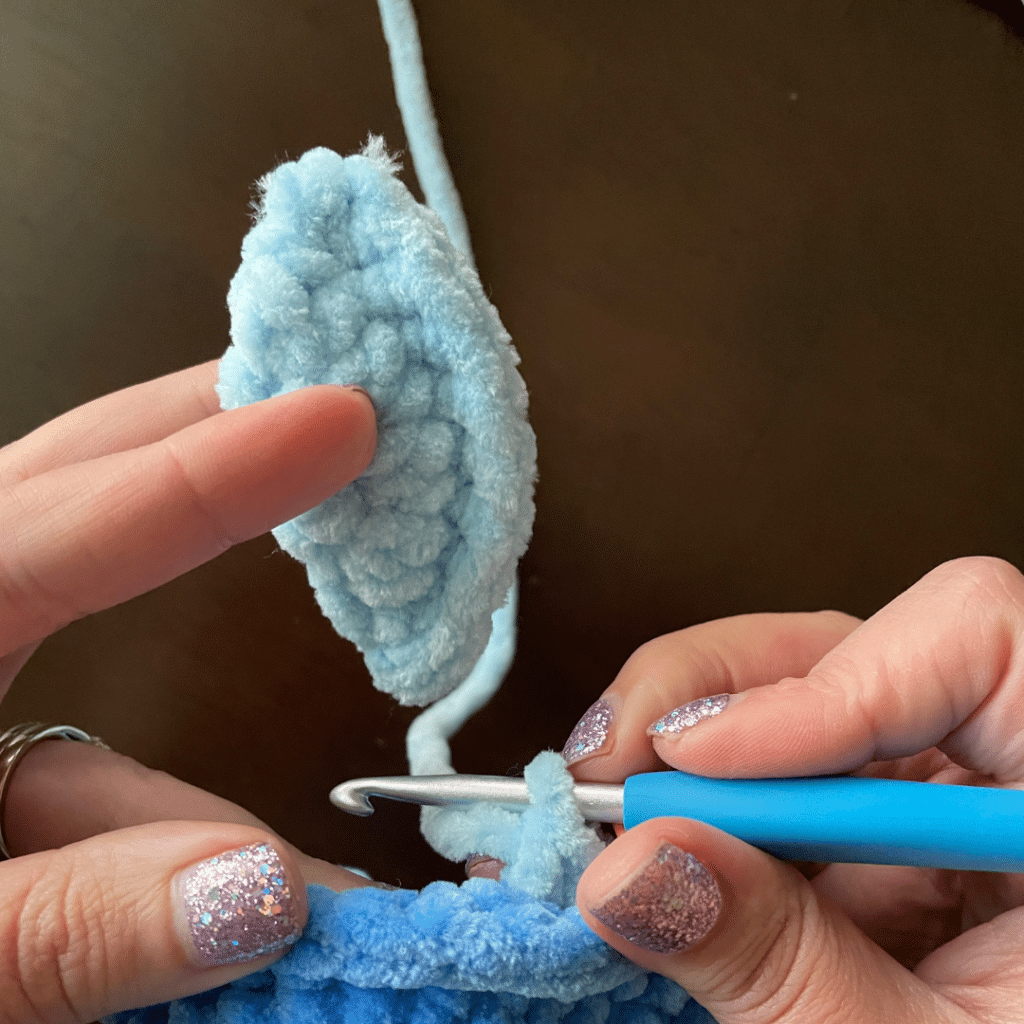
The line from the HDCs faces towards the back of the turtle, like this.
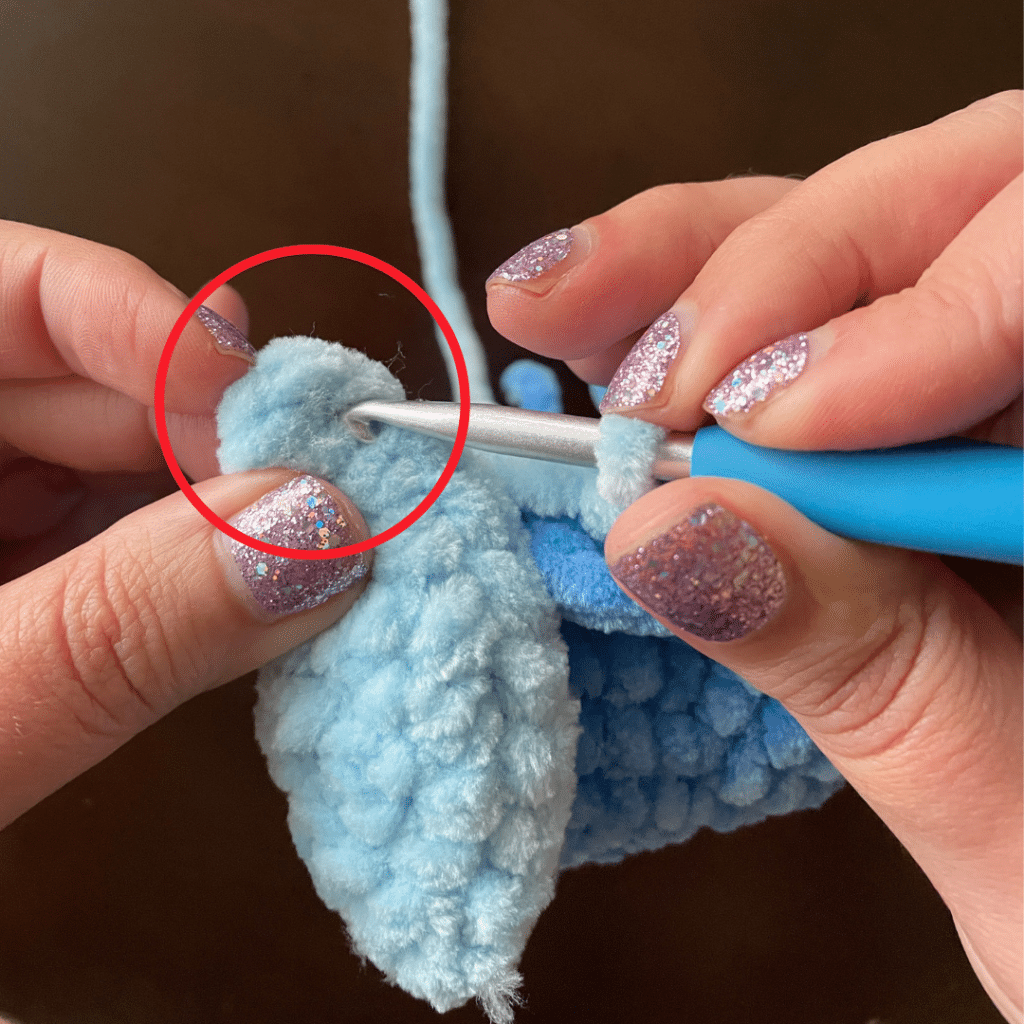
Flip the fin up so that the top now touches the shell. You will be attaching in the two circled stitches.
On the right side you attach the second to last stitch first. On the left you attach the stitch at the very end of the fin, and then the second.

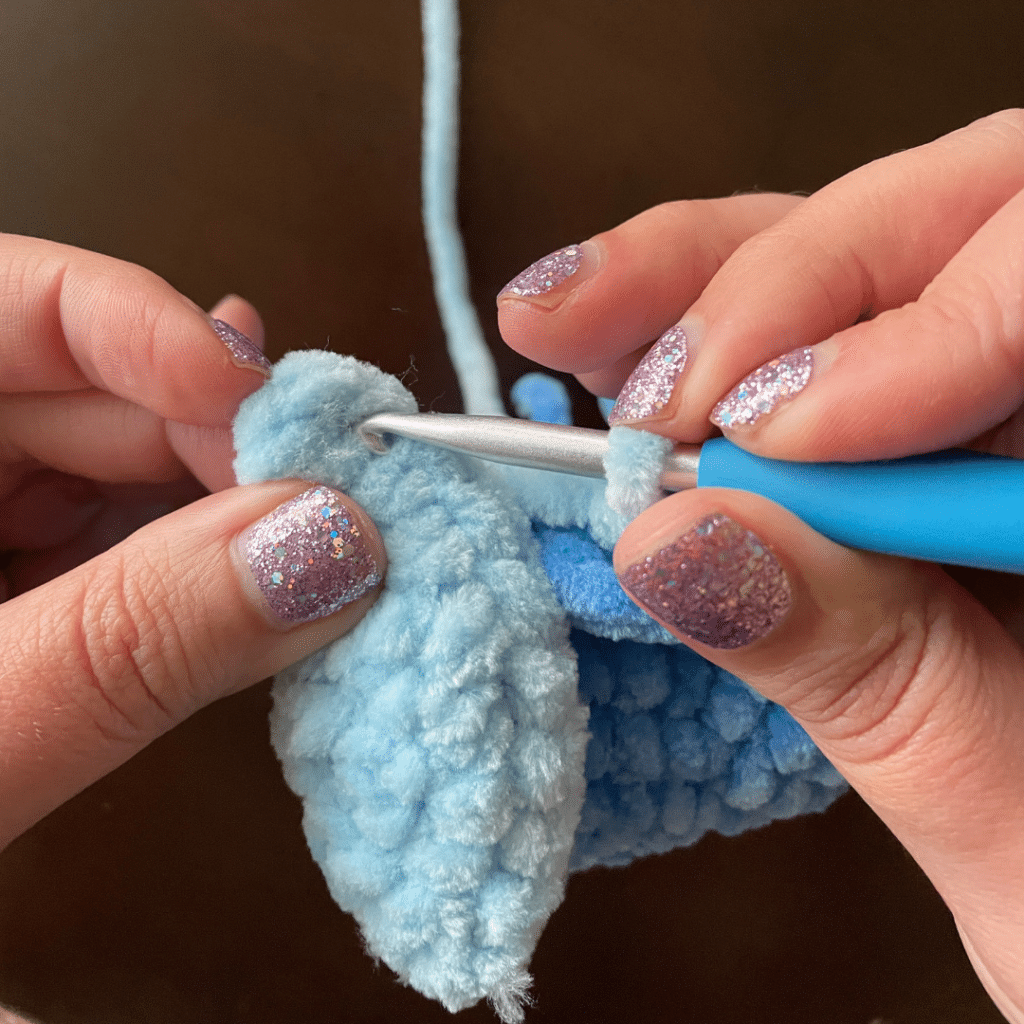
Go through the fin and then through the shell. SC as you normally would.
Repeat through the second stitch.
This is what it should look like when you are done. The SC should be under the fin.

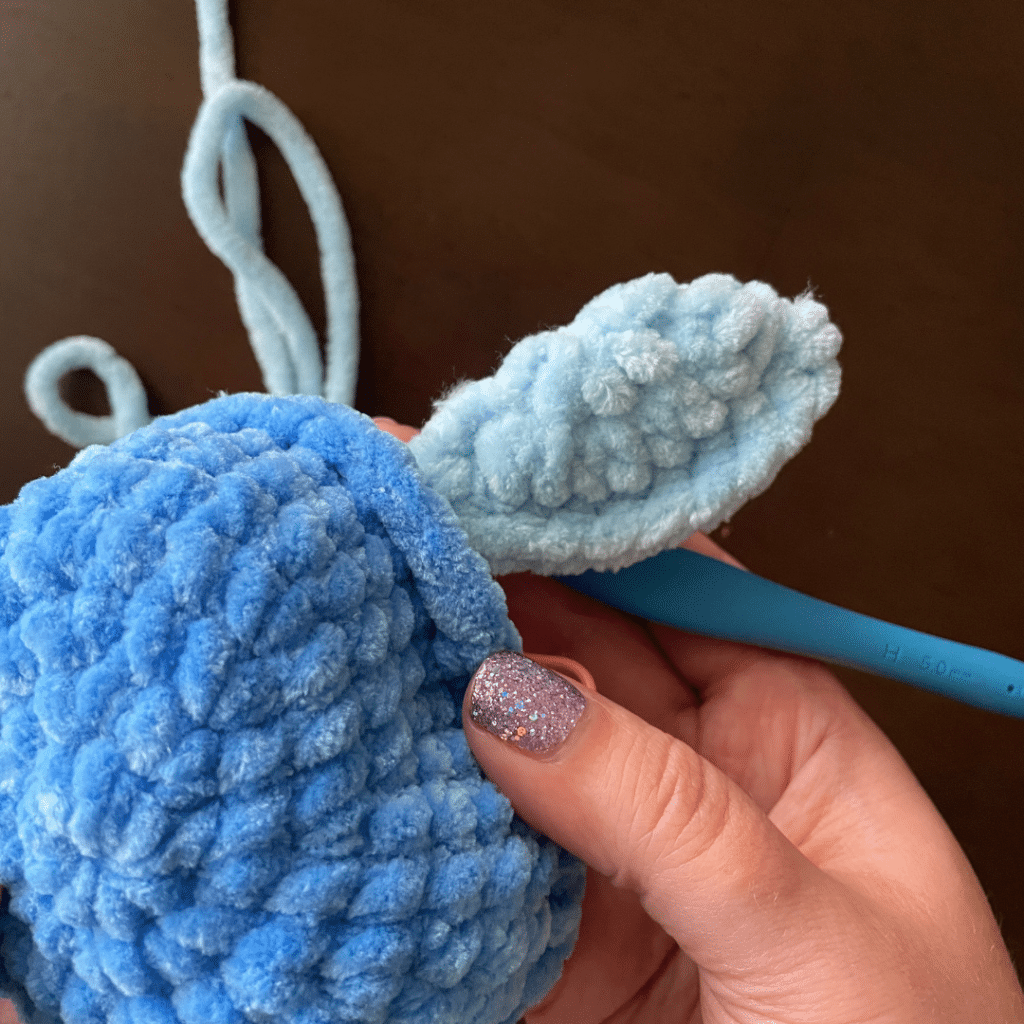
You will attach the fins using SC as you go around. You use the first two stitches on each fin to attach to the body. Each fin takes two stitches on the round to attach. The rounded part of the fin should be facing the tail. When you begin, the first fin you are attaching is the right back one.
When you attach, you want to make sure that the single crochets are underneath the fin, because those stitches will be used on the next round. An easy way to double check is to see if the fin is touching the shell as you single crochet. You should see the SC in an unbroken row beneath the fin.
To attach go through the fin and then the body. Pull through both and single crochet as normal. On the right side you attach through the second stitch and then the first stitch. On the left side you attach through the first stitch and then the second one.
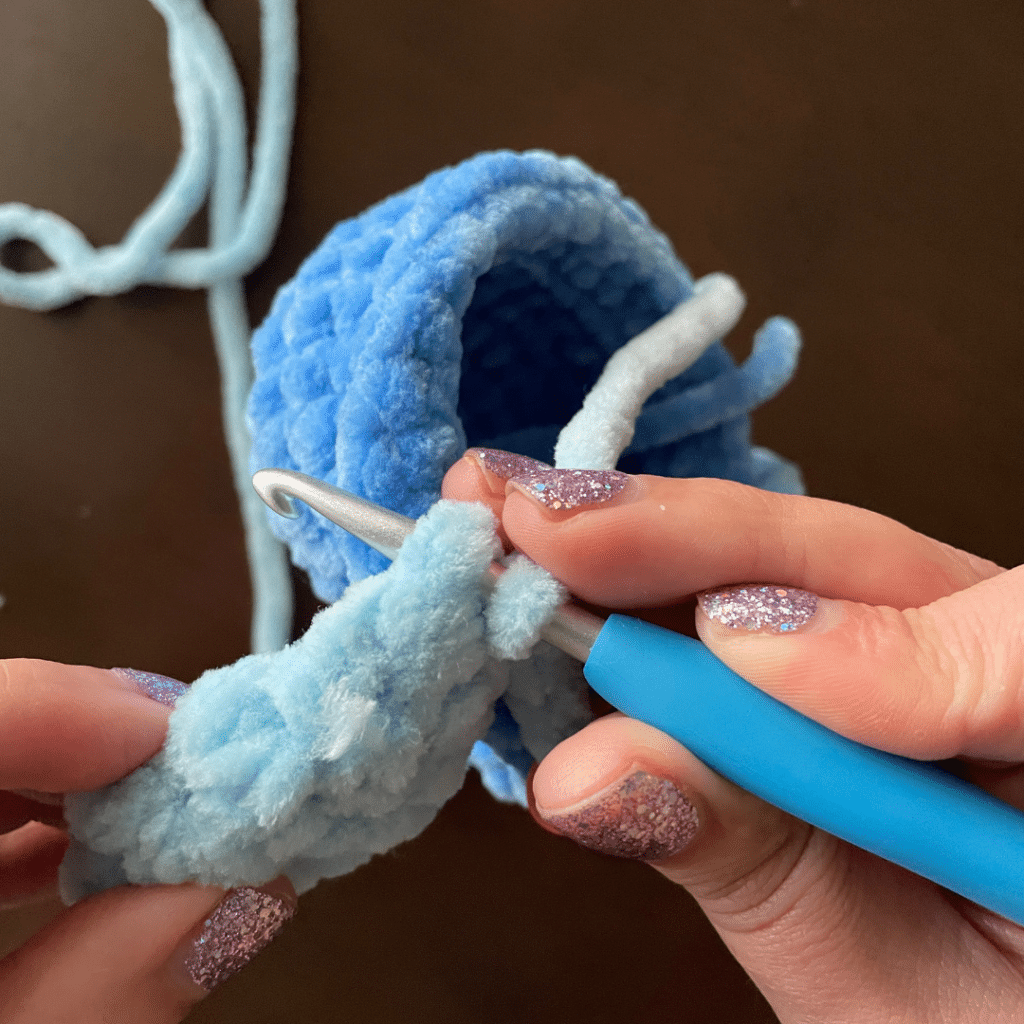
Notes on Attaching the Head
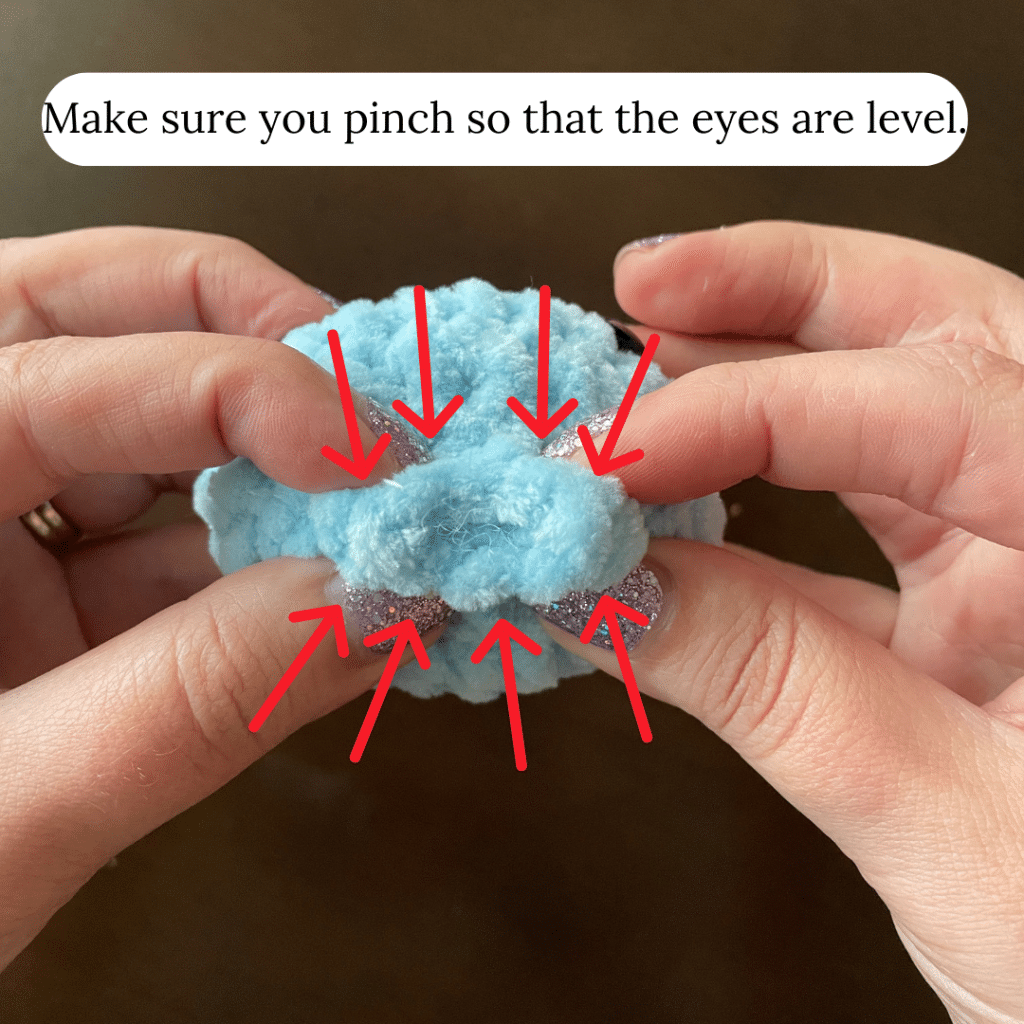
When you attach the head on row 9, you are only going through 4 of the 8 stitches of the turtle’s neck. To find these stitches, flatten the opening so that it is level with the eyes. The top four stitches, when attached, should have the eyes level and on top. For the top stitches you will use slip stitches to attach it to the body. Put your hook through the first stitch on the turtle and then through the corresponding stitch on the body. Pull up and through. You will repeat that three more times for a total of four.
You will attach the bottom half of the head on the next row. This time you will SC in each of the four bottom stitches across, just like it was a normal part of the row. This leaves a small opening. Make sure you stuff the neck and head pretty well. (click here to go back to main body pattern and finish up your turtle!)
I can’t wait to see your finished crochet turtles!
Answers to your questions about making the No Sew, One Hour Crochet Turtle
Q: Do I have to use plush yarn?
A: No, but your project will be much smaller. This was designed specifically for this type of yarn, and the shape may be slightly off.
Q: Can I sell finished items from this pattern?
A: Of course! I hope you sell lots and lots! I just ask that you credit me with the design, especially if selling online.
Did you make this crochet pattern?
We would love to see what you have created so mention @thefriendlyredfox or tag us using #thefriendlycrochetclub so we can see your creations!

Hi what happens if I single crocheted the head instead of slip-stitching
You have too small of a hole to be able to stuff the rest of the neck and make sure it’s supported. It will be floppy!
It would be bigger! 😊
Thank you for the free Turtle Pattern. Hope I can Make it.
This is only HALF of a pattern!!!! It only covers through attaching the fins and head…NOTHING else!!!! Why would you publish only half a pattern????? Now I have 6 half completed turtles!!!! Wasted time and money!!!!
I’m sorry you are frustrated with the pattern. The rest of the body instructions can be found underneath the turtle photo with the numbers on it. The large notes on the head and fins are actually located at the bottom of the post because they’re a bit longer and would have broken up the main part of the instructions. It’s a layout choice that works well for many, but I completely understand how it might have been easy to miss!
This pattern was super beginner friendly, this was actually my first plushie and it turned out super duper cute. Thanks a bunch! ♡
How do I get to the back stitch of round 7 – do I have to flip the body inside out? ( of the turtle) thank you!
If it helps to kind of push it out a little, then that works just fine! You don’t need to flip it inside out completely.
Thank you so much. This is my favorite crochet pattern on the internet!
Hi, what is there a certain gauge of yarn you recommend for this?
I use mostly size 6 yarns! Premier Basix Chenille and Bernat Blanket are my favorites. Bernat will work up a little bit bigger than the Premier.
I can’t find my 4.5 size hook, do you recommend I size up a hook size to size 5 or down to size 4?
It depends on your tension and the yarn you’re using. I’d personally size up, but if your stitches are loose, you can size down. 🙂
Would I be able to sell the finished product? If yes I’d definitely credit you but was wondering how you would like to be credited. If no then that’s completely fine too. Have a great day!
Yes you can sell the finished product! I just would ask that you either tag me in photos or reference back to pattern in any listings or conversations!
Question about rounds7,8,9 on the shell/body. Pattern states to sc blo in round 9 into round 7, but round 8 is the flo round. Shouldn’t round 9 be done into round 8?
Round 9 is done into round 7 because round 8 will be the ridge of the shell!
Thank you so much for the pattern, are you meant to stuff the fins?
No – the fins are left unstuffed!
Amazing pattern for both Big and Baby Sea Turtles! I’ve made 2 of each and have no doubt I’ll be making more! They work up even faster the more I make! 😊 Thank you for writing and sharing this for FREE! 🩵
Thanks for your sweet comment! I’m so glad you enjoyed the patterns!!
This turtle is adorable and the pattern works perfectly! I have crochet many different items for years, however, I could never master any amigurumi. I heard about Nursing Homes accepting donations of crochet amigurumi because they are comforting to the residents. So I decided to try it one more time. I am so glad I found this pattern. The written pattern is easy to understand and follow. And the photos and videos are excellent! Thank you for this pattern!
Hello! Thanks so much for the free pattern! It was my first turtle and it came out sooo cute! Tsm!
I LOVE this pattern! It is so easy to read and understand and the no-sew is the cherry on top! I have made so many of these just with some of my scraps of yarn leftover from other projects. I have given so many away to friends and family and people just love them. Thanks for sharing!!! I’m not sure how to include any pictures to show you how cute they have turned out.
Do I have to slip stitch at the end of each round?
No, you’ll use a stitch marker to mark the end of each round. It’s done in continuous rounds.
Fun and easy pattern! Thanks for your generosity in sharing. I was able to send a little surprise to each of my grands while I’m away for two years.
Could you use a larger hook to make a bigger turtle? I have a hard time seeing my stitches with the smaller hook and this kind of yarn.
Yes of course! The proportions/shaping might look a little bit different, but experimenting with bigger hooks and yarn would be so fun!
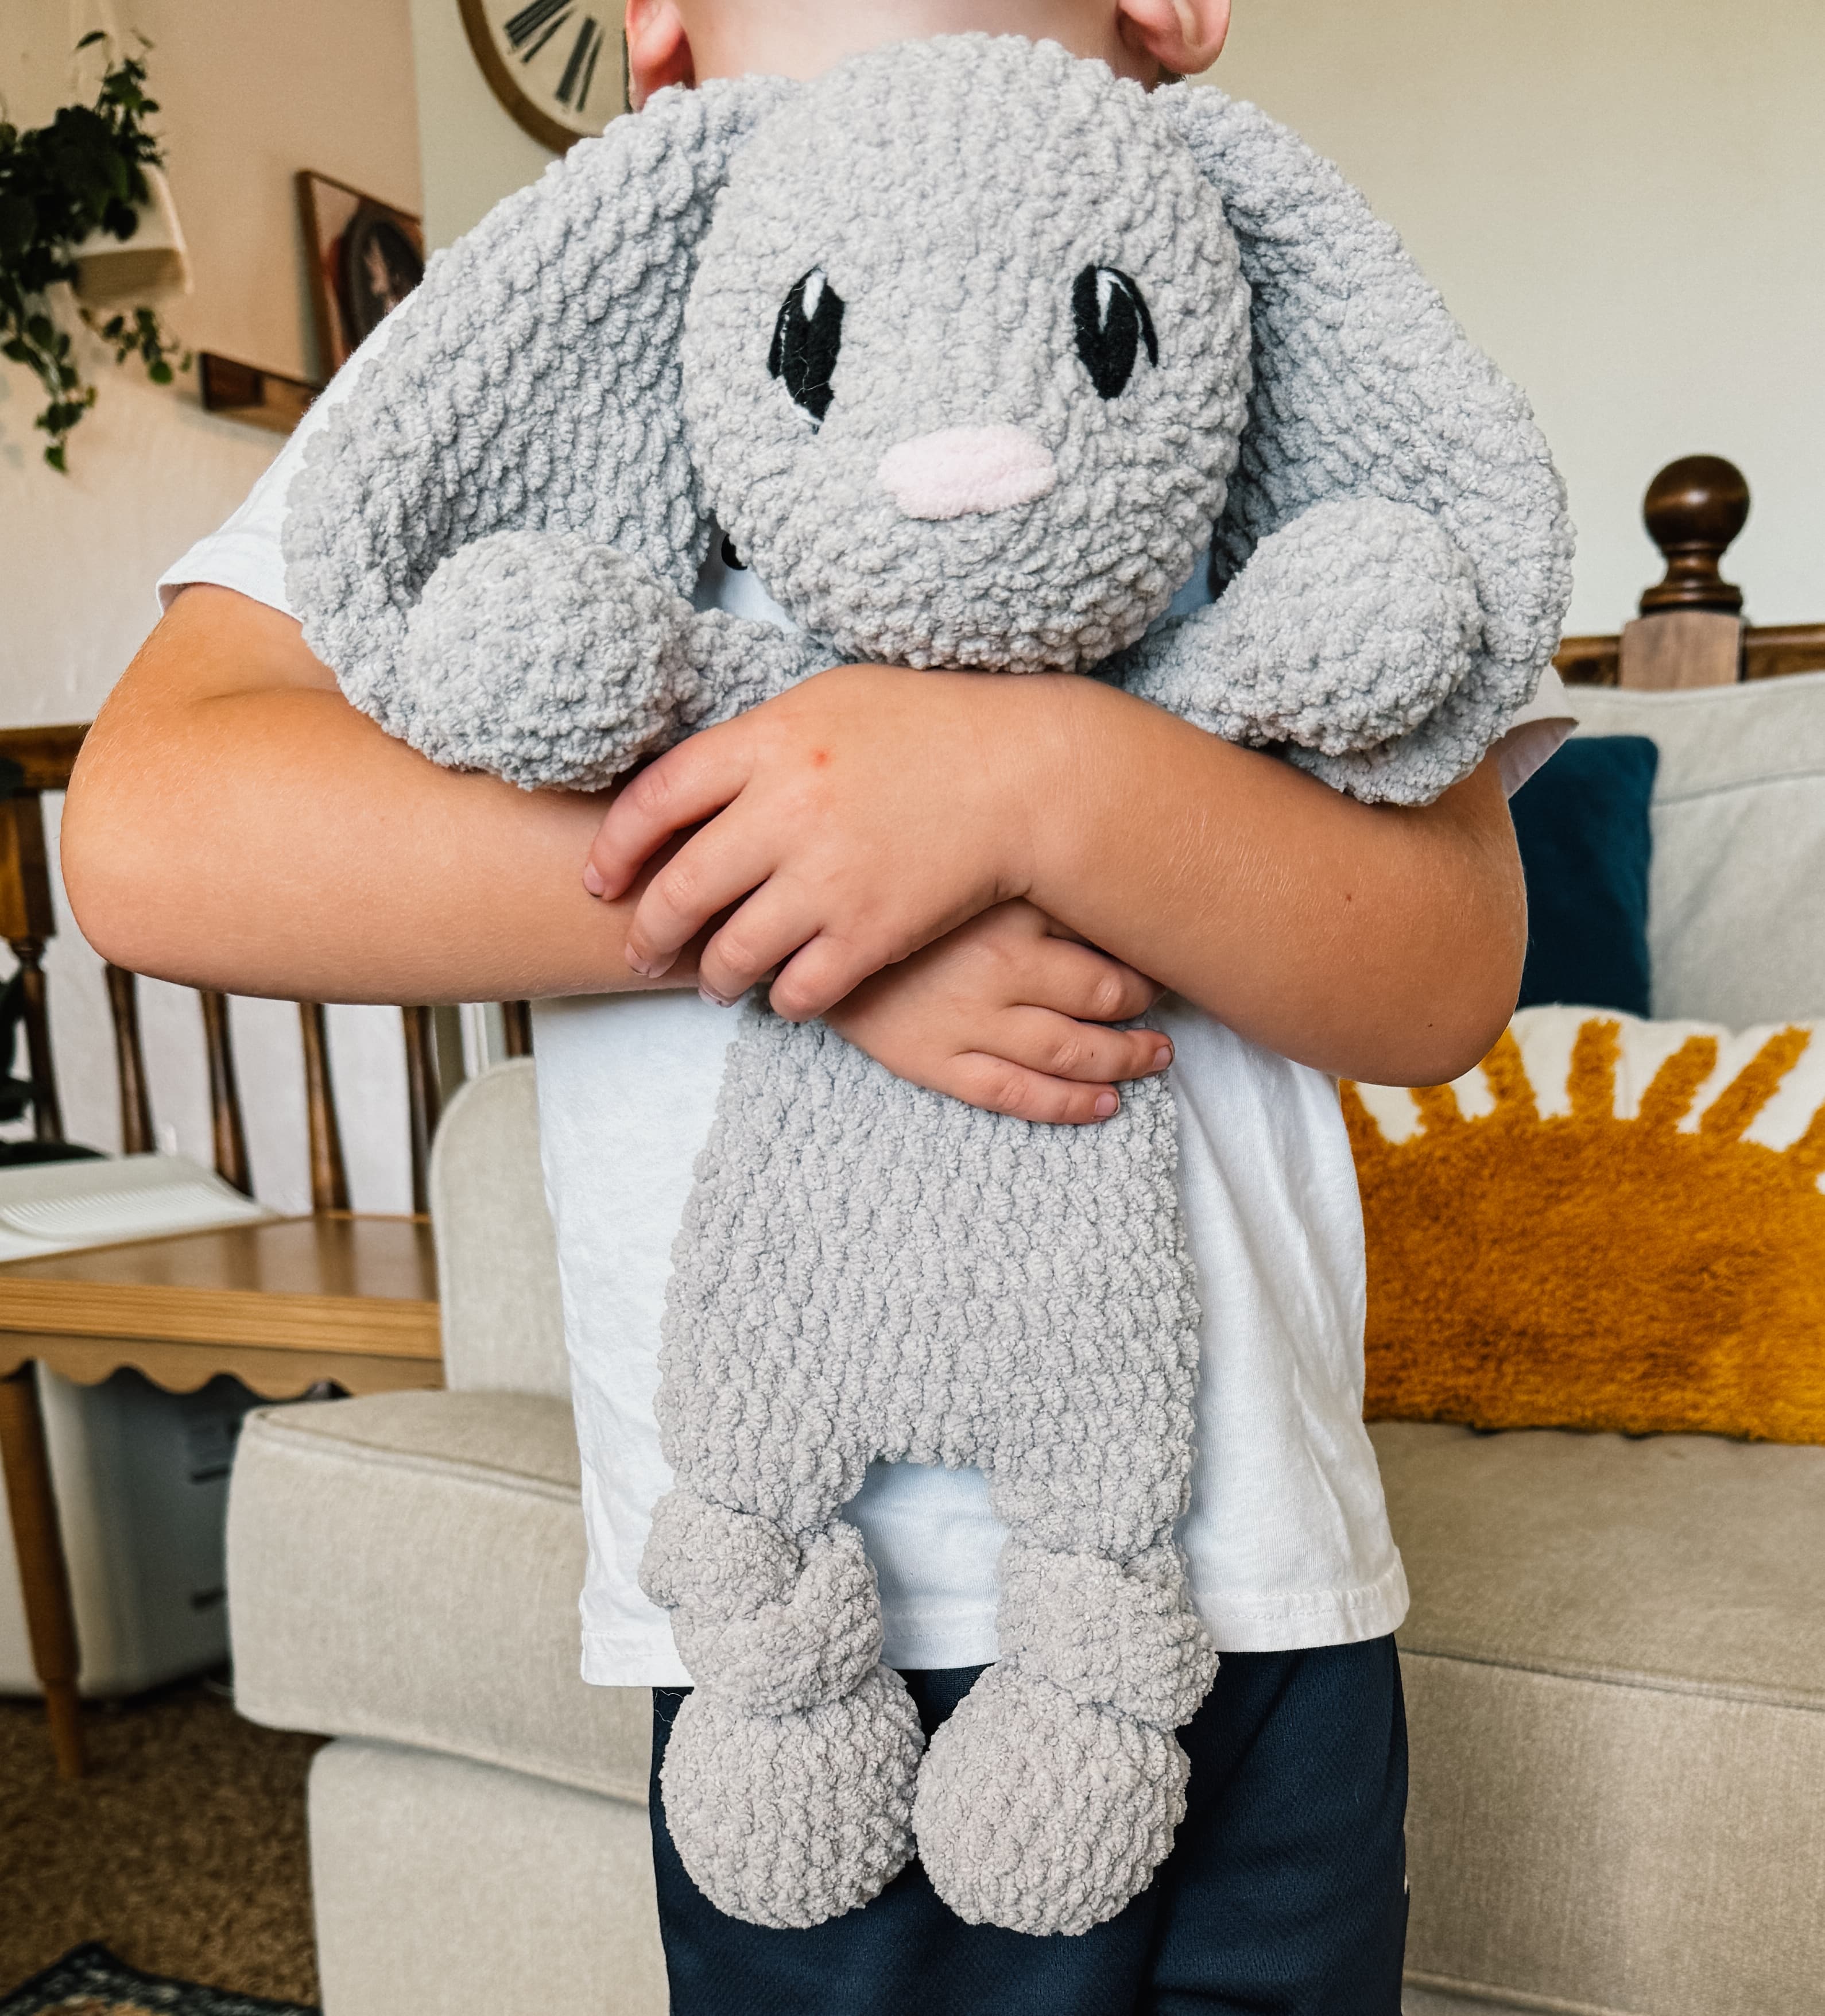
This was so much fun thank you! My son was thrilled with his new turtle. The pattern is very straightforward.
I made this and it turned out so cute thank you