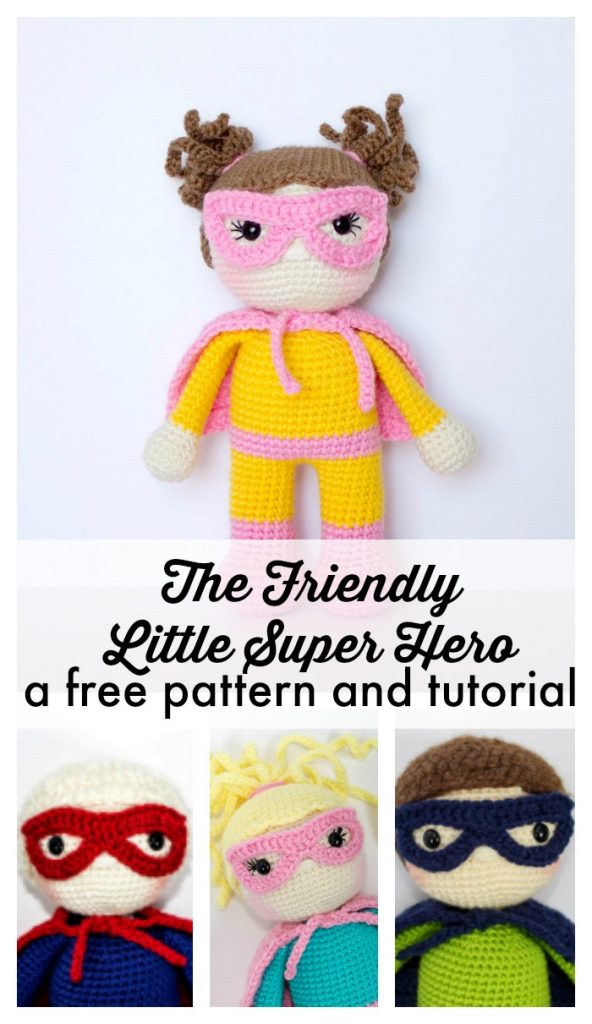
Crochet Super Hero Free Pattern
Crochet Super Hero Pattern
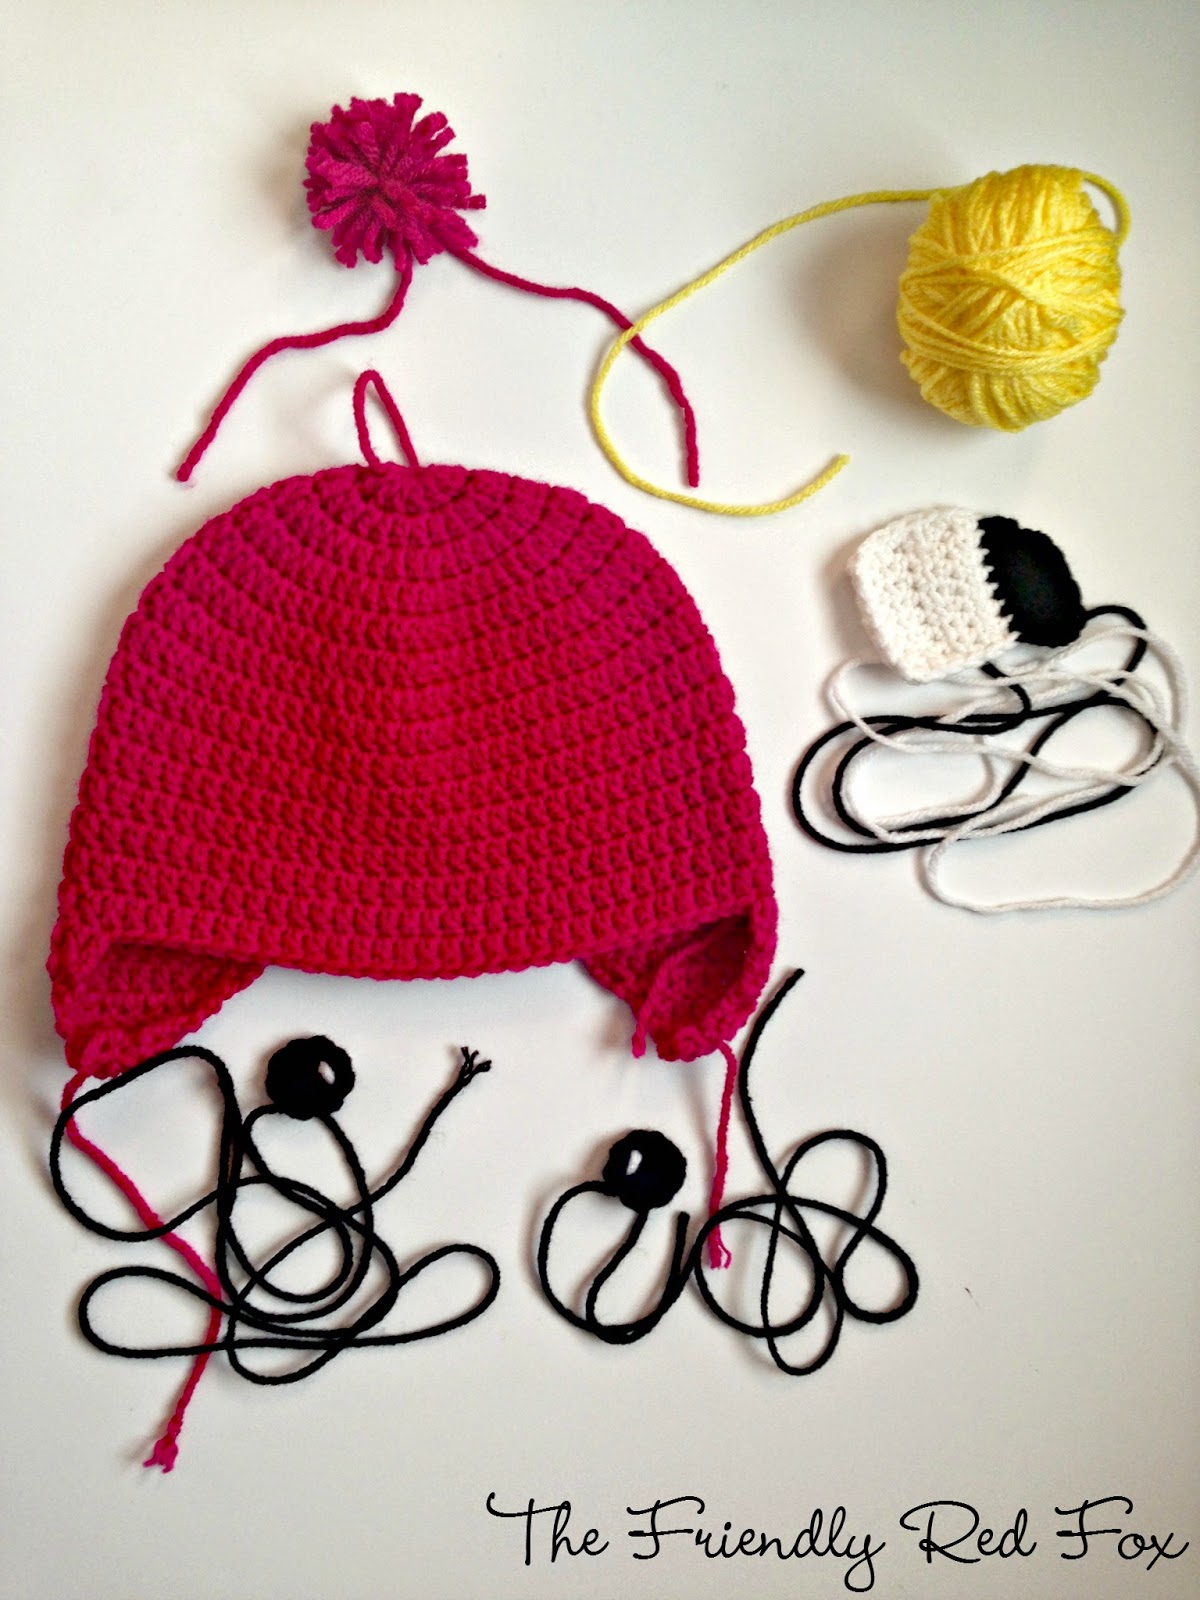
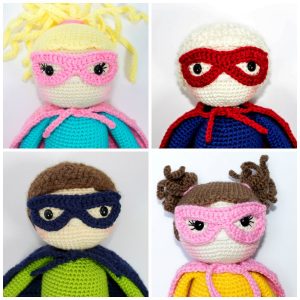
This crochet Super Hero free pattern is a smaller version of the original Friendly Super Hero. About 9 inches tall, with a cape and mask you can customize to make the perfect super hero doll!
If you are new around here, welcome! I am so excited to participate in this Crochet Along! If you don’t know what I am talking about, join this group on facebook. There are a lot of links to different videos throughout the pattern to help you with some of the trickier parts. I highly recommend reading through it first.
Come follow me on Instagram
because there are a lot of great behind the scenes stuff (and I share A
LOT in my instastories over there. all good things, all good things.)
THEN subscribe to my YouTube channel. I’m making 2018 the year of video and I am planning on sharing some awesome stuff over there, too!
Like this pattern? Then take a second to check out my other amigurumi patterns, too!
Please note this pattern is only for PERSONAL USE. Please feel free to make as many
items as you wish for yourself, or as gifts. You may sell items made with this pattern but
PLEASE LINK BACK OR GIVE CREDIT TO ME AS DESIGNER. In no way can you
share, reproduce, or sell this pattern. Please respect my rights as designer.
Read through the entire pattern and the amigurumi tips and tricks before you begin.
Supplies to Make the Crochet Super Hero
You will need:
Approx 100 g size 4 yarn in outfit color and skin color
Crochet Hook in Size 3.75 or 3.5
Yarn Needle
Fairfield Polyfil
10.5mm safety eyes
stitch marker
Crochet Terms for Super Hero Doll
(Please note that gauge is not overly important here. Unless you have wide gaps in your fabric of single crochet, then go down a hook size until you achieve tight stitches.)
*Written in US Crochet Terms*
SC– single crochet
SC INC– single crochet increase (2 SC in each stitch)
INV DEC– Invisible decrease (put hook through the FRONT LOOP ONLY of two consecutive stitches [two loops on hook] Yarn over pull through both loops. [two loops on hook] Yarn over pull through two loops)
Magic Circle– Make a loop, leaving a long tail to work with. Insert hook in center of loop, yarn over and draw up a loop. Yarn over, pull through to make the first chain (this does not count as a stitch!). Continue to crochet over the loop and tail with the number of stitches called for. (If you need 6 SC, then crochet 6 SC inside the ring.) Pull the tail to close the circle.
Okay, let’s get to it!
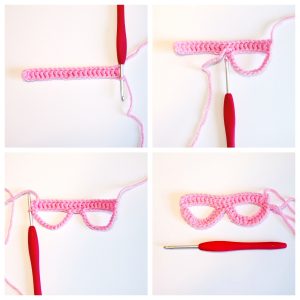
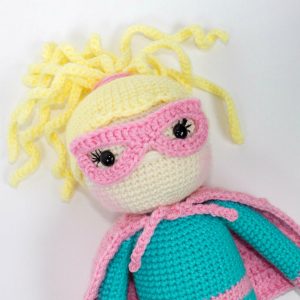
Crochet Super Hero Mask
Mask (even though you are making the mask, you won’t attach it until the end. It will help to place the eyes and hair however, so I recommend making it first.)
Using the accent color:
Chain 22. DC in the 3 chain from hook. DC in each across. Turn. (20 DC)
Chain 15. Count 9 DC over. Slip stitch to the 9th DC. Slip stitch in the next 3. Chain 15 more and connect it with a slip stitch to the last DC. Chain 1 and turn. HDC in the next 13 chains. Skip one and slip stitch to the next. Slip stitch in the next (this is the gap between the eyes). Slip stitch to the chain. Skip one on the next set of chains and HDC in the next 13. Connect with a slip stitch to the last DC. Fasten off leaving a long tail to attach the mask to the face.
Crochet Doll Legs and Body
Always move your stitch marker to the last stitch in the round. This pattern is worked in continuous rounds. Stuff as you go.
Leg One
Using accent color.
Round 1: In a magic circle, SC 6
Round 2: SC INC in each stitch around (12)
Round 3: SC in first, SC INC in next. Repeat around. (18)
Round 4: SC in first 2, SC INC in next. Repeat around. (24)
Round 5: SC in first 3, SC INC in next. Repeat around. (30)
Rounds 6-8: SC in each around. (30)
Round 9: INV DEC 12 times. SC in the next 6. (18)
Round 10-14: SC in each around. (18)
Change to main color. Watch this video on the best way to change color in amigurumi.
Rounds 15-20: SC in each around. (18)
SC in the next two. Fasten off.
Leg Two
Using Accent Color
Round 1: In a magic circle, SC 6
Round 2: SC INC in each stitch around (12)
Round 3: SC in first, SC INC in next. Repeat around. (18)
Round 4: SC in first 2, SC INC in next. Repeat around. (24)
Round 5: SC in first 3, SC INC in next. Repeat around. (30)
Rounds 6-8: SC in each around. (30)
Round 9: INV DEC 12 times. SC in the next 6. (18)
Round 10-14: SC in each around. (18)
Change to main color.
Rounds 15-20: SC in each around. (18)
If you need help on how to attach the legs, watch this video!
Round 21 (This round attaches the legs and then you will begin the body): Sc in next 12. Chain 3 and then SC in the next stitch of Leg One. Take care to crochet over the tail left over by fastening off. SC in each stitch around Leg One. When you come to the three chains, SC in each chain (a total of three.) Then SC in each stitch around Leg Two. SC in each chain back (3 stitches) to the other leg. In the last SC on the last chain place your stitch marker.
Round 22-23: SC in each around. (42)
Change to accent color for belt.
Rounds 24-26: SC in each around. (42)
Change back to main color.
Rounds 27-36: SC in each around (42)
Round 37: 4 SC, INV DEC, repeat around. (35)
Round 38: 3 SC, INV DEC, repeat around. (28)
Round 39: 2 SC, INV DEC, repeat around.(21)
Change to skin color.
Round 40: 1 SC, INV DEC, repeat around. (14)
INV DEC until you have 12 stitches on the round.
Round 41: SC in each stitch around. (12)
From here we will be increasing the head. From this point I am resetting the number on the rounds. Round 42 of the body is now Round 1 of the head. It will be easy to see.
Crochet Doll Head
Check out this tutorial on how to make sure the head doesn’t wobble!
Head
Round 1: SC in first, SC INC in next. Repeat around. (18)
Round 2: SC in first 2, SC INC in next. Repeat around. (24)
Round 3: SC in first 3, SC INC in next. Repeat around. (30)
Round 4: SC in first 4, SC INC in next. Repeat around. (36)
Round 5: SC in first 5, SC INC in next. Repeat around. (42)
Round 6: SC in first 6, SC INC in next. Repeat around. (48)
Round 7: SC in first 7, SC INC in next. Repeat around. (54)
Round 8-18: SC in each stitch around. (54)
Place the safety eyes in between rows 13 and 14, nine stitches apart. Sew on eyelashes here, if you want. This is also a good time to place the foam roller or dowel if you are using one. Make sure to stuff the neck around the dowel as well as you can.
Round 19: SC in the first 7, INV DEC in the next. Repeat around. (48)
Round 20: SC in the first 6, INV DEC in the next. Repeat around. (42)
Round 21: SC in the first 5, INV DEC in the next. Repeat around. (36)
Round 22: SC in the first 4, INV DEC in the next. Repeat around. (30)
Round 23: SC in the first 3, INV DEC in the next. Repeat around. (24)
Round 24: SC in the first 2, INV DEC in the next. Repeat around. (18)
Round 25: SC in the first, INV DEC in the next. Repeat around. (12)
Round 26: INV DEC around. (6)
Fasten off and carefully sew the remaining hole closed. Leave a long tail to make the nose.
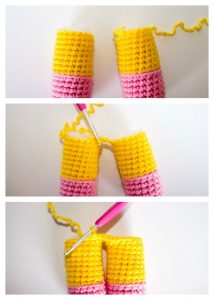
Arms (I stuff only the hands, not the arms.)
With skin color:
Round 1: 6 SC in a magic circle.
Round 2. SC INC in each around. (12)
Round 3: SC in the first, SC INC in the next. Repeat around. (18)
Round 4-6: SC in each around. (18)
Round 7: SC in the first, INV DEC in the next. (12)
Round 8: SC in each around. (12)
Change to costume color.
Rounds 9-23: SC in each around. (12)
Fasten off and leave a long tail to sew on. I sew on between rows 37-38. You can watch this video on how I sew on limbs.
Cape
Chain 18
Row 1: DC in the third stitch from the hook. DC in each stitch across. Chain 2 and turn. (16)
Row 2: DC in each stitch across. Chain 2 and turn. (16)
Row 3: DC INC in the first, DC in the next. Repeat across. Chain 2 and turn. (24)
Row 4: DC in each stitch across. Chain 2 and turn. (24)
Row 5-9: DC in each across. Chain 2 and turn.(24)
You will now be crocheting along the edge to make it nice and clean. HDC in each DC and chain space up the sides. Once you reach the top, chain 20. Fasten off and leave a long end. Thread the yarn through the chains and sew in the end inside the cape. The chains are now the ties for the cape.
Fasten the yarn to the bottom of the cape on the other side. Repeat the process. Tie the cape around your Friendly Hero’s shoulders!
Crochet Doll Hair
Boy’s Hair
I like to use soft, fuzzy types of yarn for the hair. Lion Brand Silky Twist and Homespun or Yarn Bee’s Soft Touch are some good examples. As you crochet let some of the little “loops” in the yarn come through… do not crochet too tightly. Looser stitches will let that cute hair come through! I would pull up little fluffs as I went. Also check the “wrong” side. It may look better!
Round 1: In a magic circle, 6 HDC.
Round 2: HDC INC in each around. (12)
Round 3: HDC in first, HDC INC in next. Repeat around. (18)
Round 4: HDC in first 2, HDC INC in next. Repeat around. (24)
Round 5: HDC in first 3, HDC INC in next. Repeat around. (30)
Round 6: HDC in first 4, HDC INC in next. Repeat around. (36)
Round 7: HDC in first 5, HDC INC in next. Repeat around. (42)
Round 8: HDC in first 6, HDC INC in next. Repeat around. (48)
Round 9: HDC in first 7, HDC INC in next. Repeat around. (54)
Rounds 10-11: HDC in each stitch around. (54)
Fasten off and leave a long tail to sew on.
Girl’s Ponytail
Round 1: In a magic circle, 6 SC.
Round 2: SC INC in each around. (12)
Round 3: SC in first, SC INC in next. Repeat around. (18)
Round 4: SC in first 2, SC INC in next. Repeat around. (24)
Round 5: SC in first 3, SC INC in next. Repeat around. (30)
Round 6: SC in first 4, SC INC in next. Repeat around. (36)
Round 7: SC in first 5, SC INC in next. Repeat around. (42)
Round 8: SC in first 6, SC INC in next. Repeat around. (48)
Round 9: SC in first 7, SC INC in next. Repeat around. (54)
Round 10-16: SC in each stitch around. (54)
Round 17: Chain 1. Skip one stitch. DC INC in the first stitch. DC in the next. DC INC in the next. Skip one stitch and slip stitch in the next. Repeat around. Slip stitch to the first stitch and fasten off. Leave a long tail to sew onto the head.
To make the pony tail hair, chain 40. Slip stitch in each stitch back up the chain. Fasten off and leave a tail to sew on to the hair hat. I made 12. I just sew both ends (the tail made from the chain and the tail left from fastening off) on the hat, with one or two passes through the top of the piece. I tie them underneath the hat. The knots will be hidden when placed on the head. Sew right around and slightly above the center circle.
Then sew the hair hat on the head. I like to use pins to keep it where I want it as I sew.
I wrapped extra yarn around the hair and tied tightly in the back for the ponytail holder.
To make the pigtails, separate the hair into bunches and sew on either side of her head.
Attach Mask
I attach the mask after the hair and everything else is sewn on. The mask may overlap the hair just a little bit and it helps to have it on so you can position the mask correctly. Pins will be your friend here.
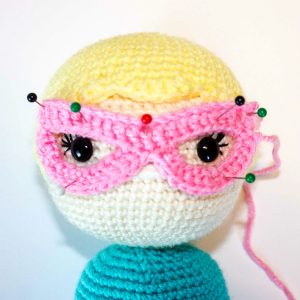
I do not sew it in every stitch. A few well placed stitches will be enough. Weave the ends through a few times and then push the needle through the back of the head. Pull tightly and then cut it as close as you can. The end should stay inside the head.
If you loved this pattern, make sure you check out my other free patterns here on the blog!