Crochet Hexagon Blanket Pattern and Tutorial
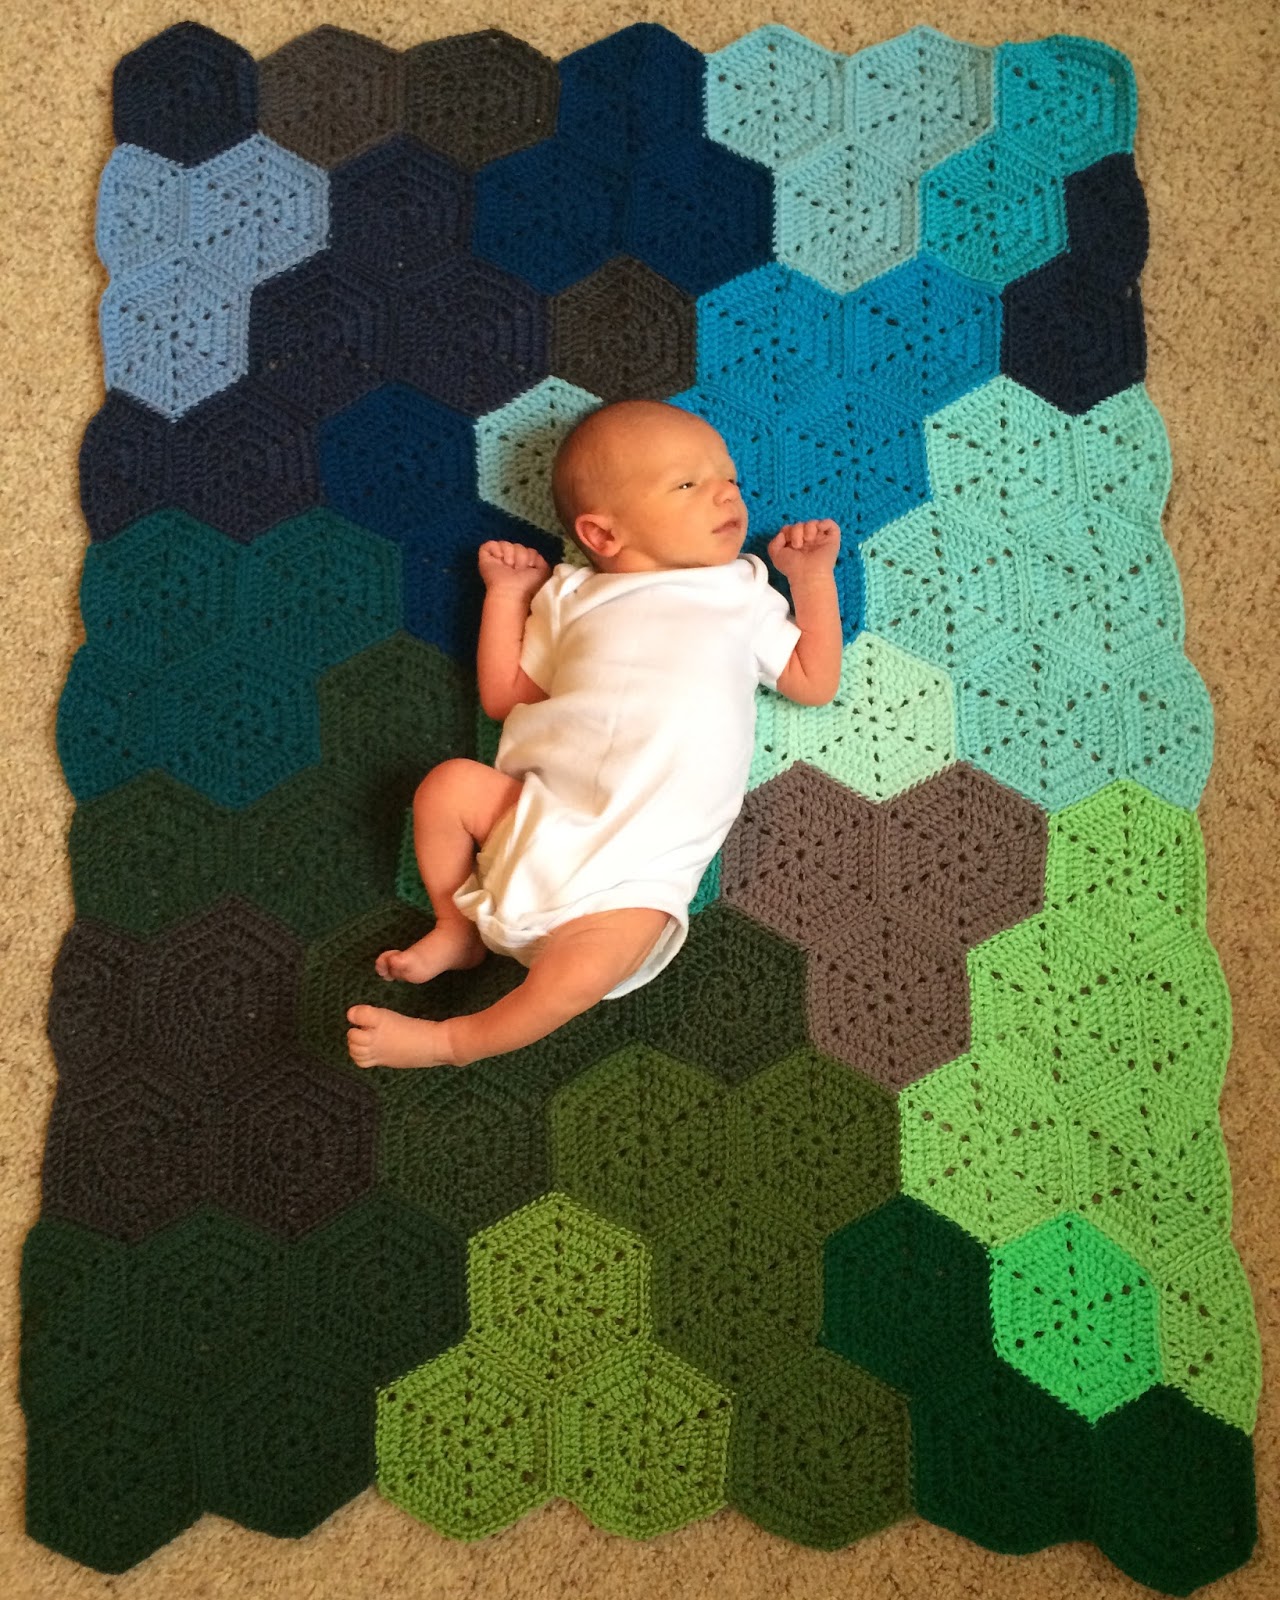
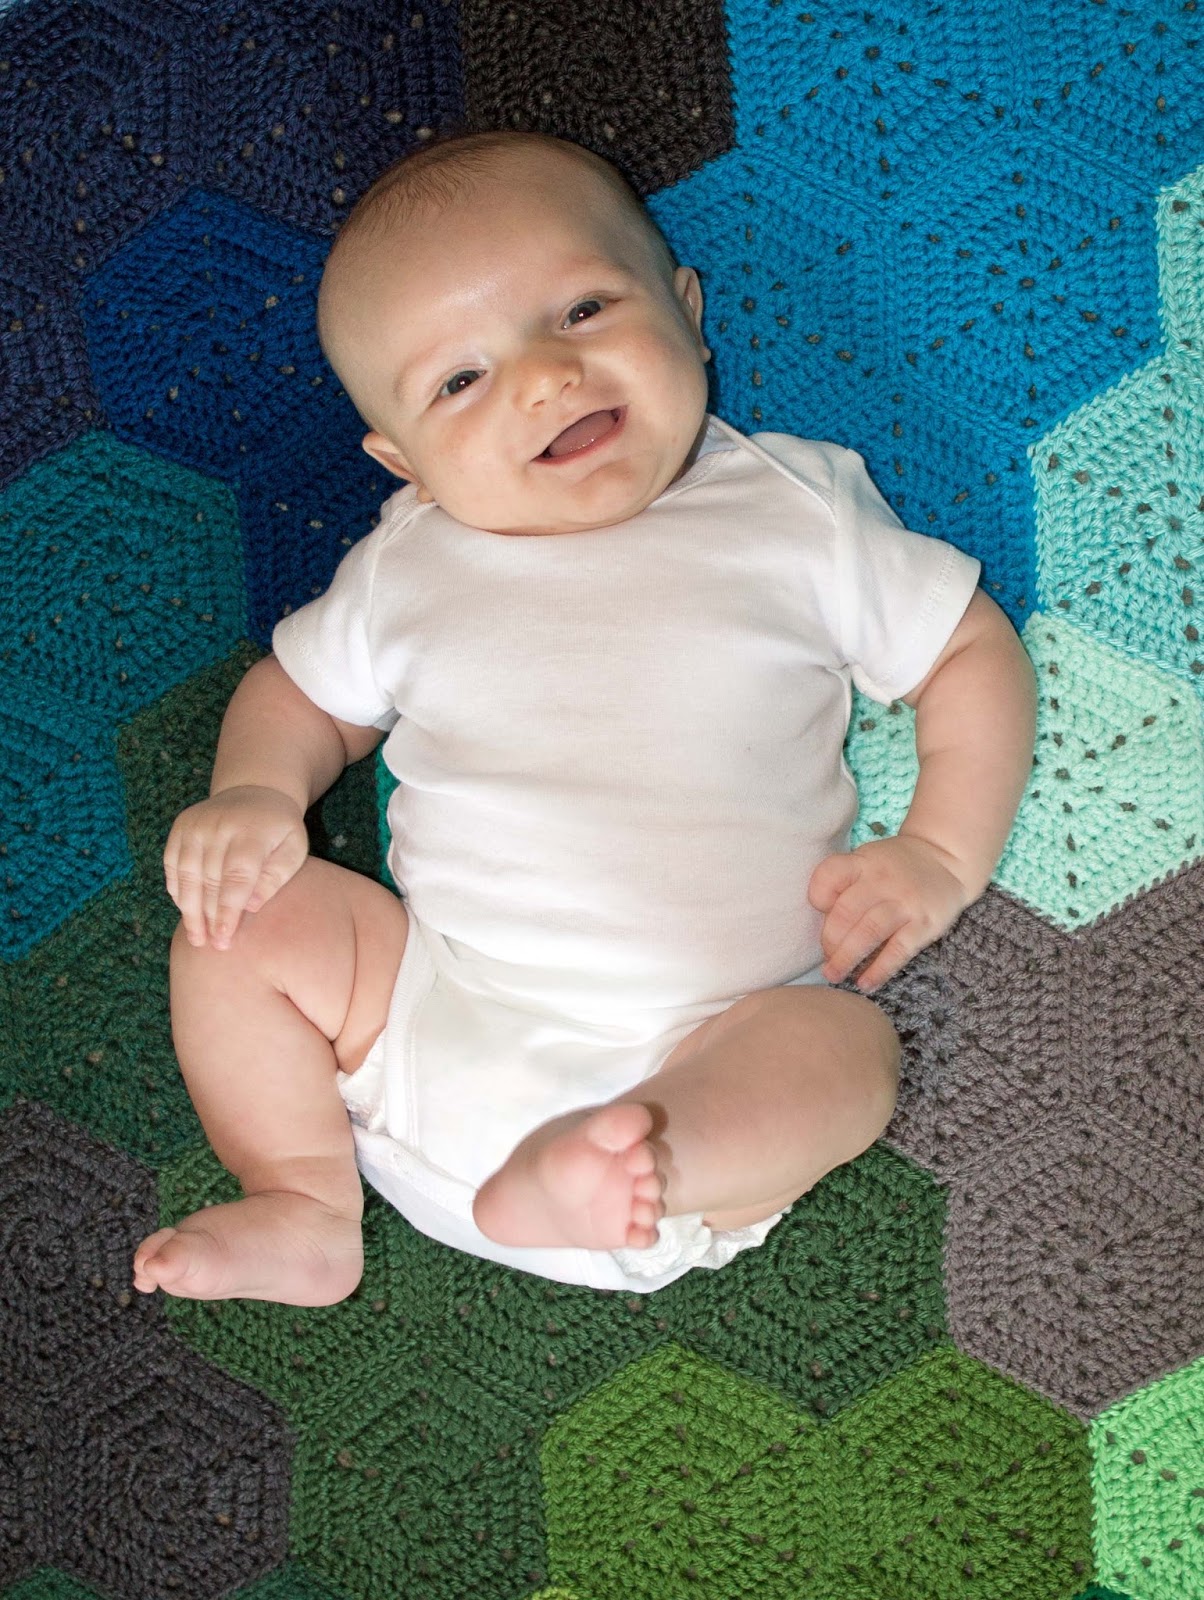
I am FINALLY getting to writing up the details on this crochet hexagon blanket that I made for my son. That last month of pregnancy and the early baby months are time suckers for sure! And I wanted to take my time and write down all the tips and tricks I picked up along the way.
The pattern I began using was THIS one from Sandra Cherry Hart. It is a join as you go pattern so it looks a little different than what I used. You should definitely check it out though, it is gorgeous! I changed it quite a bit when it came down to what I wanted. I changed the pattern to use a magic ring as well as a few other stitch differences. I also added an extra round for a bigger hexagon. I preferred to sew the hexagons together because I like that look a little better. And the join as you go method requires some planning haha! I wasn’t totally committed to where I wanted all my colors and knew I didn’t want it to be totally random. That being said, I STRONGLY suggest having some sort of plan before you get going! I know I was over thinking it (pregnancy brain is real, people) but it would have helped if I thought it through a little more.
I can’t tell you exactly how much yarn I used because I just pulled from my stash and none of the skeins were full. They were all size 4 yarn… A lot of the brands I gravitate towards are Red Heart With Love, Caron’s Simply Soft, and Hobby Lobby’s I Love this Yarn. With a few others mixed in, too. It all worked out pretty evenly, and I actually like the different textures and shine of the yarn. And the pattern the colors make is awesome! Organizing by color is my dream. I organize everything I can this way. And it adds a really cool aspect to this blanket. If I fold it a different way it looks like a totally different blanket!

Each hexagon is 4 inches across (side to side). The baby sized blanket I made is 28″x40″. It really is the perfect baby size! It took 72 whole hexagons and 10 half hexies. Of course you can make it bigger or smaller very easily! Just keep adding hexagons!
I used an H (5.0) hook and a yarn needle for this project.
I made a video tutorial on how to make a hexagon. You can watch it here!
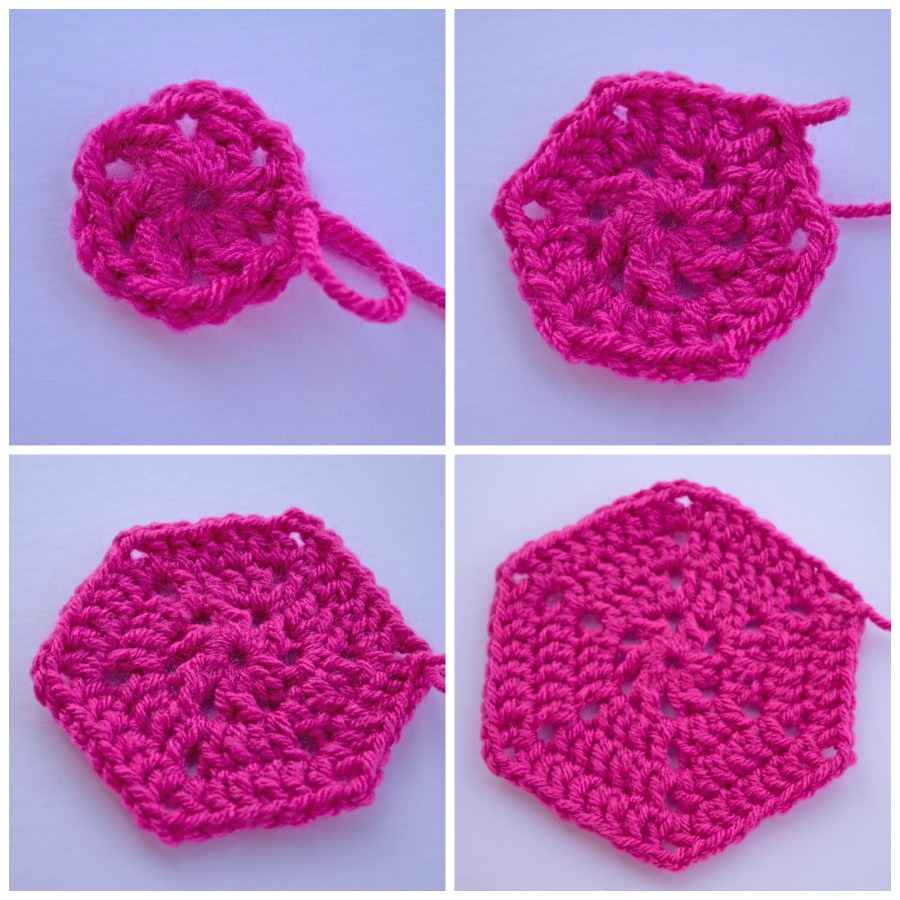
Hexagon
Round 1: In a magic ring chain 2 and DC (this will count as a DCC). *Chain 2 then DCC.* Repeat *Chain 2 and then DCC* 4 more times for a total of 6 clusters. slip stitch to the first cluster. Slip stitch to the first chain 2 opening.
Round 2: Chain 2 *DC, Chain 2, DC in opening. 2 DC in the top stitch in the first DCC*. Repeat *DC, Chain 2, DC in opening. 2 DC in the top stitch in the first DCC* 4 times. Then DC, Chain 2, DC in the gap opening, then DC. (No different than the other sides, except only one DC in the final DC). Slip Stitch over to the gap.
Hint: you will have a total of 4 DC between each gap and there will be 6 sides.
Round 3: Chain 2 *DC, chain 2, DC in gap. DC in the next 4.* Repeat *DC, chain 2, DC in gap. DC in the next 4* 4 more times. Then DC, chain 2, DC in gap. Then DC in next 3. Slip stitch to the first DC. Slip stitch over to gap.
Hint: You will have a total of 6 DC between each gap and still have 6 sides.
Round 4: Chain 2 *DC, chain 2, DC in gap. DC in the next 6.* Repeat *DC,
chain 2, DC in gap. DC in the next 6* 4 more times. Then DC, chain 2, DC
in gap. Then DC in next 5. Slip stitch to the first DC. Slip stitch
over to gap.
Hint: You will have a total of 8 DC between each gap and still have 6 sides.
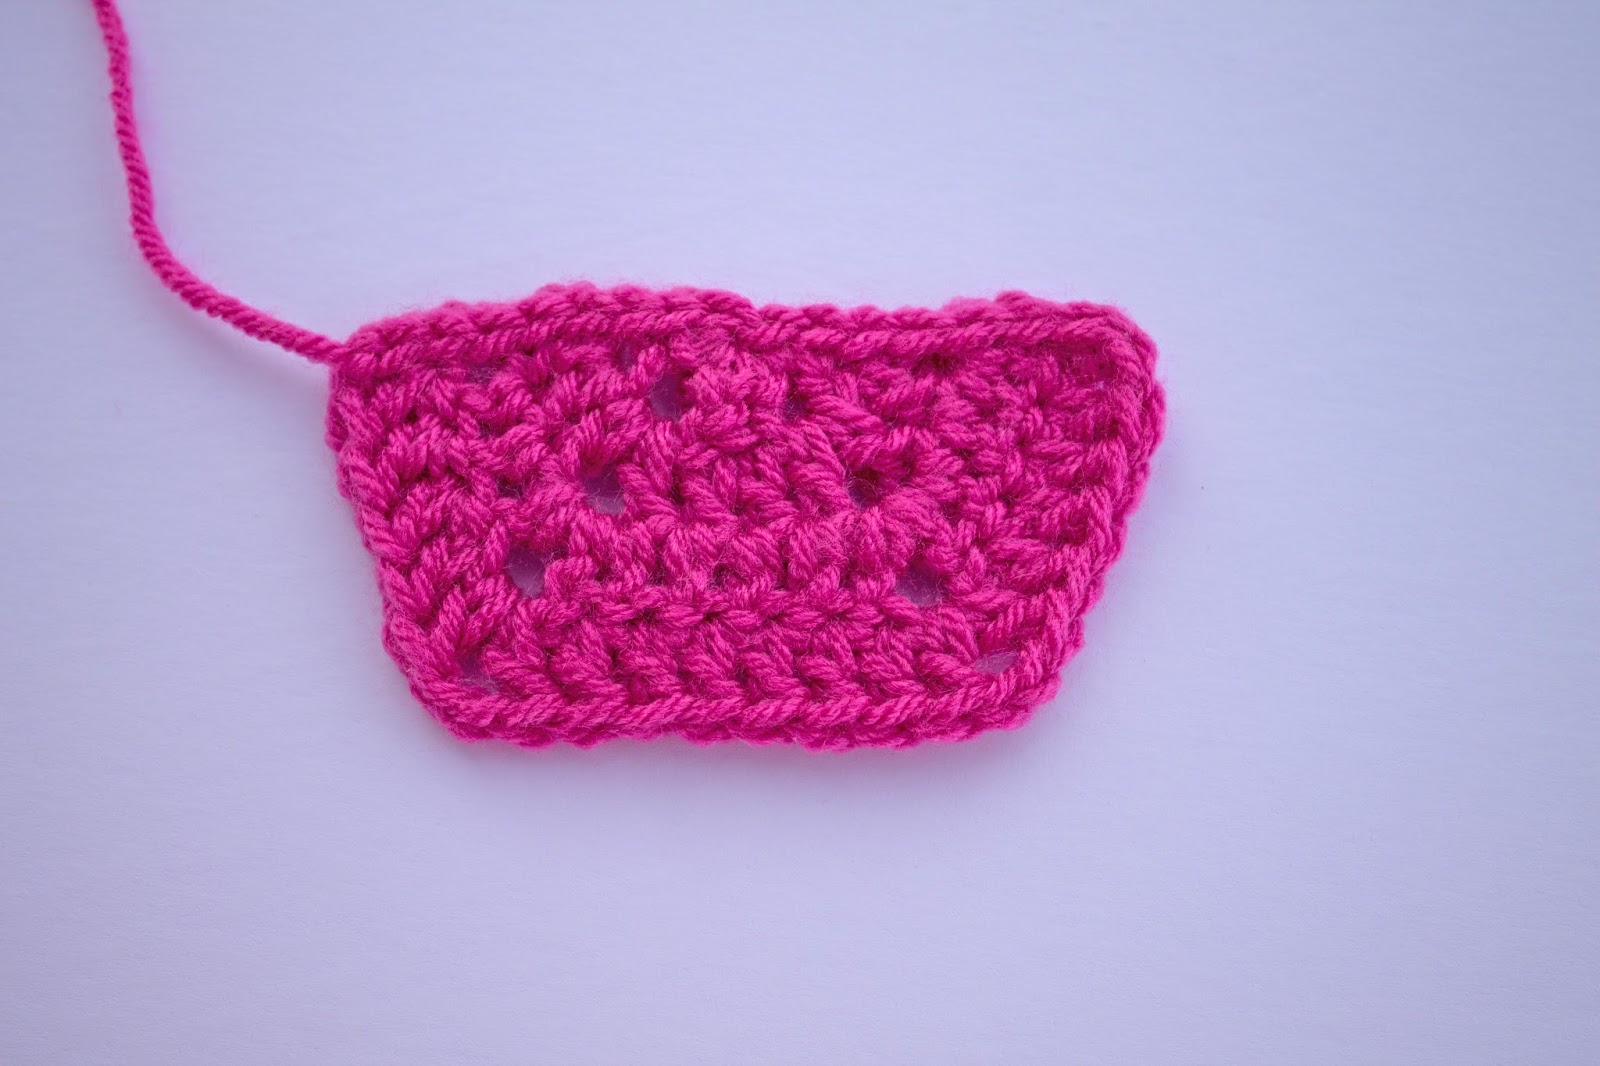
Half Hexagon
Round 1: In a magic circle chain 2, DC (This will count as one DCC) Chain 2 and then DCC, chain 2 and then DCC. (total of three DCC). Pull together. Chain 2 and turn. Do not connect!
Round 2: In first DCC, place 2 DC (3 DC counting the chain 2). In gap, DC, chain 2, DC. 2 DC in next. In gap, DC, chain 2, DC. 2 DC in next. Chain 2 and turn.
Round 3: DC in next 3. In gap, DC, chain 2, DC. DC in next 4. In gap, DC, chain 2, DC. DC in next 3. chain 2 and turn.
Round 4: DC in next 4. In gap, DC, chain 2, DC. DC in next 6. In gap, DC, chain 2, DC. DC in next 4. DC in last stitch.
Now slip stitch over the flat edge to make a nice line.
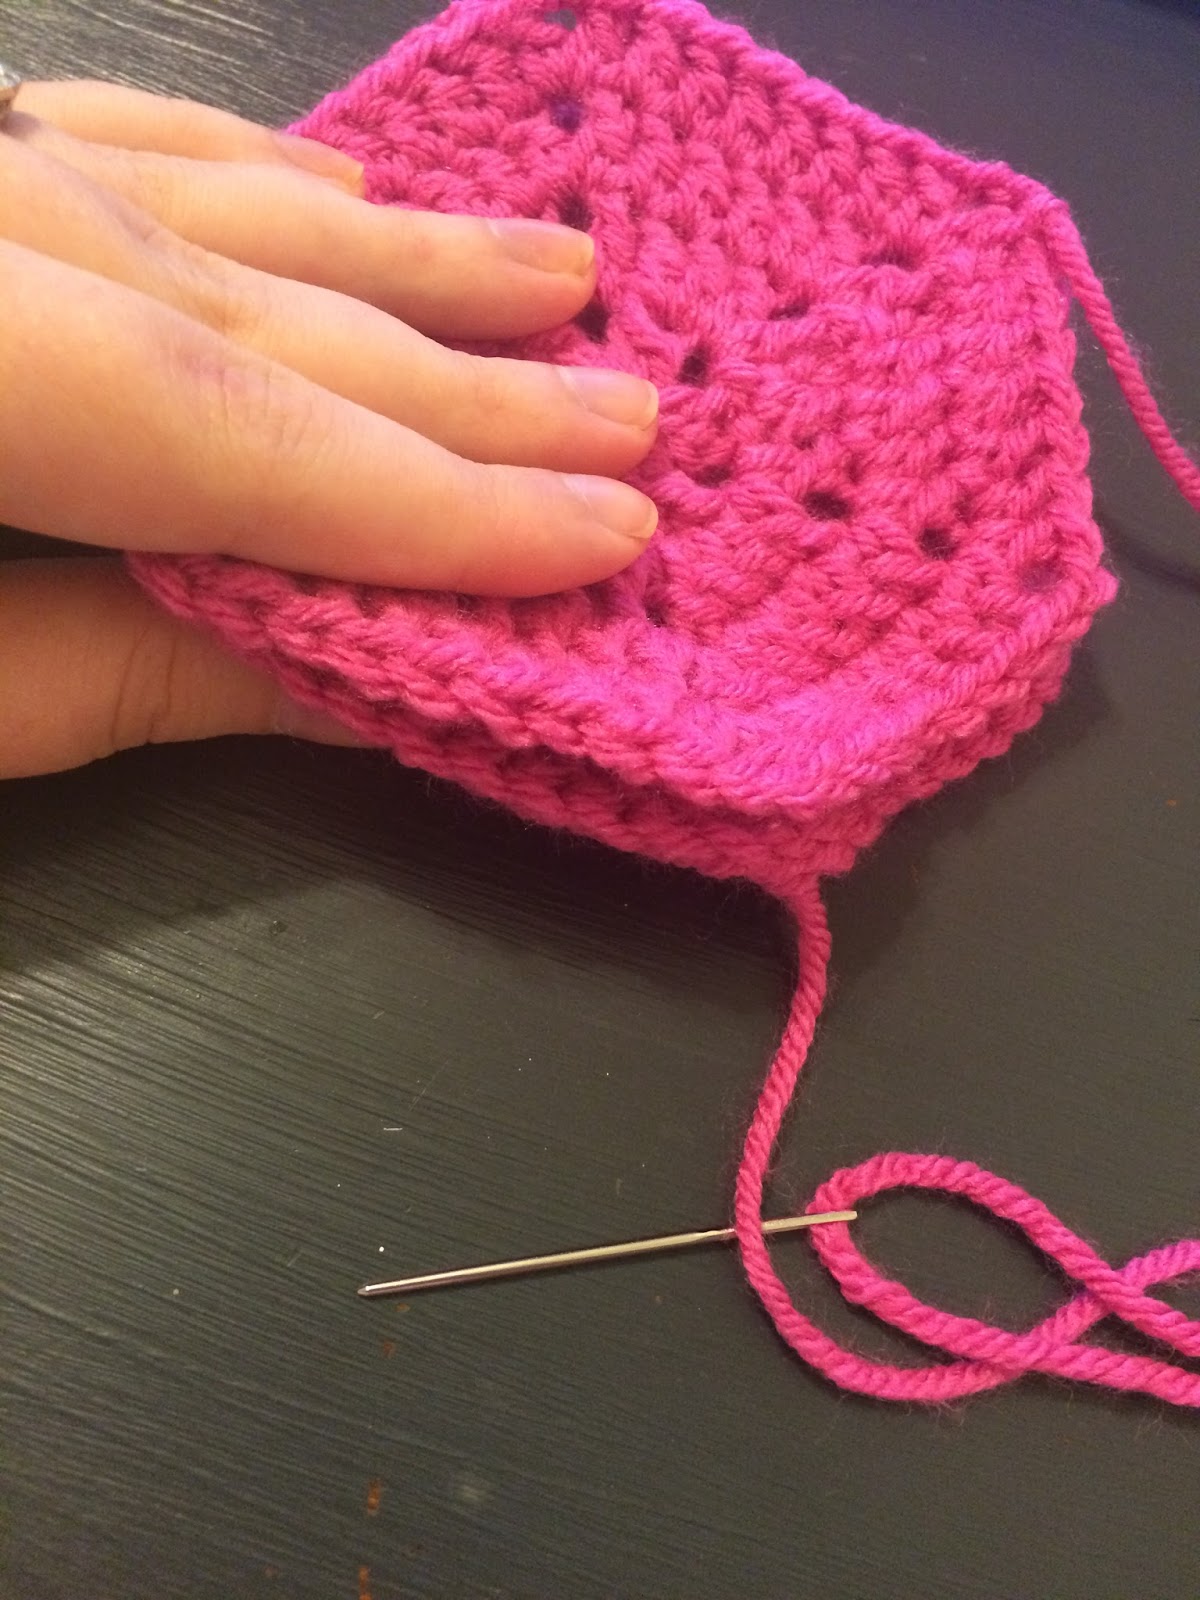
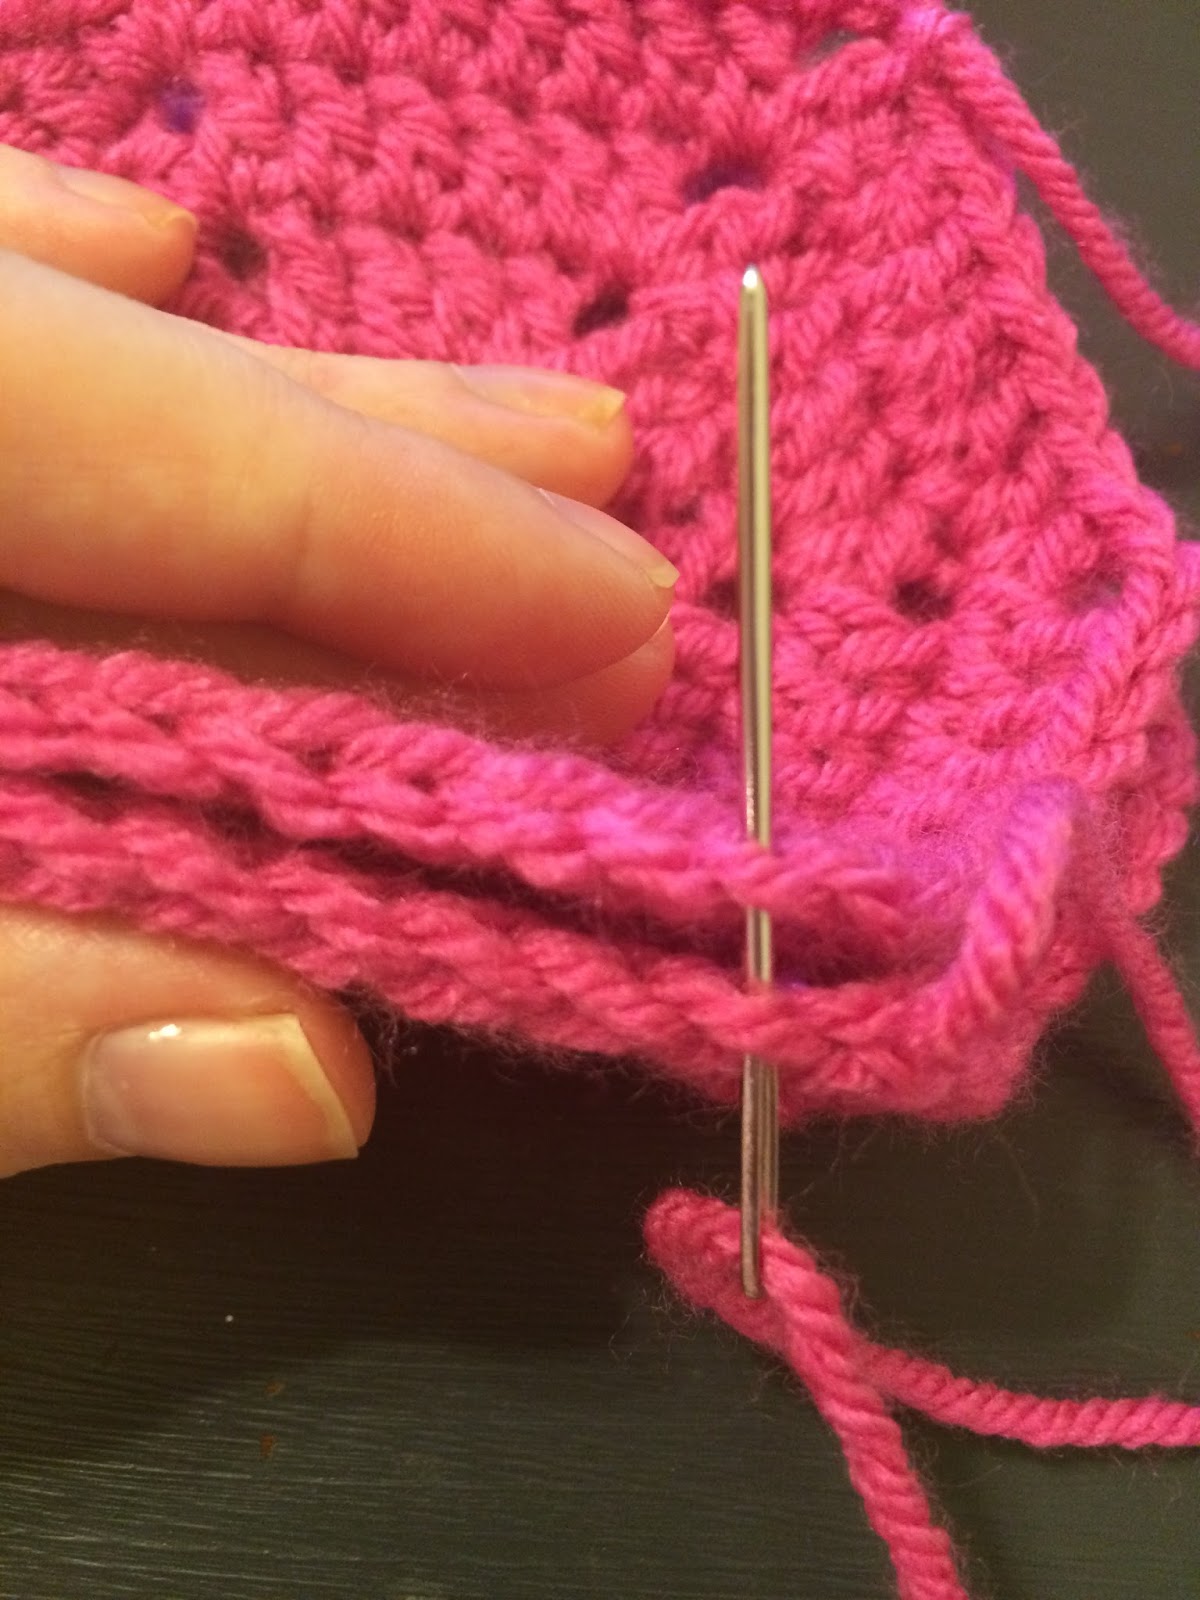
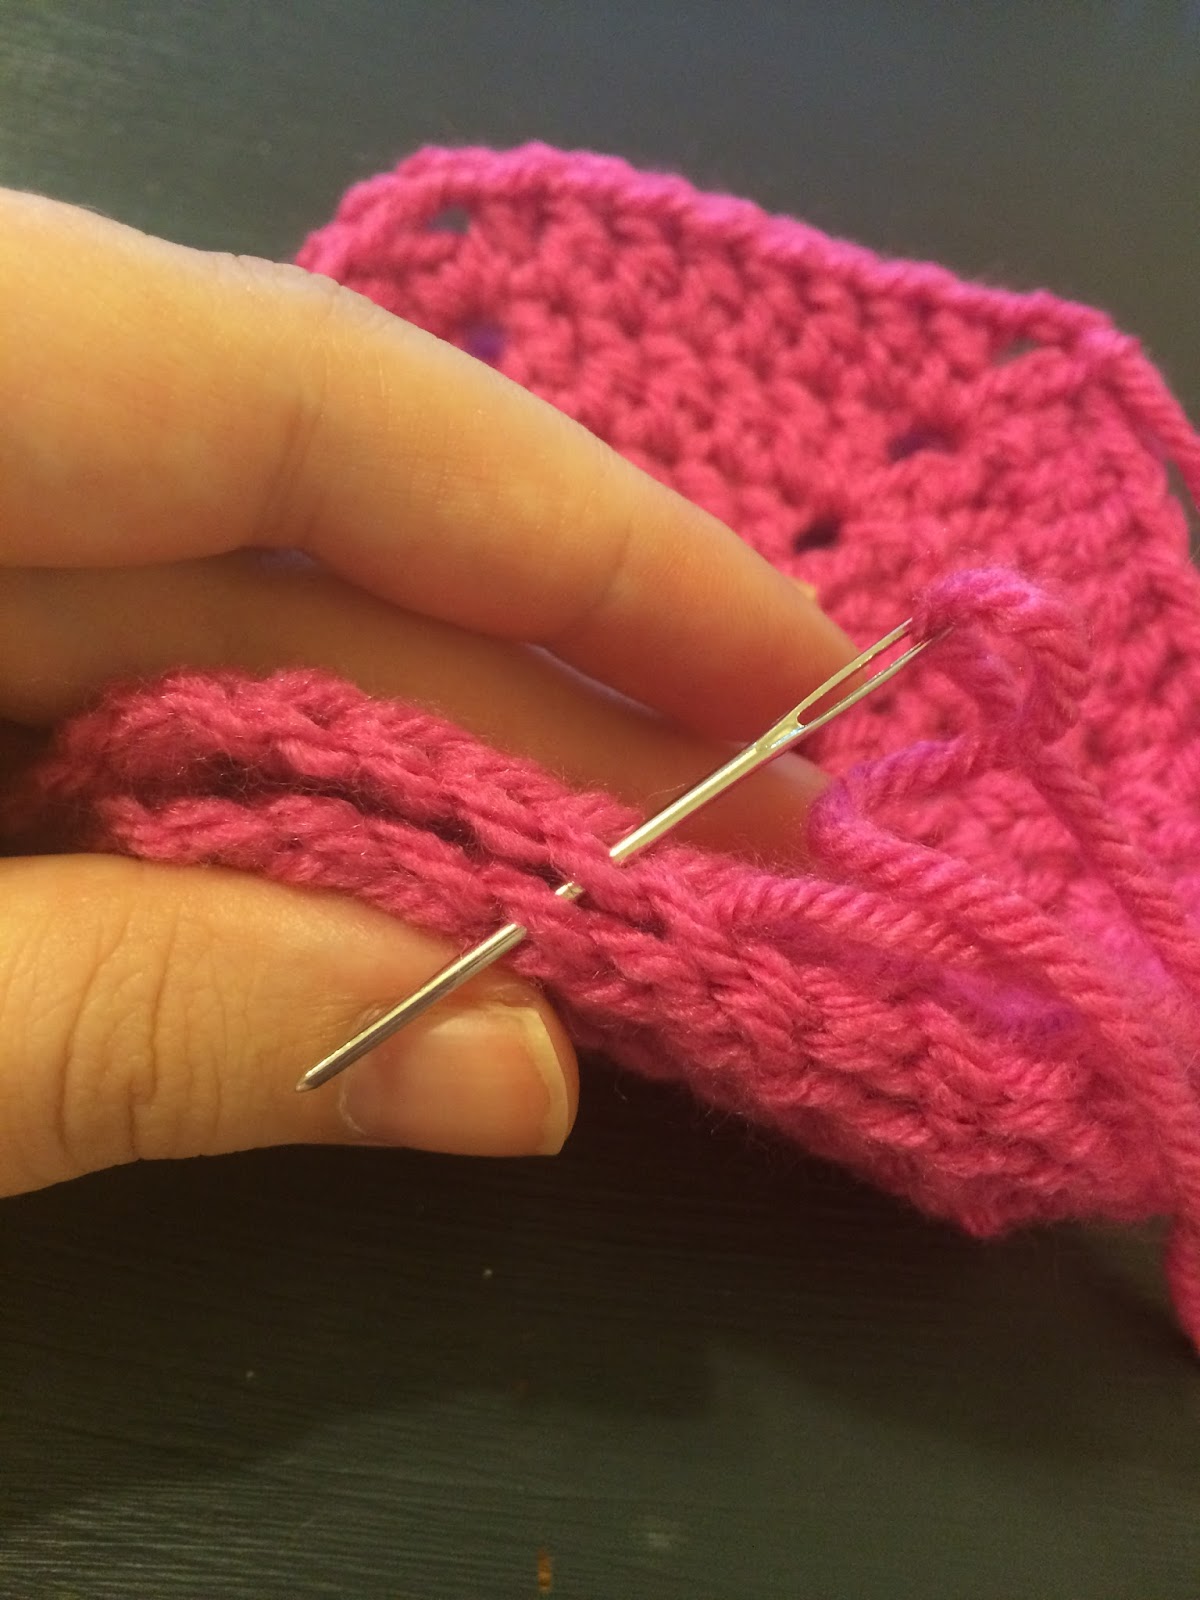
Then it is time for the hard part! Or it was for me! Lay them out how you like then start sewing! I actually like the sewing part… It is kind of cathartic for me. And make sure to weave all those ends in as you go or you will have a scraggly mess at the end of it!
This is how I sewed them. Make a sandwich with the two hexagons with the wrong sides touching. Sew only the touching part of the stitches… you won’t sew through the whole stitch. Don’t worry about the strength of it. It will end up very strong and durable.
And there you have it! To follow along for more crochet and crafty inspiration (with a heavy dose of adorable boys!) follow me on Facebook, Instagram, and Pinterest!

I have had always the passion of learning about crocheting but never get that much time to do so. By the way, this hexagon crochet is looking really awesome. I also want make this by my own for my toddler. The baby along with the crochet is looking so adorable in these photographs. Definitely this will help the mothers around the world who want to learn crocheting. I have tried to make it several times, but failed!
Baby Daily Deals
What does DCC stand for?
It’s a Double Crochet Cluster