Free Capybara Crochet Pattern
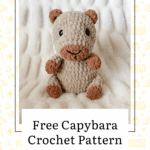
This beginner-friendly free capybara crochet pattern features a rounded, oversized body, short limbs, and an easy-to-follow construction. It’s designed with plush yarn for a super soft, squishy finish that’s perfect for hugging or gifting.

Free Capybara Crochet Pattern Notes
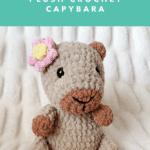
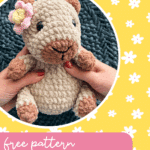
Meet the newest addition to my crochet gang— Clara the Free Capybara Crochet Pattern! This capybara crochet pattern was born out of my kids’ fascination with these quirky, gentle creatures (and let’s be honest—mine too!). With its chubby body, rounded snout, and sweet little feet, this amigurumi brings big cozy vibes and a whole lot of personality. I kept the construction simple and beginner-friendly, but with just enough detail to make it fun. Whether you’re new to amigurumi or have a whole plushy zoo in progress, this capybara is a perfect weekend project. It’s worked mostly in the round with bulky plush yarn, which means it’s super fast and extra huggable. Plus, you can customize the colors or accessories to give it its own charm—think hats, scarves, or even tiny sunglasses. Keep reading below for the free pattern, materials list, and a few extra tips to bring your squishy capy to life!
JOIN MY NEWSLETTER TO RECEIVE…
A free email course-Amigurumi 101
This free amigurumi email course gives you what you need to master the basics of amigurumi, along with some extra tips and tricks!

Ad-free, Printable PDF
My patterns are free on my website, but you can find them in my shop if you prefer a printable copy!

Plush Capybara
$6

Puppy Snuggler
$6

Squishy Axolotl
$6
Materials you’ll need
To get started making this free Capybara crochet pattern, you’ll want to gather all your materials first.
You will need:
- 100g Premier Basix Chenille in Sand
- 40g Premier Basix Chenille in Caramel
- small amount black worsted yarn
- Stuffing
- 16mm safety eyes
- 4.5mm crochet hook (or hook size that keeps stitches tight and feels comfortable)
- Needle
- Stitch marker
video tutorials
These methods are used in this pattern!


Important Notes:
This beginner-friendly capybara crochet pattern features a rounded, oversized body, short limbs, and an easy-to-follow construction. It’s designed with plush yarn for a super soft, squishy finish that’s perfect for hugging or gifting.
You can use safety eyes or try out embroidered eyes so it would be safe for a baby/toddler. I have a collection of embroidery videos here.
Abbreviations
SC– Single Crochet
SC INC– Single Crochet Increase- (2 SC in each stitch)
INV DEC– Invisible decrease: – Invisible decrease (put hook through the FRONT LOOP ONLY of two consecutive stitches [two loops on hook] Yarn over pull through both loops. [two loops on hook] Yarn over pull through two loops)
Magic Circle- Make a loop, leaving a long tail to work with. Insert hook in center of loop, yarn over and draw up a loop. Yarn over, pull through to make the first chain (this does not count as a stitch!). Continue to crochet over the loop and tail with the number of stitches called for. (If you need 6 SC, then crochet 6 SC inside the ring.) Pull the tail to close the circle.
Free Capybara Crochet Pattern
Always move your stitch marker to the last stitch in the round. This free crochet capybara pattern is worked in continuous rounds.
Body
With tan
Round 1: In a magic circle, SC 8.
Round 2: SC INC in each around. (16)
Round 3: SC in the first, SC INC in the next. Repeat around. (24)
Round 4: SC in the first 2, SC INC in the next. Repeat around. (32)
Round 5: SC in the first 3, SC INC in the next. Repeat around. (40)
Round 6: SC in the first 4, SC INC in the next. Repeat around. (48)
Round 7-8: SC in each around. (48)
Round 9: SC in the first 4, INV DEC . Repeat around. (40)
Round 10: SC in each around. (40)
Round 11: SC in the first 3, INV DEC. Repeat around. (32)
Round 12: SC in each around. (32)
Start stuffing here and continue stuffing as you go.
Round 13: SC in the first 2, INV DEC. Repeat around. (24)
Round 14: SC in each around. (24)
Round 15: SC in the first, INV DEC. Repeat around. (16)
Fasten off and leave a long tail to sew onto head.
Head
Starting with caramel
Round 1: In a magic circle, SC 8.
Round 2: SC INC in each around. (16)
Round 3: SC in the first, SC INC in the next. Repeat around. (24)
Change color to tan.
Round 4: SC in each around. (24)
Round 5: SC in the first 2, SC INC in the next. Repeat around. (32)
Rounds 6-7: SC in each around. (32)
Round 8: SC in the first 3, SC INC. Repeat around. (40)
Round 9-10: SC in each around. (40)
Attach eyes on round 7 (do NOT put the backs on yet), about 9 stitches apart. (See below for eye-shaping tutorial or see here for the video process.)
Round 11: SC in the first 3, INV DEC. Repeat around. (32)
Round 12: SC in the first 2, INV DEC. Repeat around. (24)
Start stuffing here and shape the face (see photos below). Continue to close.
Round 13: SC in the first, INV DEC. Repeat around. (16)
Round 14: INV DEC in each around. (8)
Leave a long tail for sewing and close hole. Attach on top of the open body between rounds 6-10 of the head.
Face Shaping
Watch the video below for details on how to shape the free crochet capybara pattern’s face, or scroll down to find the written instructions. If you would like the video open in a different tab you can click here.
- Once you reach Round 12, place the safety eyes on Round 7, about 9 stitches apart—but don’t attach the backs yet. Lightly stuff the head.
- Thread a long strand of matching yarn onto a needle. Insert it from the open back of the head and exit near one eye. Remove the eye, move over one stitch, and go across to the other eye, repeating the same step. Gently pull to create a nose bridge, then exit near your starting point and back out the head opening.
- Replace the eyes to check placement. If they look good, tie a knot to hold the tension and create slight dimples. Remove the stuffing (some yarn may catch—no problem), attach the safety eye backs, and restuff carefully, especially around the shaping yarn.
- Continue following the pattern to close the head, adding stuffing as needed. Tuck the yarn ends inside before finishing.

Ears (make 2)
With caramel
6 SC in a magic circle. DO NOT CLOSE. Chain 1 and turn.
6 SC in each stitch around.
Fasten off and leave a long tail to sew on to round 12. Line them up behind the eyes

Nose Embroidery
With black worsted weight yarn
Embroider a ‘Y’ shape on the caramel section of the nose (Rounds 1–3). The top of the Y should span about 4 stitches across, with the split point around the middle of Round 2. The stem of the Y should be 2 stitches long, ending near the bottom of Round 1.

Arms (make 2)
With caramel
Round 1: 10 SC in a magic circle (10)
Round 2: SC in each around. (10)
Change to tan.
Rounds 3-6: SC in each around. (10) *4 rounds*
Leave unstuffed. Fasten off and sew on the sides, beneath the head.
Legs (make 2)
With caramel:
Round 1: 7 SC in a magic circle. (7)
Round 2: INC in each around. (14)
Change to tan.
Rounds 3-6: SC in each around. (14) *4 rounds*
Leave unstuffed. Fasten off and sew on with the bottom on round 5 and the top on round 8.

Flower
In a magic circle, chain 5.
*Slip stitch into the center of the circle. (This is one petal.) Chain 5 and slip stitch to the middle. * Repeat for a total of 5 petals.
Pull the circle closed, fasten off
For the center, SC 5x in a magic circle and close with a slip stitch. Sew to the center of the flower.

Bow Tie
Blanket yarn-5mm hook
Leave a 6 inch tail, then slip stitch and chain 11. In the second chain from the hook, Sc. SC in the remaining 9. Chain 1 and turn. (10)
Rows 2-5: SC in each across. Chain 1 and turn. (Except for the last row, where you will fasten off, leaving a very long tail)
Weave both ends to the middle. Lightly weave the longest tail through the middle and lightly cinch. Wrap the end around about 8 times and then tie it off with the other tail. I wrapped the ends around the neck and tied it in the back.


Want the Ad-free, Printable PDF?
You can find it in one of my stores!

Did you make this pattern?
Mention me @thefriendlyredfox so I can see your Clara the Capybara Crochet Pattern creations! You can also leave a comment below!

I am in love with this cappy!! The pattern is incredibly easy to follow and quite quick to wip up.
She’s so adorable!
Very cute, quick and easy!! My head does not look as elongated as yours and the body is more squatty, I definitely have enough rows. Maybe I don’t know how to stuff properly? Either way, he’s super duper cute, thank you for the great pattern!
I’m glad you enjoyed him! Sometimes different yarns will turn out different heights with the stitches. I always like to stretch my pieces a little bit to help with the shaping!
I’m making this for the first time using the right size yarn and hook, but I find the yarn very sturdy. Is there something I can do?
You can always size up your hook! It will make the stitches just a little more workable. You do want them tight so the stuffing doesn’t poke out, but not so tight that you can’t actually get your hook through the stitches.
I made Clara! Great instructions! She turned out cute! Sorry I couldn’t add a pic here!
Hi, i like capybara’s a lot and it looks so cute this one, can i ask how big it turned out? In cm? Thank you for your reply.
Hi! It’s about 24-25cm!
Fabulous pattern! She turned out so cute! She took me about 2 hours to make. I’m generally not a fan of sewing but these parts were pretty easy to sew on. Thank you for so many wonderful patterns 💞
Oh my gosh, this free beginner capybara pattern is exactly what I’ve been looking for! My kid has been obsessed with capybaras lately, so this will be the perfect handmade gift for them. I love that it uses bulky plush yarn—fast to work up and turns out so squishy for hugging. The simple construction is perfect for my first amigurumi project too, and adding tiny custom accessories sounds like so much fun. Thank you so much for sharing this for free!